Utilice acciones personalizadas para escribir los eventos de recorrido en Experience Platform custom-action-aep
En esta página: Aprenda a escribir eventos de recorrido personalizados en Adobe Experience Platform desde sus recorridos mediante acciones personalizadas y llamadas de API autenticadas.
Este caso de uso explica cómo escribir eventos personalizados en Adobe Experience Platform desde Recorridos mediante acciones personalizadas y llamadas autenticadas.
Configuración de un proyecto de desarrollador custom-action-aep-IO
-
En Adobe Developer Console, haga clic en Proyecto y abra su proyecto de E/S.
-
En la sección Credenciales, haga clic en Servidor a servidor de OAuth.

-
Haga clic en Ver comando cURL.

-
Copie el comando cURL y almacene client_id, client_secret, grant_type y el ámbito.
curl -X POST 'https://ims-na1.adobelogin.com/ims/token/v3' -H 'Content-Type: application/x-www-form-urlencoded' -d 'grant_type=client_credentials&client_id=1234&client_secret=5678&scope=openid,AdobeID,read_organizations,additional_info.projectedProductContext,session'
Configurar el origen mediante la entrada de la API HTTP
-
Cree un extremo en Adobe Experience Platform para escribir los datos de los recorridos.
-
En Adobe Experience Platform, haga clic en Fuentes, en Conexiones en el menú de la izquierda. En la API HTTP, haga clic en Agregar datos.

-
Seleccione Nueva cuenta y habilite la autenticación. Seleccione Conectarse a Source.

-
Seleccione Siguiente y el conjunto de datos donde desee escribir los datos. Haga clic en Siguiente y Finalizar.

-
Abra el flujo de datos recién creado. Copie la carga útil del esquema y guárdela en el bloc de notas.
{
"header": {
"schemaRef": {
"id": "https://ns.adobe.com/<your_org>/schemas/<schema_id>",
"contentType": "application/vnd.adobe.xed-full+json;version=1.0"
},
"imsOrgId": "<org_id>",
"datasetId": "<dataset_id>",
"source": {
"name": "Custom Journey Events"
}
},
"body": {
"xdmMeta": {
"schemaRef": {
"id": "https://ns.adobe.com/<your_org>/schemas/<schema_id>",
"contentType": "application/vnd.adobe.xed-full+json;version=1.0"
}
},
"xdmEntity": {
"_id": "test1",
"<your_org>": {
"journeyVersionId": "",
"nodeId": "", "customer_Id":""
},
"eventMergeId": "",
"eventType": "",
"producedBy": "self",
"timestamp": "2018-11-12T20:20:39+00:00"
}
}
}
Configurar la acción personalizada custom-action-config
La configuración de acciones personalizadas se detalla en esta página.
Para este ejemplo, siga estos pasos:
-
Abra Adobe Journey Optimizer y haga clic en Configuraciones, en Administración en el menú de la izquierda. En Acciones, haga clic en Administrar y luego en Crear acción.
-
Establezca la dirección URL y seleccione el método Post.
https://dcs.adobedc.net/collection/<collection_id>?syncValidation=false -
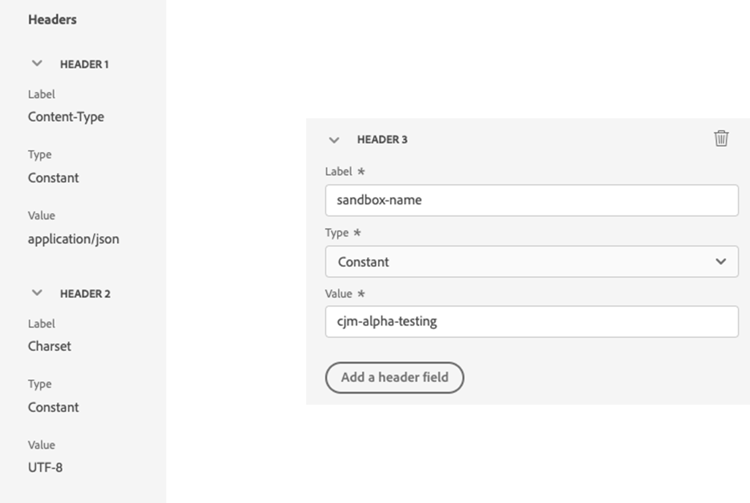
Asegúrese de que los encabezados (Content-Type, Charset, sandbox-name) estén configurados.
Configuración de la autenticación custom-action-aep-authentication
-
Seleccione Type como Custom con la siguiente carga útil.
-
Pegue client_secret, client_id, scope y grant_type (desde la carga útil del proyecto de IO utilizada anteriormente).
code language-none { "type": "customAuthorization", "authorizationType": "Bearer", "endpoint": "https://ims-na1.adobelogin.com/ims/token/v3", "method": "POST", "headers": {}, "body": { "bodyType": "form", "bodyParams": { "grant_type": "client_credentials", "client_secret": "********", "client_id": "<client_id>", "scope": "openid,AdobeID,read_organizations,additional_info.projectedProductContext,session" } }, "tokenInResponse": "json://access_token", "cacheDuration": { "duration": 28000, "timeUnit": "seconds" } } -
Use Haga clic para probar el botón de autenticación y probar la conexión.

Configuración de la carga útil custom-action-aep-payload
-
En los campos Solicitud y Respuesta, pegue la carga útil de la conexión de origen utilizada anteriormente.
code language-none { "xdmMeta": { "schemaRef": { "id": "https://ns.adobe.com/<your_org>/schemas/<schema_id>", "contentType": "application/vnd.adobe.xed-full+json;version=1.0" } }, "xdmEntity": { "_id": "/uri-reference", "<your_org>": { "journeyVersionId": "Sample value", "nodeId": "Sample value", "customer_Id":"" }, "eventMergeId": "Sample value", "eventType": "advertising.completes, "producedBy": "self", "timestamp": "2018-11-12T20:20:39+00:00" } } -
Cambie la configuración del campo de Constant a Variable para los campos que se rellenarán dinámicamente.
-
Guarde la acción personalizada.
Recorrido
-
Finalmente, utilice esta acción personalizada en un recorrido para escribir los eventos de recorrido personalizados.
-
Rellene los atributos ID de versión de Recorrido, ID de nodo, Nombre de nodo y otros según su caso de uso.

This section contains structured knowledge intended to support interpretation, retrieval, and question answering related to this topic.
For complete understanding, this information should be combined with the documentation on this page. Neither source is intended to stand alone; the page describes the feature, while this section provides additional context that helps disambiguate terminology, intent, applicability, and constraints.
- TL;DR: This use case explains how to configure a custom action in Journey Optimizer that writes journey event data into Adobe Experience Platform using an HTTP API inlet and OAuth Server-to-Server authenticated calls.
Intents:
- Set up an Adobe Developer Console IO project with OAuth Server-to-Server credentials for AEP API authentication
- Create an HTTP API inlet source in Adobe Experience Platform to receive streaming journey event data
- Configure a custom action in Journey Optimizer with the correct URL, headers, and custom Bearer token authentication
- Map journey fields (journey version ID, node ID, customer ID) dynamically as variables in the custom action payload
- Use the custom action in a journey to write custom events to an AEP dataset
Glossary:
- HTTP API Inlet: An Adobe Experience Platform source connector that creates a streaming endpoint for ingesting data via HTTP POST requests (product-specific)
- OAuth Server-to-Server: An authentication credential type in Adobe Developer Console that generates Bearer tokens for server-to-server API calls without user interaction (product-specific)
- Custom authorization: A Journey Optimizer custom action authentication type that fetches a Bearer token from a specified endpoint and caches it for a configured duration (product-specific)
- XDM entity: The data payload structure conforming to the Experience Data Model schema, used as the body when writing events to AEP via the HTTP API inlet (product-specific)
- cacheDuration: The token cache setting in custom authorization configuration that controls how long the fetched Bearer token is reused before a new one is requested (product-specific)
Guardrails:
- After creating the Adobe Developer Console project, developer and API access control permissions must be explicitly granted before the credentials can be used
- The HTTP API inlet source must be created with authentication enabled; the connection endpoint URL and schema payload must be copied and stored for use in the custom action configuration
- Custom action headers must include Content-Type, Charset, and sandbox-name
- Fields intended to be populated dynamically at runtime must be changed from Constant to Variable in the custom action payload configuration
Terminology:
- Canonical name: Custom action — Acronym: none — variants: custom action configuration, Journey Optimizer custom action
- Canonical name: Adobe Experience Platform — Acronym: AEP — variants: Experience Platform, Platform
- Synonyms: “HTTP API Inlet” = “streaming endpoint” = “DCS collection endpoint”
- Do not confuse: “OAuth Server-to-Server” ≠ “OAuth user authentication” (Server-to-Server does not require a user login; it uses client credentials)
FAQ:
- Q: What type of authentication is used to call the AEP HTTP API Inlet from a Journey Optimizer custom action? — Custom Bearer token authentication using OAuth Server-to-Server client credentials fetched from the Adobe IMS token endpoint.
- Q: Where do I find the client_id, client_secret, grant_type, and scope values? — From the OAuth Server-to-Server credentials section of your Adobe Developer Console IO project, by clicking “View cURL command.”
- Q: How do I make journey-specific fields (e.g., journeyVersionId, nodeId) dynamic in the payload? — Change their field configuration from Constant to Variable in the custom action payload setup so they are populated from the journey context at runtime.
- Q: What permissions are required on the Adobe Developer Console project? — Developer and API access control must be granted with the right permissions after the project is created, as described in the AEP API authentication documentation.
- Q: What is the purpose of the cacheDuration setting in the authentication payload? — It controls how long the fetched Bearer token is cached and reused (28,000 seconds in the example) before the custom action requests a new token.