Create an approval workflow template for documents
In the Workfront Setup area, users with a Standard license can create reusable Approval Templates. A template is visible only to the user who created it, unless the creator shares it with specific users or with everyone in the organization. Once created, Approval Templates can be applied to assets in the Documents area of an object.
Access requirements
| table 0-row-2 1-row-2 layout-auto html-authored no-header | |
|---|---|
| Adobe Workfront package |
Any Workfront package to manage approvals using legacy Workfront storage Any Workflow package to manage approvals using Adobe cloud storage |
| Adobe Workfront license |
Standard Plan |
For more detail about the information in this table, see Access requirements in Workfront documentation.
Create an approval template
The approval template dialog always opens in Advanced mode. There is no Basic mode for templates. You can configure up to 30 parallel paths in a template, with up to 100 stages total. Each path runs independently and can contain one or more sequential stages.
To create an approval template:
-
Click the Main Menu icon


-
In the left panel, click Review and Approval > Approval Templates.
-
Click New Template on the right side of the page.
-
Add a Template name.
-
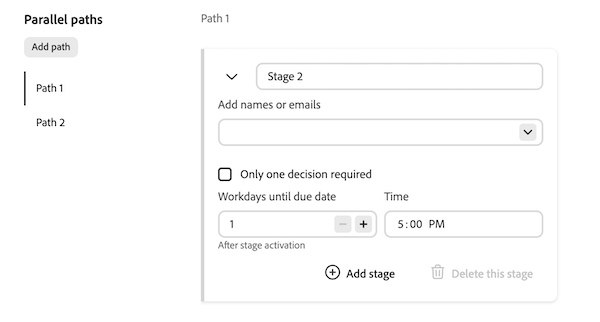
Fill in details for Stage 1 of Path 1:
table 0-row-2 1-row-2 2-row-2 3-row-2 4-row-2 html-authored no-header Stage name Stages are named Stage 1, Stage 2, and so on by default. Rename the stage to something more descriptive, such as Initial Review or Final Approval. Add names or emails (optional) Begin typing a user or team name to add as an approver or reviewer. Participants are optional in templates. You can add them when the template is applied to a document.
Note: A reviewer or approver can be assigned to only one open stage at a time on the same asset. If multiple parallel stages are open simultaneously, the same person can't be added to more than one.
Add people or teams in preview (optional) Begin typing a user name, team, or email address. Participants are optional in templates. You can choose to add them when the template is applied to a document. Note: If a user is already added, or belongs to more than one team you add, they're included once. Additionally, participants can be assigned only to one open stage at a time on the same asset. Only one decision required (optional) The first person who makes a decision completes the stage. Workdays until due date (optional) Choose how many workdays the stage takes to complete after it opens. The first stage of each path also supports an absolute due date. Each subsequent stage in the path supports a relative due date only. Add Custom Message (optional) Type a message in the Add Custom Message text box. When the template is applied to a document, the message appears in the approval email notification and in the Approvals tab in Workfront.
When you add a second stage, Show this message on all stages is selected by default. Leave it selected to use the same message in every stage. To use a different message for each stage, clear Show this message on all stages, then type the stage-specific message in each stage's Add Custom Message text box.
-
(Optional) Click Add stage to add another stage to the path. Stages within a path run sequentially in the order they’re listed. When all required decisions in a stage are made, the next stage in that path begins and the previous stage is locked. You can reorder stages within a path, but you can’t move a stage from one path to another. Each path can have a different number of stages.
-
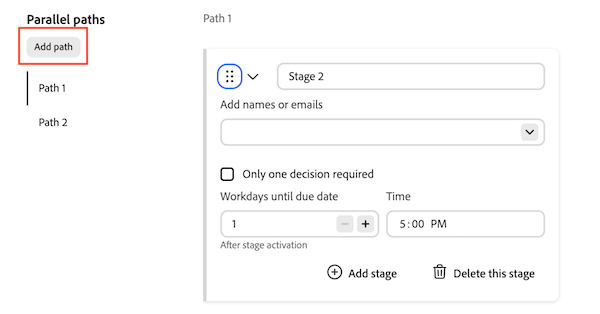
(Optional) Under Parallel paths, click Add path to add another path. The new path starts with one empty stage and becomes the selected path. Paths can’t be reordered.
-
(Optional) To rename a path, hover the path label, click the pencil icon, then type a new name. To remove a path, hover the path label and click the trash icon. Path 1 can’t be removed, and other paths can be removed only if no stage within the path is locked or completed.
-
(Optional) To clear all paths and stages and start over, click Reset in the upper-right corner.
-
Click Save.
Once the template is created, it can be applied to documents in the Documents area of an object to begin the formal review and approval process in Workfront.