Microsoft Office 365 Calendar

In an Adobe Workfront Fusion scenario, you can automate workflows that use Microsoft Office 365 Calendar, as well as connect it to multiple third-party applications and services.

In order to use Office 365 Calendar with Adobe Workfront Fusion, it is necessary to have an Office 365 Excel account. You can create one at www.office.com.

For instructions about connecting your Office 365 account to Workfront Fusion, see Create a connection to Adobe Workfront Fusion - Basic instructions

After you grant consent, you are redirected back to the Workfront Fusion administration page where you can continue creating your scenario.

Access requirements

You must have the following access to use the functionality in this article:

Adobe Workfront plan*
Pro or higher
Adobe Workfront license*
Plan, Work
Adobe Workfront Fusion license**

Current license requirement: No Workfront Fusion license requirement.

Or

Legacy license requirement: Workfront Fusion for Work Automation and Integration

Product

Current product requirement: If you have the Select or Prime Adobe Workfront Plan, your organization must purchase Adobe Workfront Fusion as well as Adobe Workfront to use functionality described in this article. Workfront Fusion is included in the Ultimate Workfront plan.

Or

Legacy product requirement: Your organization must purchase Adobe Workfront Fusion as well as Adobe Workfront to use functionality described in this article.

To find out what plan, license type, or access you have, contact your Workfront administrator.

For information on Adobe Workfront Fusion licenses, see Adobe Workfront Fusion licenses.

Prerequisites

To use Microsoft Office 365 Calendar modules, you must have a Microsoft Office 365 Calendar account.

Connecting the Office 365 Calendar service to Workfront Fusion

For instructions about connecting your Office 365 Calendar account to Workfront Fusion, see Create a connection to Adobe Workfront Fusion - Basic instructions

NOTE
Some Microsoft apps use the same connection, which is tied to individual user permissions. Therefore, when creating a connection, the permissions consent screen displays any permissions that were previously granted to this user’s connection, in addition to any new permissions needed for the current application.
For example, if a user has “Read table” permissions granted via the Excel connector and then creates a connection in the Outlook connector to read emails, the permissions consent screen will show both the already granted “Read table” permission and the newly required “Write email” permission.

Microsoft Office 365 Calendar modules and their fields

When you configure Microsoft Office 365 Calendar modules, Workfront Fusion displays the fields listed below. Along with these, additional Microsoft Office 365 Calendar fields might display, depending on factors such as your access level in the app or service. A bolded title in a module indicates a required field.

If you see the map button above a field or function, you can use it to set variables and functions for that field. For more information, see Map information from one module to another in Adobe Workfront Fusion.

Event

Watch Events

This trigger module retrieves details of an event when the event is created, updated, deleted, started, or ended in the selected calendar.

NOTE
To watch for deleted occurrences of an event series, select By Updated Time in the Watch events field. This module does not watch for deleted single events or deleted event series.
Connection
Connection
For instructions about connecting your Office 365 account to Workfront Fusion, see Create a connection to Adobe Workfront Fusion - Basic instructions
Watch events

Select how you want to watch events.

  • By Created Time

    Watch for new events.

  • By Updated Time

    Watch for updated events.

Calendar Group ID
Select the calendar group that contains the calendar where you want to watch events.
Calendar
Select the specific calendar that you want to watch.
Filter
Set the filter conditions to filter results by subject, event ID, or body.
Limit
Enter the maximum number of messages Workfront Fusion should return during one scenario execution cycle.

Search Events

This search module retreves details of an event when the event is created, updated, deleted, started, or ended in the selected calendar.

Connection
Connection
For instructions about connecting your Office 365 account to Workfront Fusion, see Create a connection to Adobe Workfront Fusion - Basic instructions
Calendar Group ID
Select the calendar group that contains the calendar where you want to watch events.
Calendar
Select the specific calendar that you want to watch.
Filter

Set the filter conditions to filter results. You can filter by the following properties:

  • Subject
  • Event ID
  • Created Date Time
  • Last Modified Date Time
  • Body Preview
Order by

Select how you want to order the results.

  • Subject, ascending or descending
  • Created Date Time, ascending or descending
  • Last Modified Date Time, ascending or descending
Limit
Enter the maximum number of events Workfront Fusion should return during one scenario execution cycle.

Get an Event

This action module retrieves details of the specified event.

Connection
For instructions about connecting your Office 365 account to Workfront Fusion, see Create a connection to Adobe Workfront Fusion - Basic instructions
Event ID
Enter or map the ID of the event you want to retrieve details about.

Create an Event

This action module creates a new event.

Connection
Connection
For instructions about connecting your Office 365 account to Workfront Fusion, see Create a connection to Adobe Workfront Fusion - Basic instructions
Subject
Enter or map a title for the created event.
Start date
Enter a single point of time when the event starts in a combined date and time representation. Use the format ({date}T{time}; for example, 2017-08-29T04:00:00.0000000. For a list of supported date and time formats, see Type coercion in Adobe Workfront Fusion.
End date
Enter a single point of time when the event ends in a combined date and time representation. Use the format {date}T{time}; for example, 2017-08-29T04:00:00.0000000. For a list of supported date and time formats, see Type coercion in Adobe Workfront Fusion.
Reminder on
Select whether you want to activate a reminder for this event.
Reminder
Enter or map he number of minutes before the start of the event when the reminder should trigger.
Importance

Select the importance of this event.

  • Low
  • Medium
  • High
Sensitivity

Select the sensitivity of this event.

  • Normal

  • Personal

    The recipient sees a "Please treat this as Personal" message.

  • Private

    The recipient sees a "Please treat this as Private" message. This event isn't forwarded or redirected by the recipient's inbox rules.

  • Confidential

    The recipient sees a "Please treat this as Confidential" message.

Body content type
Select whether the body content is plain text or HTML.
Body content
Enter or map the body of the message associated with the event. It can be in HTML or text format (as specified in the Body Content Type field above).
Location
Enter the event location details.
Response requested
Select Yes to request the invitee to send a response to the event invitation.
Show as

Select how you want the event to appear to people who view your calendar.

  • Free
  • Tentative
  • Busy
  • Out of office
  • Working elsewhere
  • Unknown
Attendees

Add attendees of the event.

  • Name

    Enter the attendee's name.

  • Email

    Enter the attendee's email address.

Category
Enter or map the categories that you want the event to display as on the calendar.

Update an Event

This action module updates an existing event.

Connection
Connection
For instructions about connecting your Office 365 account to Workfront Fusion, see Create a connection to Adobe Workfront Fusion - Basic instructions
Event ID
Enter, map, or select the ID of the event you want to update.
Subject
Enter or map a title for the created event.
Start date
Enter a single point of time when the event starts in a combined date and time representation. Use the format {date}T{time}; for example, 2017-08-29T04:00:00.0000000. For a list of supported date and time formats, see Type coercion in Adobe Workfront Fusion.
End date
Enter a single point of time when the event ends in a combined date and time representation. Use the format ({date}T{time}; for example, 2017-08-29T04:00:00.0000000. For a list of supported date and time formats, see Type coercion in Adobe Workfront Fusion.
Reminder on
Select whether you want to activate a reminder for this event.
Reminder
Enter or map he number of minutes before the start of the event when the reminder should trigger.
Importance

Select the importance of this event.

  • Low
  • Medium
  • High
Sensitivity

Select the sensitivity of this event.

  • Normal

  • Personal

    The recipient sees a "Please treat this as Personal" message.

  • Private

    The recipient sees a "Please treat this as Private" message. This event isn't forwarded or redirected by the recipient's inbox rules.

  • Confidential

    The recipient sees a "Please treat this as Confidential" message.

Body content type
Select whether the body content of the message associated with the event is plain text or HTML.
Body content
Enter or map the body of the message associated with the event. It can be in HTML or text format (as specified in the Body Content Type field above).
Location
Enter the event location details.
Response requested
Select Yes to request the invitee to send a response to the event invitation.
Show as

Select how you want the event to appear to people who view your calendar.

  • Free
  • Tentative
  • Busy
  • Out of office
  • Working elsewhere
  • Unknown
Attendees

Add attendees of the event.

  • Name

    Enter the attendee's name.

  • Email

    Enter the attendee's email address.

Category
Enter or map the categories that you want the event to display as on the calendar.

Delete an Event

This action module deletes an existing event.

Connection
Connection
For instructions about connecting your Office 365 account to Workfront Fusion, see Create a connection to Adobe Workfront Fusion - Basic instructions
Event ID
Enter or map the ID of the event you want to delete.

Calendar

List Calendars

This search module retrieves a list of all of the authenticated user’s calendars.

Connection
Connection
For instructions about connecting your Office 365 account to Workfront Fusion, see Create a connection to Adobe Workfront Fusion - Basic instructions
Calendar Group ID
Select the calendar group that contains the calendars you want to list.
Limit
Enter the maximum number of calendars Workfront Fusion should return during one scenario execution cycle.

Get a Calendar

This action module retrieves details about a single calendar.

Connection
Connection
For instructions about connecting your Office 365 account to Workfront Fusion, see Create a connection to Adobe Workfront Fusion - Basic instructions
Calendar ID
Enter or map the ID of the calendar you want to retrieve details about.

Create a Calendar

This action module creates a new calendar in your Google account.

Connection
Connection
For instructions about connecting your Office 365 account to Workfront Fusion, see Create a connection to Adobe Workfront Fusion - Basic instructions
Calendar name
Enter a name for the new calendar.

Update a Calendar

This action module edits an existing calendar.

Connection
Connection
For instructions about connecting your Office 365 account to Workfront Fusion, see Create a connection to Adobe Workfront Fusion - Basic instructions
Calendar ID
Enter the Calendar ID for the calendar you want to update.
New Calendar name
Enter a name for the new calendar.

Delete a Calendar

This action module deletes an existing calendar.

Connection
Connection
For instructions about connecting your Office 365 account to Workfront Fusion, see Create a connection to Adobe Workfront Fusion - Basic instructions
Calendar ID
Enter the Calendar ID for the calendar you want to delete.

Other

Make an API Call

This module allows you to perform a custom API call.

Select the HTTP request method you need to configure the API call. For more information, see HTTP request methods in Adobe Workfront Fusion.

Connection
Connection
For instructions about connecting your Office 365 account to Workfront Fusion, see Create a connection to Adobe Workfront Fusion - Basic instructions
URL
Enter a path relative to https://graph.microsoft.com. Example: /v1.0/me/events
Method
Headers
Add the headers of the request in the form of a standard JSON object.For example, {"Content-type":"application/json"}. Workfront Fusion adds the authorization headers for you.
Query String
Add the query for the API call in the form of a standard JSON object.
Body

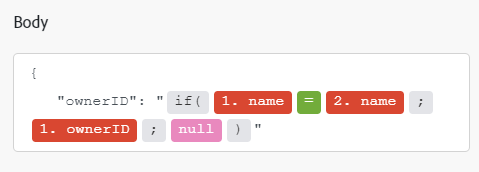
Add the body content for the API call in the form of a standard JSON object.

Note:

When using conditional statements such as if in your JSON, put the quotation marks outside of the conditional statement.

recommendation-more-help
5f00cc6b-2202-40d6-bcd0-3ee0c2316b43