Jira Software modules
In an Adobe Workfront Fusion scenario, you can automate workflows that use Jira Software, as well as connect it to multiple third-party applications and services.
These instructions apply to both Jira Cloud and Jira Server modules.
For instructions on creating a scenario, see the articles under Create scenarios: article index.
For information about modules, see the articles under Modules: article index.
Access requirements
| table 0-row-2 1-row-2 2-row-2 3-row-2 layout-auto html-authored no-header | |
|---|---|
| Adobe Workfront package |
Any Adobe Workfront Workflow package and any Adobe Workfront Automation and Integration package Workfront Ultimate Workfront Prime and Select packages, with an additional purchase of Workfront Fusion. |
| Adobe Workfront licenses |
Standard Work or higher |
| Adobe Workfront Fusion license |
Operation-based: No Workfront Fusion license requirement Connector-based (legacy): Workfront Fusion for Work Automation and Integration |
| Product | If your organization has a Select or Prime Workfront package that does not include Workfront Automation and Integration, your organization must purchase Adobe Workfront Fusion. |
For more detail about the information in this table, see Access requirements in documentation.
For information on Adobe Workfront Fusion licenses, see Adobe Workfront Fusion licenses.
Prerequisites
To use Jira modules you must have a Jira account.
Jira API information
The Jira connector uses the following:
Connect Jira Software to Workfront Fusion
Your connection method is based on whether you are using Jira Cloud or Jira Server.
Connect Jira Cloud to Workfront Fusion
Connect Jira Cloud to Workfront Fusion
To connect Jira Software to Workfront Fusion, you must create an API token and insert it together with your Service URL and Username to the Create a connection field in Workfront Fusion.
Create an API token in Jira
-
Create an API token in Jira.
For instructions, we recomments searching for “Create an API token” in the Jira documentation.
-
After creating the token, copy the token to a secure location.
note important IMPORTANT You can’t view the token again after closing this dialog. 1. Store the generated token in a safe place.
-
Continue with Configure the Jira API token in Workfront Fusion.
Configure the Jira API token in Workfront Fusion
-
In any Jira Cloud module in Workfront Fusion, click Add next to the connection field.
-
Specify the following information:
- Environment
- Type
- Service URL: This is the base URL that you use to access your Jira account. Example:
yourorganization.atlassian.net - Username
- API token: This is the API token you created in the Create an API token in Jira section of this article.
-
Click Continue to create the connection and return to the module.
Connect Jira Server to Workfront Fusion
To authorize a connection between Workfront Fusion and Jira Server, you need your Consumer Key, Private Key, And Service URL. You may need to contact your Jira administrator for this information.
Generate Public and Private keys for your Jira connection
To acquire a private key for your Workfront Fusion Jira connection, you need to generate public and private keys. This is done through your computer’s terminal. You can locate your terminal by searching for terminal in your start menu or computer search bar (not your browser search bar.)
-
In your terminal, run the following
opensslcommands.-
openssl genrsa -out jira_privatekey.pem 1024This command generates a 1024 bit private key.
-
openssl req -newkey rsa:1024 -x509 -key jira_privatekey.pem -out jira_publickey.cer -days 365This command creates an X509 certificate.
-
openssl pkcs8 -topk8 -nocrypt -in jira_privatekey.pem -out jira_privatekey.pcks8This command extracts the private key (PKCS8 format) to the
jira_privatekey.pcks8file. -
openssl x509 -pubkey -noout -in jira_publickey.cer > jira_publickey.pemThis command extracts the public key from the certificate to the
jira_publickey.pemfile.note note NOTE If you are using Windows, you may need to save the public key to the jira_publickey.pemfile manually:-
In your terminal, run the following command:
openssl x509 -pubkey -noout -in jira_publickey.cer -
Copy the terminal output, including
-------BEGIN PUBLIC KEY--------and-------END PUBLIC KEY--------. -
Paste the terminal output into a file named
jira_publickey.pem.
-
-
-
Continue to Configure the client app as a consumer in Jira
Configure the client app as a consumer in Jira
-
Log in to your Jira instance.
-
In the left navigation panel, click Jira Settings

-
In the Enter the URL of the application you want to link field, enter
code language-none https://app.workfrontfusion.com/oauth/cb/workfront-jiraserver-oauth1 -
Click Create new link. Ignore the “No response was received from the URL you entered” error message.
-
In the Link applications window, enter values into the Consumer key and Shared secret fields.
You can choose the values for these fields.
-
Copy the values of the Consumer key and Shared secret fields to a secure location.
You will require these values later in the configuration process.
-
Fill in the URL fields as follows:
table 0-row-2 1-row-2 2-row-2 3-row-2 Field Description Request Token URL <Jira base url>/plugins/servlet/oauth/request-tokenAuthorization URL <Jira base url>/plugins/servlet/oauth/authorizeAccess Token URL <Jira base url>/plugins/servlet/oauth/access-token -
Select the Create incoming link checkbox.
-
Click Continue.
-
In the Link applications window, fill in the following fields:
table 0-row-2 1-row-2 2-row-2 layout-auto html-authored no-header Consumer Key Paste in the consumer key that you copied to a secure location. Consumer name Enter a name of your choice. This name is for your own reference. Public key Paste in the public key from your jira_publickey.pemfile. -
Click Continue.
-
Continue to Create a connection to Jira Server or Jira Data Center in Workfront Fusion
Create a connection to Jira Server or Jira Data Center in Workfront Fusion
-
In any Jira Server module in Workfront Fusion, click Add next to the connection field.
-
In the Create a connection panel, fill in the following fields:
table 0-row-2 1-row-2 2-row-2 3-row-2 4-row-2 5-row-2 layout-auto html-authored no-header Connection name Enter a name for the connection. Environment Select whther you are using a production or non-production environment. Type Select whether you are using a service account or a personal account. Consumer Key Paste in the consumer key that you copied to a secure location in Configure the client app as a consumer in Jira Private Key Paste in the private key from the jira_privatekey.pcks8file you created in Generate Public and Private keys for your Jira connection.Service URL Enter your Jira instance URL. Example: yourorganization.atlassian.net -
Click Continue to create the connection and go back to the module.
Jira Software modules and their fields
When you configure Jira Software modules, Workfront Fusion displays the fields listed below. Along with these, additional Jira Software fields might display, depending on factors such as your access level in the app or service. A bolded title in a module indicates a required field.
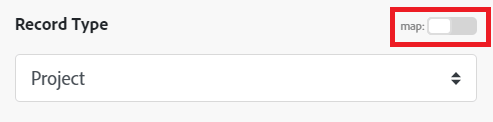
If you see the map button above a field or function, you can use it to set variables and functions for that field. For more information, see Map information from one module to another.
Triggers
Watch for records
This trigger module starts a scenario when a record is added, updated, or deleted.
Actions
Add issue to sprint
This action module adds one or more issues to a sprint.
When you are configuring this module, the following fields display.
Create a Record
This action module creates a new record in Jira.
The module returns any standard fields associated with the record, along with any custom fields and values that the connection accesses. You can map this information in subsequent modules in the scenario.
When you are configuring this module, the following fields display.
Custom API Call
This action module lets you make a custom authenticated call to the Jira Software API. Use this module to create a data flow automation that can’t be accomplished by the other Jira Software modules.
When you are configuring this module, the following fields display.
Select the HTTP request method you need to configure the API call. For more information, see HTTP request methods.
<Instance URL>/rest/api/2/Add the headers of the request in the form of a standard JSON object.
For example, {"Content-type":"application/json"}
Workfront Fusion adds the authorization headers for you.
Add the query for the API call in the form of a standard JSON object.
For example: {"name":"something-urgent"}
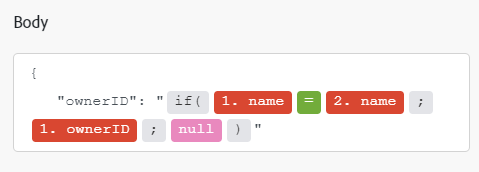
Add the body content for the API call in the form of a standard JSON object.
Note:
When using conditional statements such as if in your JSON, put the quotation marks outside of the conditional statement.
Delete a record
This action module deletes the specified record.
You specify the ID of the record.
The module returns the ID of the record and any associated fields, along with any custom fields and values that the connection accesses. You can map this information in subsequent modules in the scenario.
When you are configuring this module, the following fields display.
Download an attachment
This action module downloads a particular attachment.
When you are configuring this module, the following fields display.
Read a record
This action module reads data from a single record in Jira Software.
You specify the ID of the record.
The module returns any standard fields associated with the record, along with any custom fields and values that the connection accesses. You can map this information in subsequent modules in the scenario.
When you are configuring this module, the following fields display.
Update a record
This action module updates an existing record, such as an issue or project,.
You specify the ID of the record.
The module returns the ID of the record and any associated fields, along with any custom fields and values that the connection accesses. You can map this information in subsequent modules in the scenario.
When you are configuring this module, the following fields display.
Searches
[410] The requested API has been removed. Please migrate to the /rest/api/3/search/jql API. A full migration guideline is available at https://developer.atlassian.com/changelog/#CHANGE-2046
-
Only the Search module is affected. At this time, other Jira API endpoints used by the Fusion connector are not impacted by this deprecation.
-
Geographic rollout may cause inconsistencies. Atlassian is rolling out this change regionally, which means some Jira Cloud instances may still temporarily support older endpoints. This can lead to inconsistent behavior across environments.
List records
This search module retrieves all items of a specific type that match your search query
You can map this information in subsequent modules in the scenario.
When you are configuring this module, the following fields display.
Search for records
This search module looks for records in an object in Jira Software that match the search query you specify.
You can map this information in subsequent modules in the scenario.
When you are configuring this module, the following fields display.