Configure fields to track in change history
The information on this page refers to functionality not yet generally available. It is available only in the Preview Sandbox environment.
Adobe Workfront generates automatic system updates to record the following events:
- Changes users make in an object field
- Actions users perform on an object
These system updates include the following type of information:
- The change that was made
- The name of the user who made the change
- The time and date of the change
As a Workfront administrator, you can configure which object fields and actions Workfront tracks.
For example, you could have Workfront track all changes users make to the names of issues throughout the system. Any issue name change then appears as an entry on the change history log. For more information, see View and manage change history.
Access requirements
| table 0-row-2 1-row-2 2-row-2 layout-auto html-authored no-header | |
|---|---|
| Adobe Workfront package | Any |
| Adobe Workfront license | Standard |
| Access level configurations | System administrator |
For information, see Access requirements in Workfront documentation.
Limits to field tracking
The limits for the number of fields you can track are defined by your Workfront package.
Add fields you want to track
-
Click the Main Menu icon


-
In the left panel, click Change Tracking > Configuration.
-
On the Configuration screen, click Add field.
-
In the Add fields box, select an object. You can begin typing the object name, then select it when it appears in the list.
-
Next, select the field names that you want to track for that object. You can begin typing the field name, then select it when it appears in the list.
Both custom fields and native fields are available for the object.
Fields already being tracked are shown as selected in the list.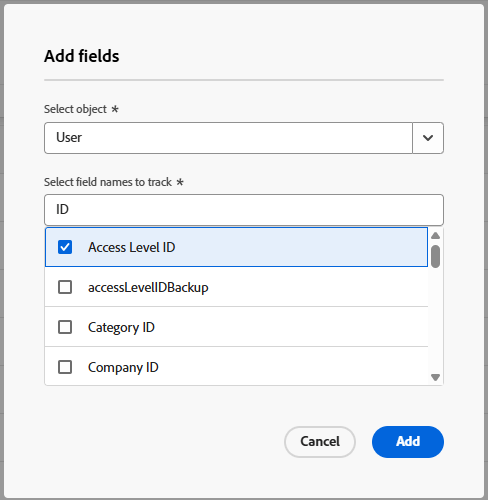
-
After selecting all of the fields you want to track, click Add.
The fields are added to the Tracked Fields list.
Remove fields you no longer want tracked
You can remove fields you don’t want the system to track for a particular type of object throughout the Workfront interface.
-
Click the Main Menu icon
-
In the left panel, click Change Tracking > Configuration.
-
On the Configuration screen, select the field or fields you want to stop tracking.
You might see the same field name more than once. The fields are grouped by object so you can locate the correct field. You can also use the search box at the top of the screen.
-
Select Delete in the action bar at the bottom of the screen.
-
Click Remove on the confirmation message.
The fields are removed from the Tracked Fields list.