User access and permissions
After provisioning is complete and sandboxes are bound, complete the following steps to provide Marketo Optimizer access for your team and users.
- Create a Marketo Optimizer product profile in the Admin Console (one-time/initial setup only).
- Add a user group in the Admin Console.
- Assign the product profile to the user group in the Admin Console.
- Add users to the new group in the Admin Console.
- Edit built-in roles or create a custom role with product permissions and the required Marketo Optimizer sandbox in Experience Platform.
- Add users or groups to roles in Adobe Experience Platform.
Configure the product profile config-profile
As an administrator, you can complete these tasks in the Adobe Admin Console, which is a central place to administer and manage your Adobe product licenses and users. In the Admin Console, you can create and manage users in a single location instead of within your various individual solutions. To learn more about its functions and capabilities, refer to the Admin Console overview page.
Access the Admin Console admin-console
Before you can use the Admin Console to administer users within your team, you need to ensure that you can access the Admin Console and have the appropriate permissions.
-
As a system administrator, you should receive multiple emails from Adobe as part of the onboarding process.
Locate the welcome email that provides the information about the organization name to which you have been granted access.
-
Click the Get started link in your welcome email to navigate to the Admin Console.
If you cannot find the email, open a browser directly to the Admin Console at https://adminconsole.adobe.com.
-
Log in using your Adobe ID.
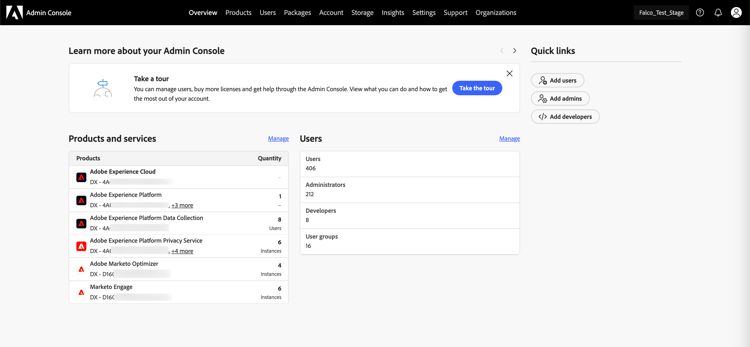
Upon successful login, you see the Overview page of the Adobe Admin Console.
-
If you have access to multiple organizations, ensure that you have logged in to the correct organization.
To change your organization, click the organization name from the top right corner and choose the organization to which you need access.
-
Select Administrators from the Users card to verify that you are a system administrator.
-
Search by entering your Adobe ID email, username, first, or last name.
-
If your access is correctly configured, the search returns your record.
-
If the value in the ADMIN ROLE column shows
System, you know that you (or the displayed user) are a system administrator.
-
Create the Marketo Optimizer product profile create-profile
When granting users access to an Adobe solution, you do not necessarily want to give them full access. Product profiles enable each solution to have its own set of user permissions. Use the Admin Console to assign product profiles.
For more information about using product profiles for user entitlements, see Manage product profiles for enterprise users in the Admin Console documentation.

-
Select the Products tab.
-
Open the Marketo Optimizer instance where you want to add the profile and click New profile.
-
Enter a product profile name, such as Access.
-
Click Next and then Save.
Add a user group add-user-group
A user group is a collection of users who are granted a shared set of permissions. You can add or remove users in your user group. The group permissions remain the same while the users within the group change.
For more information about how user groups are used to manage permissions, see Manage user groups in the Admin Console documentation.
-
Select the Users tab.
-
Choose User Groups in the left navigation.
-
Click New user group at the top right.
-
Enter a name for the user group, such as Optimizer users and click Save.

Assign the product profile assign-profile
-
Click the user group that you created.
-
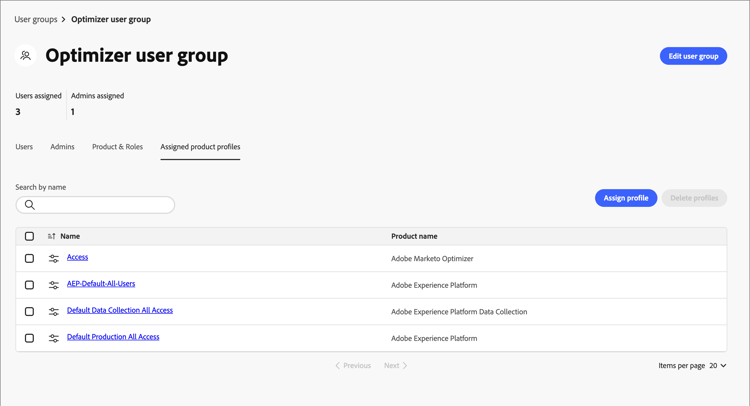
Select the Assigned product profiles tab and click Assign profile.
-
Click + and add each instance of the following products:
- Adobe Marketo Optimizer - Access
- Adobe Experience Platform - AEP-Default-All-Users
- Adobe Experience Platform Data Collection - Default Data Collection All Access
- Adobe Experience Platform - Default Production All Access
-
Click Save.
Add users to the new group add-users
For information about user management, see Adobe Admin Console users in the Admin Console documentation.
-
If the users are not already members of your organization, add each user:
-
Under Quick links, click Add users.
-
Enter the user’s email address and click Add as new user.

-
Enter the first and last name, then click Save.
-
-
Add each user to the group:
-
Click the user name.
-
In the user details page, scroll to User groups.
-
Click the More ( … ) icon on the left and choose Edit user groups.
-
Click the Add ( + ) icon below User groups.

-
Select the user group that you created previously and click Apply.
-
Click Save for the user changes.
-
Assign product permissions assign-product-permissions
Permissions are unitary rights that allow you to define the authorizations assigned to a product profile. Each permission is grouped under a capability, such as person journeys or content, representing functionalities in Marketo Optimizer.
The Permissions area of Adobe Experience Platform is where administrators can define user roles and access policies to manage access permissions for features and objects within a product application. In this app, you can create and manage roles, as well as assign the desired resource permissions for these roles. Permissions also allow you to manage the sandboxes and users associated with a specific role.
For more information about role permissions in Experience Platform, see Manage permissions for a role in the Experience Platform documentation.
-
Go to experience.adobe.com.
-
In the Quick access panel, select Permissions.
note NOTE If you don’t see Permissions, you may need to click View all and select it from the available applications. 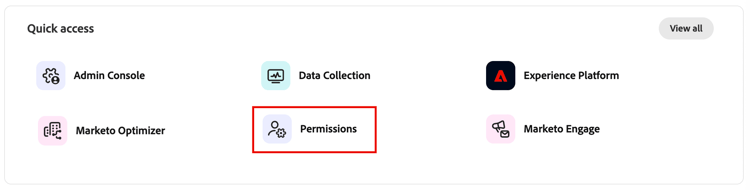
Permission resources permissions
The following permission resources control access to channel configuration, content management, and person journey features in Marketo Optimizer:
Mktoaep + Marketo Engage subscription prefix. For example, if your linked Marketo Engage subscription prefix is AcmeAssoc, the sandbox required for Marketo Optimizer access is MktoaepAcmeAssoc.To provide support for external destinations in Marketo Optimizer, the following permissions are required:
Edit role permissions edit-role-permissions
For built-in or custom roles, you can decide at any time to add or delete permissions. If you modify a default or custom role, it impacts every user assigned to the role.
Mktoaep + Marketo Engage subscription prefix. For example, if your linked Marketo Engage subscription prefix is AcmeAssoc, the sandbox required for Marketo Optimizer access is MktoaepAcmeAssoc.To change the permissions for a role:
-
Select Roles in the left navigation.
-
Click the Optimizer users role name.
-
In the details page, click Edit at the top right.

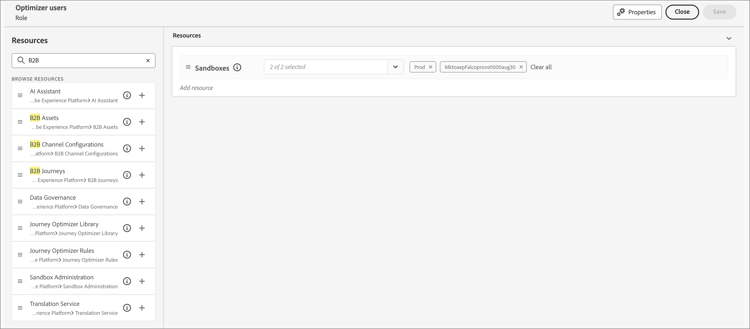
In the role editor, the Resources menu displays the list of resources that apply to the Experience Cloud - Platform powered applications.
-
Select the sandbox provisioned for Marketo Optimizer access (
Mktoaep<Marketo subscription prefix>).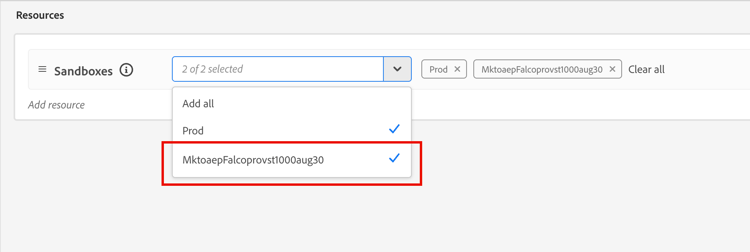
-
Click the Add icon (+) for each of the functional resources.
-
Add the specific permissions for each of the resources, or select Add all.
-
Click Save.
-
Click Close to return to the details page.
Add users to a role add-users-to-a-role
-
Open the role details and select the Users tab.
This tab displays a list of all users assigned to the role.
-
Click Add users.

-
In the Add users dialog, locate and select the users that you want to add to the role.
-
You can use the Search tool to filter the list of users.
-
Select the checkbox for each user.

-
-
Click Save when you have selected all the users that you want to add.
Add user groups to a role add-user-groups-to-a-role
For information about user management, see Adobe Admin Console users in the Admin Console documentation.
-
Open the role details and select the User groups tab.
This tab displays a list of all user groups assigned to the role.
-
Click Add Groups.

-
In the Add groups dialog, locate and select the groups that you want to add to the role.
-
You can use the Search tool to filter the list of user groups.
-
Select the checkbox for each user group.

-
-
Click Save when you have selected all the groups that you want to add.
Create a custom role create-a-custom-role
-
Select Roles in the left navigation and select Create role.
-
In the Create new role dialog, enter a name for the role, such as B2B Marketers, and a description (optional).
-
Click Confirm.
-
Select the sandbox provisioned for Marketo Optimizer access (
Mktoaep<Marketo subscription prefix>). -
Add product permissions:
To determine which product capabilities you want for the role, refer to the list of product permissions.
In the Resources list on the left, locate the B2B items and click the Add (+) icon to add each attribute that you want to enable for the role.
You can enter B2B in the search tool to filter the list for many of the B2B-related product permissions that apply to Marketo Optimizer.
-
Click Save at the top right.
-
Go to the role details and select the User groups tab.
-
Click Add Groups.
-
Select the checkbox next to the user group that you created previously in the Admin Console.
-
Click Save.
Your custom role is configured and users in the assigned group can now access the Marketo Optimizer capabilities you selected.