Email deliverability
The following information is for administrators who configure sending infrastructure to support marketers and email content creators. It describes deliverability features and how to configure subdomains, authentication, and IP pools.
Email deliverability in Adobe Marketo Optimizer is the set of infrastructure and authentication configurations that help email messages reach the recipient’s inbox, not the spam folder, and not blocked by ISPs (Internet Service Providers).
It uses the following building blocks, configured by an administrator, typically in the following order:
- Delegate one or more subdomains to Adobe.
- Configure DMARC, SPF, and DKIM records on each subdomain.
- Confirm the IP pool used to send email for your subdomain.
- Create one or more email channel configurations that bind a subdomain, IP pool, and sender identity.
- Allowlist the sending IP addresses with your IT department so test emails reach your inbox.
- Configuring email channels - Email channel configuration
- Creating emails - Add emails to journeys
- Designing email content - Email content authoring
Current limitations limitations
- Custom Delegation method for subdomain delegation is not yet available. Use Fully Delegated or CNAME. Custom Delegation is targeted for the GA release.
- Dedicated IP pools are not available at Beta. The shared IP pool is the only option. Dedicated IPs ship at GA, including IP warmup planning and PTR record management.
Key concepts key-concepts
Before configuring email, review these concepts that apply to email channel deliverability features:
mail.contoso.com) used to send email through Marketo Optimizer. Subdomains isolate your B2B marketing reputation from corporate or transactional mail.Subdomain delegation subdomain-delegation
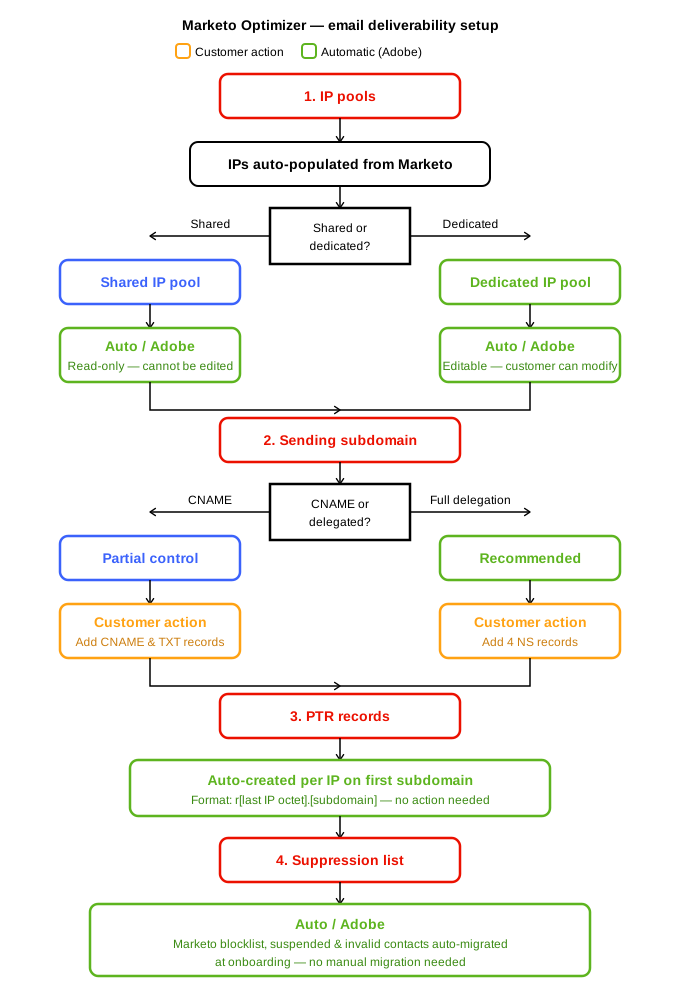
Subdomain delegation tells the internet that Adobe is authorized to send email on behalf of a specific subdomain (for example, mail.contoso.com) of your domain. Delegating a dedicated subdomain — rather than your root domain — protects your corporate mail and provides the following benefits:
- Reputation isolation. Marketing sends are kept separate from corporate mail. If marketing reputation dips, your transactional and corporate mail are not affected.
- Faster IP warmup. Dedicated subdomains help establish positive sender reputation more quickly with ISPs.
- Modern authentication. SPF, DKIM, and DMARC can be set up cleanly per subdomain without affecting other mail flows.
- Compliance. Helps meet bulk-sender requirements from Gmail, Yahoo, and other major ISPs.
Supported methods supported-methods
Marketo Optimizer supports two of the three subdomain delegation methods in this Beta release. The third method (Custom Delegation) is on the roadmap.
Delegate a subdomain (Fully Delegated method) delegate-fully-delegated
- Decide on a subdomain naming convention (for example,
mail.contoso.comfor marketing,alerts.contoso.comfor transactional). - Confirm with your IT/DNS team that they can delegate the subdomain (NS records) to Adobe.
- Create the new subdomain in your DNS provider, then wait 24–48 hours for DNS propagation before delegating to Adobe.
- Confirm you have the Administrator role in Marketo Optimizer.
-
In the Marketo Optimizer left navigation, expand Administration and select Channels.
-
In the panel, expand Email settings and select Subdomains.
-
Click Set up subdomain.
-
Enter the full subdomain name (for example,
mail.contoso.com). -
Choose Fully Delegated as the delegation method.
-
Configure DMARC for the subdomain (see DMARC, SPF, and DKIM).
At minimum, set up a DMARC record with a starting policy of
noneso you can monitor reports without affecting delivery. -
Review the list of DNS records for Adobe to manage.
These typically include MX, SPF, DKIM, DMARC, A, and CNAME records (for tracking and mirror-page URLs).
-
Download the DNS records as a CSV file using the Download records button. Share this file with your DNS team.
-
Your DNS team adds the NS records in your domain hosting solution that delegate the subdomain to Adobe.
-
After your DNS team confirms the records are in place, return to Marketo Optimizer and check the box confirming that you have created the required records on the hosting site.
-
Click Submit to initiate a series of validation checks (pre-validation, MX, SPF, DKIM, DMARC, FBL registration).
-
Wait for the subdomain status to change to Success.
This typically takes a few minutes after DNS propagation is complete.
Delegate a subdomain (CNAME method) delegate-cname
Use this method only if the DNS policy of your organization prohibits full delegation. With CNAME, you maintain DNS records on your side.
- In the Marketo Optimizer left navigation, expand Administration and select Channels.
- In the panel, expand Email settings and select Subdomains.
- Click Set up subdomain.
- Enter the full subdomain name.
- Choose CNAME as the delegation method.
- Configure DMARC for the subdomain (DMARC, SPF, and DKIM).
- Review the list of CNAME records to generate. These point the components of your subdomain to Adobe-managed records.
- Download the records as CSV and share with your DNS team.
- Your DNS team adds each CNAME record to your DNS hosting solution.
- When records are in place and propagated, return to Marketo Optimizer and confirm.
- Click Submit.
- Wait for status to reach Success.
For step-by-step instructions for common DNS providers, review the following sections:
Add CNAME records by DNS provider add-cname-records-dns-provider
Marketo Optimizer generates the exact CNAME and TXT records for your subdomain and lets you download them as a CSV file. Use the following provider-specific steps to help your DNS team locate the correct settings screen and add each record.
AWS Route 53 aws-route-53
-
Sign in to the AWS Management Console and open Route 53.
-
Select Hosted zones, then choose the hosted zone for your domain.
-
Click Create record and keep the routing policy set to Simple routing.
-
For each row in the CSV:
- Record name — Enter only the portion before your zone name. For example, for
data.mail.contoso.comin thecontoso.comzone, enterdata.mail. - Record type — Choose
CNAMEorTXTto match the CSV. - Value — Paste the target from the CSV. For TXT records, wrap the value in double quotation marks.
- TTL — 300 seconds is sufficient.
- Record name — Enter only the portion before your zone name. For example, for
-
Click Add another record to batch entries, then Create records after all rows are entered.
Cloudflare cloudflare
-
Log in to the Cloudflare dashboard and select your domain.
-
Go to DNS Records and click Add record.
-
For each row in the CSV:
- Type — Choose
CNAMEorTXT. - Name — Enter the host portion, for example
data.mail. Cloudflare appends your domain automatically. - Target (for CNAME) or Content (for TXT) — Paste the value from the CSV.
- Proxy status — Set to DNS only (grey cloud icon).
- TTL — Leave as Auto.
- Type — Choose
-
Click Save for each row.
Azure DNS azure-dns
-
Sign in to the Azure portal and open DNS zones.
-
Select the DNS zone for your domain.
-
Click + Record set.
-
For each row in the CSV:
- Name — Enter the host portion, for example
data.mail. Azure appends the zone name. - Type — Choose
CNAMEorTXT. - For a CNAME record, enter the target from the CSV in the Alias field.
- For a TXT record, paste the value into the Value field. Azure handles quoting for you.
- TTL — Enter a number and unit, for example 300 seconds.
- Name — Enter the host portion, for example
-
Click OK to save the record set for each row.
Google Cloud DNS google-cloud-dns
-
Open the Google Cloud console and go to Network Services > Cloud DNS.
-
Select the zone for your domain.
-
Click Add standard to add a record set.
-
For each row in the CSV:
- DNS name — Enter the host portion, for example
data.mail. Cloud DNS shows the zone suffix, and you prepend the host. - Resource record type — Choose
CNAMEorTXT. - TTL — 300 seconds is sufficient.
- For a CNAME record, enter the target in Canonical name and end it with a trailing period.
- For a TXT record, paste the value into the data field.
- DNS name — Enter the host portion, for example
-
Click Create for each row.
gcloud dns record-sets create command.Subdomain guardrails subdomain-guardrails
- Default limit: 10 subdomains per organization. Contact your Adobe representative if you need more (up to 100 depending on contract).
- DNS propagation: Allow 24–48 hours for changes to propagate globally. Validation can fail simply because DNS has not yet propagated.
- Subdomain reuse: A subdomain that is already used by another Adobe product (Marketo Engage, Adobe Campaign) cannot be reused in Marketo Optimizer.
DMARC, SPF, and DKIM dmarc-spf-dkim
DMARC, SPF, and DKIM are email authentication standards. Together they prove to receiving mail servers that your message is genuinely sent on behalf of your domain and has not been spoofed. Modern ISPs — Gmail, Yahoo, Microsoft — require these standards for bulk senders.
DMARC policy modes dmarc-policy-modes
nonequarantinerejectConfigure DMARC configure-dmarc
DMARC is configured at the time of subdomain delegation, but you can also add or update DMARC for an already-delegated subdomain.
-
In the Marketo Optimizer left navigation, expand Administration and select Channels.
-
In the panel, expand Email settings and select Subdomains.
-
In the Subdomains list, locate your subdomain and check the DMARC Record column.
If a record is missing, an alert is displayed.
-
Open the subdomain and scroll to the DMARC record section.
- If a DMARC record already exists on the parent domain, Marketo Optimizer fetches the values automatically. You can keep them or override.
- If no record exists, choose Manage with Adobe and Adobe creates and hosts the DMARC record.
-
Set the policy:
none,quarantine, orreject. Start withnoneunless you already have a mature DMARC posture on your parent domain. -
(Optional) Configure additional DMARC tags (
spfor subdomain policy,pctfor percentage,ruaandruffor report addresses). -
If using Fully Delegated, click Save.
Adobe applies the record automatically. If using CNAME, copy the DNS record and have your DNS team add it, then confirm it in Marketo Optimizer.
-
Allow up to 48 hours for DNS propagation, then verify that the DMARC status indicator on the subdomain page is green/healthy.
policy=none to monitor authentication reports, then progress to quarantine, and finally to reject after your reports show healthy SPF and DKIM alignment. Moving straight to reject without monitoring can cause legitimate mail to be rejected.IP pools ip-pools
An IP pool is a named group of IP addresses used to send your email. IP pools are critical for sender reputation: each pool has its own reputation with ISPs, so a problem with one pool (for example, a marketing burst that triggers spam complaints) does not contaminate another (for example, transactional confirmations).
Pool types pool-types
Review and assign an IP pool review-ip-pool
In this release, IP pools are pre-provisioned for your organization. You assign an IP pool when creating an email channel configuration.
- In the Marketo Optimizer left navigation, expand Administration and select Channels.
- In the panel, expand Email settings and select IP pools.
- Confirm that an IP pool with status Active is available for your organization.
- Hover over the pool to view the IP addresses and their PTR records (reverse DNS).
- If your organization has multiple business units or brands, plan how you will use IP pools (for example, marketing-pool versus webinar-pool) before creating channel configurations.
Allowlist IP addresses allowlist-ip-addresses
Corporate anti-spam systems sometimes block test emails you send from Marketo Optimizer. These systems rely on sender IP addresses to verify that an email is valid. To ensure that your test emails arrive, add Marketo Optimizer to your corporate allowlist.
Ask your IT department to add these IP addresses to your corporate allowlist:
- 54.212.167.17
- 35.165.244.220
- 44.235.171.179