Record a session
As an Instructor, you have full control over how a session is captured, refined, and shared. You can start a recording during a live session, manage it while it runs, and review the automatically generated topics, summary, and transcript once the session ends.
Beyond capturing the session, you can edit the recording to remove unnecessary sections, enable closed captions, and transcripts. The following sections walk through each of these actions in detail.
Record a session
-
Navigate to the More actions menu.
-
Select Start recording.
A confirmation pop-up appears, indicating that “The session is now being recorded”.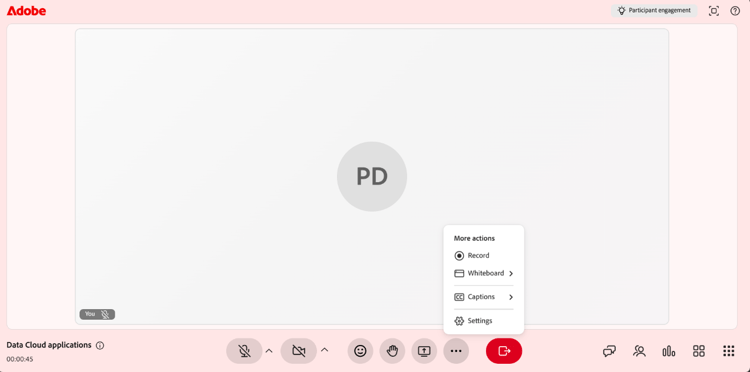
Select Record from the More actions menu to begin capturing the session.
Stop, Pause, and Resume recording
When a session is being recorded, a recording indicator appears in the top corner of the virtual classroom. You can start, stop, and resume the recording.
Stop recording
-
Select the recording indicator.
A pop-up window opens with recording actions.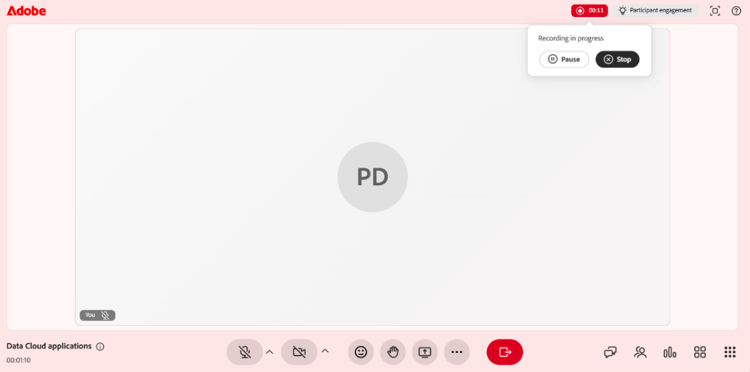
While recording, use the Recording in progress options to pause or stop the session. -
Select Stop recording.
A confirmation message appears that the session is no longer being recorded.
Pause recording
To pause the recording:
-
Select the recording indicator.
-
Select Pause recording.
A confirmation message will appear, displaying Recording and transcription paused.
Resume recording
Once you pause the recording, a resume recording option appears. Select Resume recording to continue the paused recording.
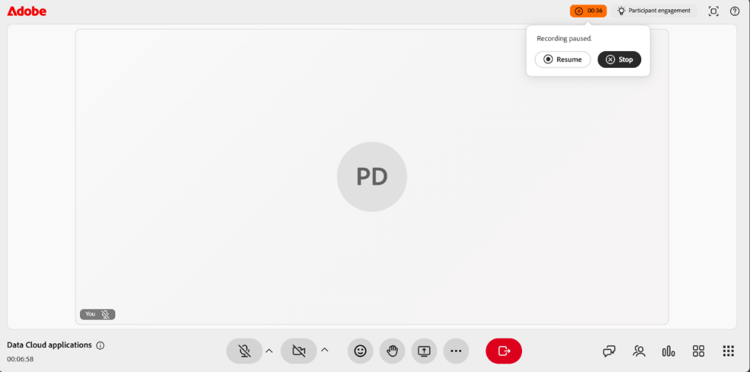
When paused, the Recording paused options let you resume or stop the recording.
Access a recording
Recorded sessions are available on the Session Overview page for each session. From here, you can play back a recording or open it in edit mode to refine the timeline and transcript.
To access a recording:
-
Navigate to the required course and open the session.
-
Scroll to the Live hub section on the Session Overview page.
-
In the View recording card, do one of the following:
-
Select View recording to open the recording in playback mode.
-
Select Edit to open the recording in edit mode.

The View recording card in the Live hub section, where you play back or edit a recording. -
Play a recording
Selecting View recording opens the recording in the recording player. The player displays the session video, participant thumbnails, and the Transcript.
To play a recording:
-
Navigate to the Session Overview page.
-
Select View recording from the Live hub section.
The recording opens in playback mode.
The recording player is in playback mode, showing the session video and the Transcript panel. -
Use the following playback controls to adjust your viewing experience:
Generate Topics in recording
Topics automatically divide recordings into meaningful sections based on the flow of the session discussion. They help organize longer recordings and improve navigation. You can also search for a topic using keywords to quickly navigate to the relevant section of the recording.
View Topics in recording
Once the topics are generated, you can browse and navigate them. The topics are marked as Generated using AI. Review the content, as AI-generated responses should be double-checked.
To view and navigate topics:
-
In the Topics panel, browse the list of topics, or use the Search box to find a topic using keywords.
-
Select a topic to expand it and view its summary, details, and total duration.
-
Select Play topic.
The recording starts playing from the selected topic section.
The Topics panel, where AI-generated topics help you navigate the recording.
View Transcript
The transcript provides a time-stamped text version of the session that you can read alongside the recording. Each entry includes the speaker’s name and the time the text was spoken.
To view the transcript:
-
Select the Transcript icon from the panel toggles on the right side of the player.
The Transcript panel opens and displays the time-stamped transcript. -
(Optional) Use the Search box to find specific words or phrases within the transcript.
To navigate to a specific part of the recording, select a transcript entry. The recording jumps to the corresponding timestamp and begins playback from that point.
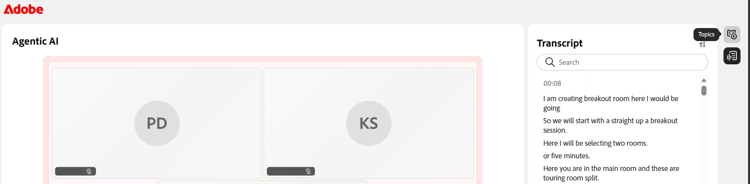
The Transcript panel, where each entry links to its point in the recording.
Change the Transcript text size
You can adjust the size of the transcript text to make it easier to read.
To change the text size:
-
In the Transcript panel, select the text size icon next to the Transcript heading.
-
Select a text size from the list. The available sizes are 12, 14, 16, 18, 20, 24, 30, and 36. The default size is 14. The transcript text updates to the selected size.
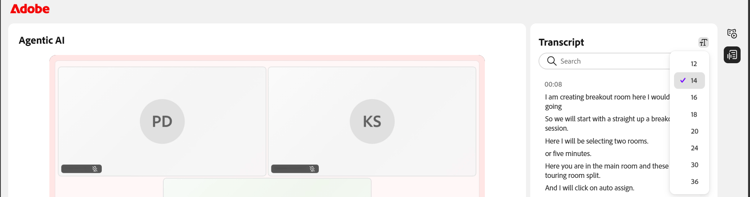
Choose a transcript text size to make entries easier to read.
Edit a recording
Editing a recording in Live Hub allows you to refine the content before sharing it with learners. You can trim the timeline to remove unnecessary sections and improve clarity. Edits do not change the original recording until you save them.
To edit a recording:
-
Navigate to Session Overview > Live hub > View recording and select Edit.
The recording opens in edit mode. -
(Optional) To rename the recording, select the edit (pencil) icon next to the recording title and enter a new name.
-
Select Edit timeline at the bottom of the recording player.
A draggable progress bar appears in the recording timeline. -
Position the marker on the progress bar to select the segment you want to remove.
-
Drag the marker or use the left and right arrow keys to move it precisely. A preview thumbnail and time stamp help you find the exact point.

Position the marker to select the timeline segment you want to remove. -
Select Cut selection. The selected section of the recording is removed.
-
(Optional) Use Undo or Redo to reverse or reapply an action or select Cancel to discard the current selection.
-
Select Save edits.
The changes are applied to your recording.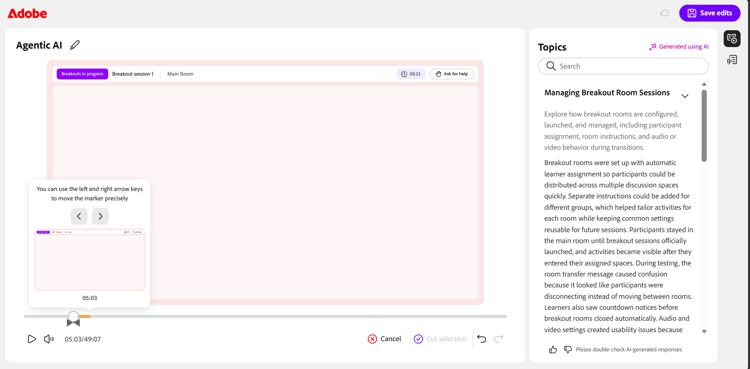
Once you cut a selection, Save edits become active so you can apply the change.
You can also edit a recording from the Session dashboard. See Components of the Session dashboard for more information.
Regenerate topics
When you edit the recording timeline, the existing topics no longer match the updated recording. You can regenerate the topics to keep them in sync with the new timeline.
To regenerate topics:
-
Select the Topics icon from the panel toggles on the right of the player.
The Topics panel appears. -
Select Regenerate.
A Generating topics message appears while the topics are being identified. Identifying topics might take some time.
After editing the timeline, use the prompt to regenerate topics in sync with the recording.
Revert to original
If you want to discard all edits and restore the recording to its original state, use the Revert to original option.
To revert to the original recording:
-
Select Revert to original icon at the top of the player.
A Revert to original confirmation pop-up appears.
The confirmation pop-up warns that reverting to the original cannot be undone. -
Select Revert. This undoes all changes made to the recording and transcript. This is an irreversible action and cannot be undone.
-
(Optional) Select Cancel if you do not want to revert.
Download a recording
You can download a recording to access it offline or share it outside the platform.
Downloading a recording is managed from the session dashboard. See Components of the Session dashboard for more information.