Best practices for using templates
Templates significantly reduce the time and effort required to generate new content by providing a starting point that includes pre-configured layouts and design elements.
Adhere to the following recommendations when using templates with GenStudio for Performance Marketing:
- Know about template elements
- Configure channel guidelines for effective personalization of content
- Design with accessibility standards for an optimal experience
- Follow channel-specific template guidelines
- When using Express templates, consider the specific tips under Express to GenStudio template best practices.
Learn the basics of template elements and procedures in Work with Templates. And deep-dive into customizing a template for specific instructions to use in your next campaign.
Use the right template elements
Each template type uses different elements to create a structure for channel-specific content creation. Familiarize yourself with the parts of a template and include the best elements for your content and template type.
When customizing your template, use the field names in place of these elements where you need GenStudio for Performance Marketing to generate content.
See Template elements.
Using placeholder text in templates
Placeholder text can help define syntax or structure for content to be filled in later in a template by a user. For example, {first_name}.{last_name}@email.etc. to define an email address. However, some common delimiters are already reserved for other meanings in GenStudio for Performance Marketing:
❌ < > - In use for HTML tags.
❌ {{ }} - In use for Handlebar expressions.
Use single brackets (whether straight or curly) to indicate placeholder text to avoid confusion with existing tags.
✅ {first_name} - Placeholder for first name.
Configure channel guidelines
Defining clear channel guidelines is essential to ensure that your generated content aligns with your brand’s requirements and objectives. Channel guidelines let you specify rules for elements like tone, length, and style used in your template. For example, you can set a maximum character count for the body or require a specific call-to-action style. By setting these guidelines in advance, you reduce the need to write out detailed instructions in each AI prompt, streamlining the content generation process and ensuring consistency across your emails.
Review and define your Brand’s channel guidelines for all key fields in your template. If you don’t define guidelines, then the default channel guidelines are applied, which may not fully reflect your brand requirements.

Learn how Brands, Products, and Personas guidelines influence generated content and how to tailor them for your marketing goals.
Uploading images for templates
Images used in templates should come from the content repository, and need to be uploaded correctly to ensure the image is displayed accurately.
When a template features an edge-to-edge (full bleed) image, the selected image is automatically resized to fit the full template dimensions. However, if the image doesn’t match the template aspect ratio, the image is cropped to fit the template dimensions and may not display as expected.
There’s no “autofit” functionality for images included in templates.
To resolve image cropping, users must define the aspect ratio of the image to be used in the template when it’s uploaded to the content repository. When uploading an approved template:
-
Proceed through the template upload process until you reach the Add details page.
-
Define the aspect ratio of the image to be used in the template in Ad width (px) and Ad height (px). This will define the image window for the section of the template displaying the image.
-
In the More details section, select the Image size dropdown and choose Crop to a fixed size.
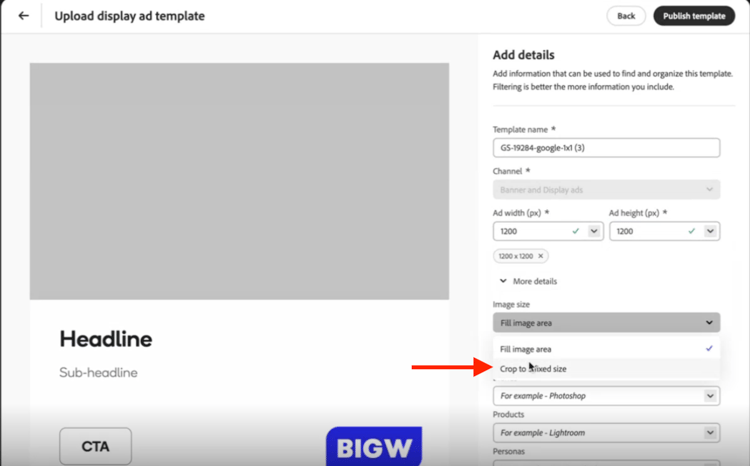
To determine an image’s size and aspect ratio in browser:
-
Inspect the image.
- On Windows/Linux:
- Press F12.
- On macOS:
- Press Command + Option + I.
- On Windows/Linux:
-
Hover over the image.
-
Note the aspect ratio. Use this to define the aspect ratio of the image in the template.
When these details are not applied during upload, the image is assumed to be the entire aspect ratio of the template and images that don’t match that aspect ratio exactly will appear cropped.
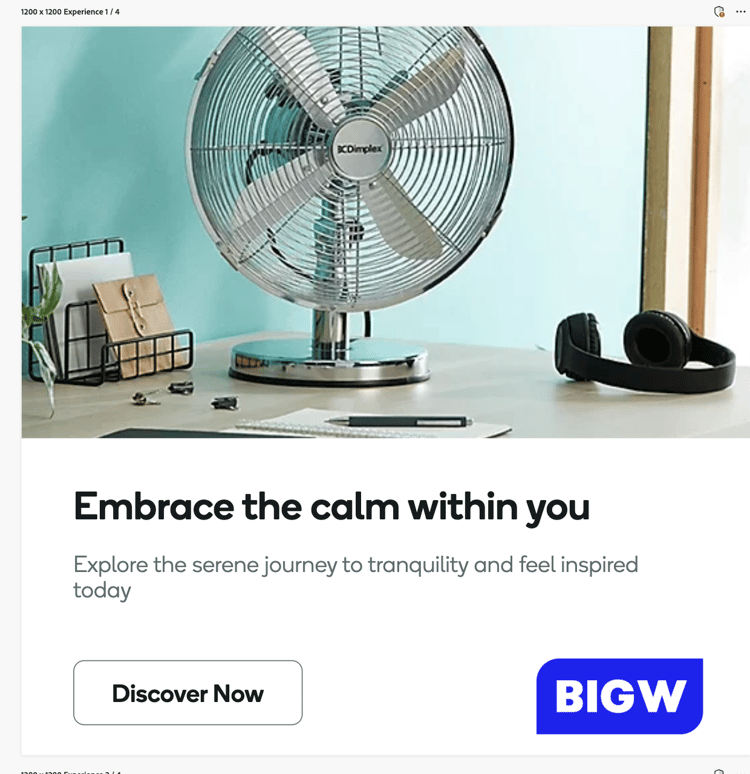
❌ Cropped image in a display ad template
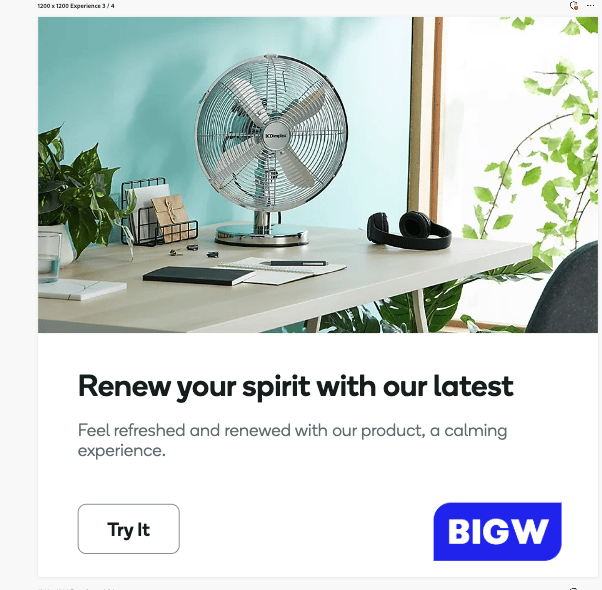
✅ Image fully displayed
Follow channel-specific template guidelines
When creating templates, ensure they meet the specific requirements of the intended channel. Build templates that accommodate the layout and visual requirements for each channel. There are general guidelines that apply to any template, such as:
- Use clean and responsive HTML and inline CSS
- Use Adobe or Google fonts
- Do not use JavaScript
backdrop-filter filter effect (blurring, brightness, contrast). If your template uses these properties, they may not appear as expected in the exported content.See further tips and constraints when working with each template type to ensure optimal performance:
Express to GenStudio template best practices
The following tips help you get reliable results when you convert designs from Adobe Express into templates for GenStudio for Performance Marketing.
Use Multi-variation templates
In Adobe Express, pages can represent multiple size or aspect ratio variations in one template file.
When you select the template in GenStudio for Performance Marketing, all variations appear in the canvas.
This behavior improves on HTML templates, which support only one variation per file.
Locking fields to control what marketers can edit
Use locking to communicate intent. For example, lock a legal disclaimer so it is never AI-generated, but leave a headline flexible for generation.
Right-click any element in Adobe Express to set lock behavior:
- Full lock — The element is static, and AI does not generate content for it.
- Lock, allow image replace — Locks size and position but lets users swap the image. This option works well for logos.
- Lock, allow text replace — Locks size and position but lets users edit text. AI does not auto-generate content for it.
- Fully flexible (unlocked) — Users can move and resize the element, and AI treats it as content to generate.
Name layers for better AI mapping
When you convert a design to a template, AI scans the design and maps fields such as headline, CTA, and body copy. AI maps simple templates accurately more often than highly complex layouts.
Best practice: In placeholder copy, include the intended field type (for example, headline, sub-headline, or CTA) to help the AI map fields correctly. This approach can reduce mapping errors.
Convert to template
-
In Adobe Express, click Share > Convert to Template.
-
Only the Info tab and Locks tab carry over to GenStudio for Performance Marketing.
-
At conversion time, choose how unlocking works:
- Allow users to unlock
- Prevent all unlocking
- Set a passphrase — A middle ground that discourages casual changes without blocking access permanently.
Keep a copy of the original design file
Converting creates a separate Adobe Express template file, however the original design file stays editable.
Tip: Keep the original so you can revise the design, create variations, and generate new templates later.
Share for greater visibility
After conversion, the template is visible only to you by default. You can share it with individuals or with the whole organization.
Requirement: Adobe Express and GenStudio for Performance Marketing must use the same IMS organization for templates to sync. Templates usually appear in GenStudio for Performance Marketing almost immediately after conversion.
Control AI field mapping
After you select a template, AI maps fields once per template, assigning labels such as primary media, generated, or locked. You can adjust mappings manually when AI assigns fields incorrectly.
Use the Enable generation toggle per field to turn on or off before you generate. You can adjust mappings manually when AI assigns fields incorrectly. Permanent corrections to template mappings are planned for a future release.
Design in Adobe Express, assemble in GenStudio for Performance Marketing
Consider these design workflows to utilize each service at its best:
- Complete design work such as colors, layouts, and graphics in Adobe Express.
- Use GenStudio for Performance Marketing to assemble and generate content from those templates.
- Use Adobe Express brands (colors, logos, fonts, and graphics) for design governance.
- Use GenStudio for Performance Marketing brands for font color changes after generation.
Email limitations
Email is not supported on the Horizon Canvas for the Adobe Express template workflow. Email continues to use the traditional HTML template process.
Take advantage of custom fonts
Teams often ask how custom fonts work with Adobe Express templates. Admins may need to accept the Custom Fonts qualifying offer in the admin console before those fonts are available; see Using Adobe Express templates.