Connect your Salesforce account to Experience Platform using the UI
Read this guide to learn how to connect your Salesforce account and bring your CRM data into Adobe Experience Platform using the Experience Platform user interface.
Getting started
This tutorial requires a working understanding of the following components of Experience Platform:
-
Experience Data Model (XDM) System: The standardized framework by which Experience Platform organizes customer experience data.
- Basics of schema composition: Learn about the basic building blocks of XDM schemas, including key principles and best practices in schema composition.
- Schema Editor tutorial: Learn how to create custom schemas using the Schema Editor UI.
-
Real-Time Customer Profile: Provides a unified, real-time consumer profile based on aggregated data from multiple sources.
If you already have an authenticated Salesforce account, you may skip the remainder of this document and proceed to the tutorial on configuring a dataflow for CRM data.
Configure your Salesforce connected app
Before connecting Salesforce to Adobe Experience Platform, ensure that the Salesforce connected app you use for authentication includes the OAuth scope Manage user data via APIs (api). This scope is required for Experience Platform to access data from Salesforce. If this scope is missing, authentication may fail.
- For more information on authentication, read the Salesforce authentication guide.
- For more information on available OAuth scopes, read the Salesforce OAuth scope documentation.
Gather required credentials gather-required-credentials
The Salesforce source supports authentication via OAuth2 Client Credential.
https://[domain].my.salesforce.com.52, then you must input the value as 52.0. If this field is left blank, then Experience Platform will automatically use the latest available version.false.For more information on using OAuth for Salesforce, read the Salesforce guide on OAuth Authorization Flows.
Connect your Salesforce account
In the Experience Platform UI, navigate to Sources from the left menu to open the Sources workspace. Use the catalog on the left to browse categories, or use the search bar to quickly find the source you want to connect.
Select Salesforce under the CRM category, and then select Add data.

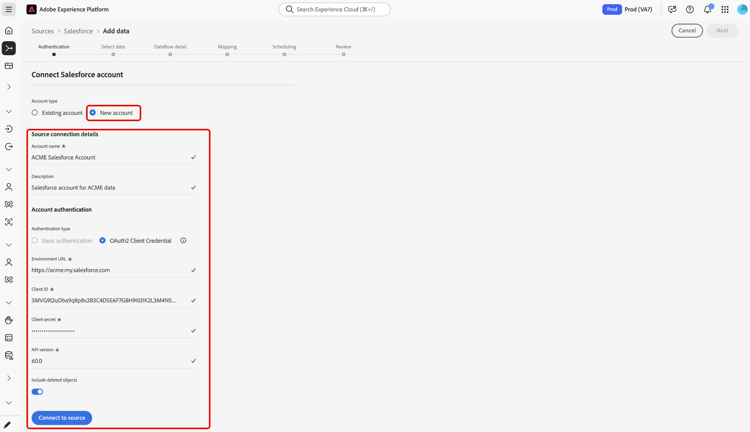
The Connect to Salesforce page appears. On this page, you can either use new credentials or existing credentials.
Use an existing account
To use an existing account, select Existing account and then select the account that you want to use from the list that appears. When finished, select Next to proceed.

Create a new account
To create a new account, select New account and provide a name and a description for your new Salesforce account.
For OAuth 2 Client Credential, select OAuth2 Client Credential and then provide values for the following credentials:
- Environment URL
- Client ID
- Client secret
- API version
- Include delete objects
api). If this scope is missing, authentication can fail when Experience Platform attempts to read data from Salesforce.When finished, select Connect to source.
Connect to Salesforce on AWS aws
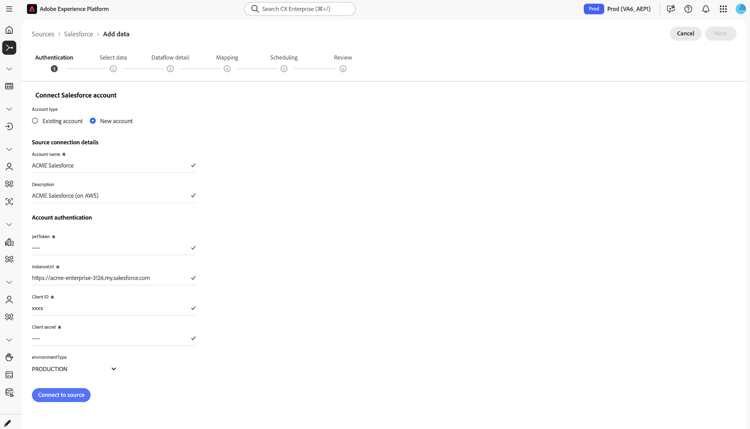
Follow the steps below to connect a Salesforce account on Amazon Web Services (AWS) using OAuth 2.0 JWT Bearer authentication.
To create a new account, select New account and provide a name and a description for your new Salesforce account, then provide values for the following credentials:
jwtTokeninstanceUrl- Client ID
- Client secret
To connect to a Sandbox org instead of a Production org, select SANDBOX from the environmentType dropdown. If you do not select a value, Experience Platform defaults to PRODUCTION. For more information on Sandbox support, read the section on connecting to a Production or Sandbox org.
environmentType and instanceUrl point to. For information on setting up a Connected App on AWS, read the Salesforce AWS setup guide.When finished, select Connect to source.
Skip preview of sample data skip-preview-of-sample-data
During the data selection step, you may encounter a timeout when ingesting large tables or files of data. You can skip data preview to circumvent the timeout and still view your schema, albeit without sample data. To skip data preview, enable the Skip previewing sample data toggle.
The rest of the workflow will remain the same. The only caveat is that skipping data preview may prevent calculated and required fields from being auto-validated during the mapping step, and you will then have to manually validate those fields during mapping.
Next steps
By following this tutorial, you have established a connection to your Salesforce account. You can now continue on to the next tutorial and configure a dataflow to bring data into Experience Platform.