Barcode Component in Interactive Communication Editor
aem-forms-ea@adobe.com to request access.1. Introduction
The Barcode component in the Interactive Communication editor enables authors to visually represent encoded data within communication templates. This is particularly useful for applications that involve tracking, identification, billing, or automation. With support for various barcode standards like Code 128, QR, and more, this component offers flexible styling, positioning, and data binding options to suit a wide range of business needs.
Whether you’re creating customer invoices, shipping labels, or membership cards, the Barcode component simplifies the process by embedding machine-readable data directly into your document.
2. Properties
The Barcode component comes with a comprehensive set of configurable options to control its behavior and appearance:
2.1 Basic Field
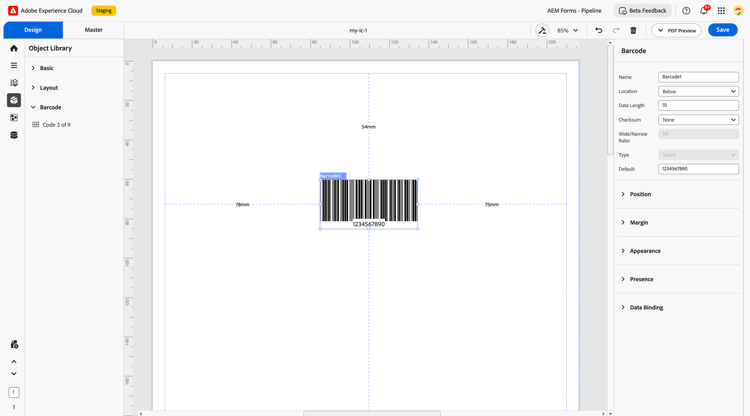
Name: A unique identifier for the barcode. It’s used to reference the component in data models and rule sets.
Location: Specifies where the barcode text is displayed relative to the barcode symbol.
Options:
-
None: Hides the text.
-
Above: Displays the text above the barcode.
-
Below: Displays the text below the barcode.
-
Above Embedded: Embeds the text within the top area of the barcode.
-
Below Embedded: Embeds the text within the bottom area of the barcode.
-
Type: Specifies the barcode standard (e.g., Code 128, Code 39, QR Code, etc.).
-
Default: A predefined value that appears if no data is provided.
-
Data Length: Indicates the expected or maximum number of characters the barcode can hold.
-
Checksum: Validates barcode data for accuracy.
-
Options:
-
None: No checksum validation.
-
Auto: Automatically calculates checksum based on the type.
-
-
-
Wide/Narrow Ratio: Defines the relative width of the wide bars to the narrow ones (used in some 1D barcodes).
2.2 Location
Determines where the barcode appears in relation to the content:
-
None: No additional positioning.
-
Above: Places the barcode above the related content.
-
Below: Places the barcode below the content.
-
Above Embedded: Barcode is embedded and floats above the content.
-
Below Embedded: Embedded below content.
2.3 Position
Defines the exact placement of the barcode within the layout:
-
X and Y Coordinates: Position the barcode within the form using millimeter units.
-
Height and Width: Set the physical dimensions of the barcode.
2.4 Margin
Adds spacing around the barcode for better visual separation:
-
Top
-
Bottom
-
Left
-
Right
These margins help with layout consistency and readability.
2.5 Appearance
Customize the barcode’s visual style:
-
Fill: Background color of the barcode area.
-
Stroke: Border color.
-
Width: Defines the thickness of the barcode lines.
-
Style: Choose from presets like flat, bordered, or elevated.
-
Edges: Decide between rounded or sharp corners for the barcode box.
2.6 Presence
Controls whether the barcode is shown or hidden at runtime:
-
Visible: Barcode is shown in the final output.
-
Hidden: Space is reserved but the barcode is not displayed.
2.7 Data Binding
Data Binding: Connects the barcode to a backend data model (XML or JSON). This ensures the barcode dynamically reflects unique data per document instance, such as an order ID or tracking number.
3. Usage
The Barcode component is particularly helpful when automating processes that rely on scanned data. It can be added to communication templates such as:
-
Invoices (for customer reference and quick scan payments)
-
Shipping Labels (for package tracking)
-
Membership or Loyalty Cards (for scan-based identification)
-
Coupons and Vouchers (for validation at point of sale)
Authors can embed the barcode in layout containers and style it according to the brand or document theme.
4. Best Practices
-
Use an appropriate barcode type for the use case—e.g., QR Code for URLs, Code 128 for alphanumeric IDs.
-
Validate barcode readability by printing test versions and scanning them.
-
Ensure data integrity using the checksum option if the barcode standard supports it.
-
Choose readable sizes and line widths to avoid scanning issues.
-
Maintain adequate margins to prevent clipping when printed.
The Barcode component in the Interactive Communication editor empowers document creators to bridge the gap between digital and physical systems. When implemented effectively, it enhances automation, improves user convenience, and supports seamless integration with scanning devices and workflows.