[AEM Assets]{class="badge positive" title="Applies to AEM Assets)."}
Dynamic Media Journey: The Basics, part II dm-journey-part2
-
Are you new to Dynamic Media? For a quick, high-level overview of Dynamic Media, see Work with Dynamic Media.
-
Follow Dynamic Media Best Practices to get the most value.
-
Try out Dynamic Media image capabilities with the Snapshot tool.
-
Ensure smooth video playback with adaptive video.
-
Automate cropping of images with Smart Crop.
-
Automate cropping of videos with Smart Crop.
-
Deliver an interactive 3D-powered experience.
-
Other Dynamic Media resource bank.
Welcome to Dynamic Media Journey: The Basics, Part II, where you can expect to learn the following:
- Anatomy of a Dynamic Media URL and how Dynamic Media delivers content.
- Fundamentals of creating image presets to render assets.
- Image sets, spin sets, and mixed media sets.
See also Dynamic Media Journey: The Basics, Part I.
Anatomy of a Dynamic Media URL and how Dynamic Media delivers content dm-journey-d
After your Dynamic Media assets are uploaded and published, you can copy an asset’s generated URL and paste it into your browser to see how the asset appears to a customer. The following copied URL for a watch image breaks down by color to make it easier to read and understand.
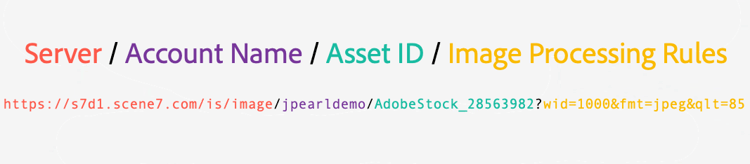
Structure of a Dynamic Media URL.
The first part of the URL in red is referencing the server domain itself. In this case, Dynamic Media is running on a generic server domain, which is https://s7d1.scene7.com/is/image/. You can easily identify if Dynamic Media serves a set of images by checking the server domain. The URL structure is consistent. There are, however, some Dynamic Media customers that have switched over to a dedicated server domain where it is name-of-your-company.scene7.com. A dedicated server domain is required for Smart Imaging.
The account name is the portion in purple. In this case, the account is called jpearldemo.
The asset ID or name, AdobeStock_28563982 is in green. Notice that the asset has no file extension such as .png or .jpg. When assets are ingested into Dynamic Media, the file extension is stripped out and a different kind of file is created: a pyramid-TIFF file. The pyramid-TIFF allows Dynamic Media to create renditions quickly on-the-fly.
And finally, there are some image processing parameters, ?wid=1000&fmt=jpeg&qlt=85, shown in yellow on the end.
The entire URL path is live. Try it.
With your browser window still open to the Dynamic Media URL and the watch image, look at how you can create renditions of the image by changing the URL.
Rendering the watch image through the URL
Begin by manually deleting only the image processing rules in the URL path; leave the server name, account name, and the asset ID or image name. Try it.
Now add an image processing parameter to the end of the URL. In the URL field, to the right of the image name, type ?wid=500, then press Enter. Try it.
Notice that a new rendition of the watch is generated. A key takeaway to understand from this simple exercise of changing the image’s width is that the image seen is generated 100% dynamically.
Now change the width value of 500 pixels to 1000 pixels, and then press Enter. Try it.
The moment you press Enter, the browser goes back to the Dynamic Media Image Server. It generates a rendition of the watch, based on the new width value you entered, then delivers the image to the browser and caches it.
Dynamic Media has numerous image processing parameters that you can use to fine-tune your image assets on web pages. You can see a list of them here.
Now try adding a rotation parameter to the watch image. At the end of the URL path, immediately following wid=1000, type &rotate=90, and then press Enter. Try it{target=“_blank”}.
The watch is still slightly skewed to the left. Change the rotate value of 90 to 92, and then press Enter. Try it.
Again, the moment you press Enter, a new rendition of the watch generates immediately. You can see the performance levels, which explains why Dynamic Media can deliver more than 800,000 image requests, per second, during high-traffic periods.
Changing image processing parameters in a URL on an image-by-image basis is inefficient, especially for websites with thousands of images. A much better approach is using image presets.
Fundamentals of creating image presets to render assets dm-journey-e
There are multiple ways to create an image. You want to have an image available. Traditionally, a creative professional goes into Adobe Photoshop, and saves each of these different renditions as static images.
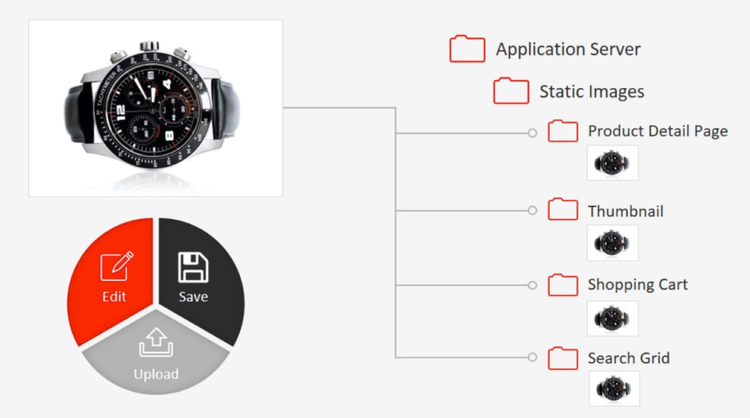
Good: static images, each one manually created.
Now imagine the creative lead looks at the images and says,
“I really wanted this shot so that the large hand is pointing at the four, and the small hand is pointing at the 1 to make the watch dial easier to see.”
The creative reshoots all new static images.
But, with Dynamic Media, if you have different image presets, you can use those images wherever you need them. The image presets enforce standards.
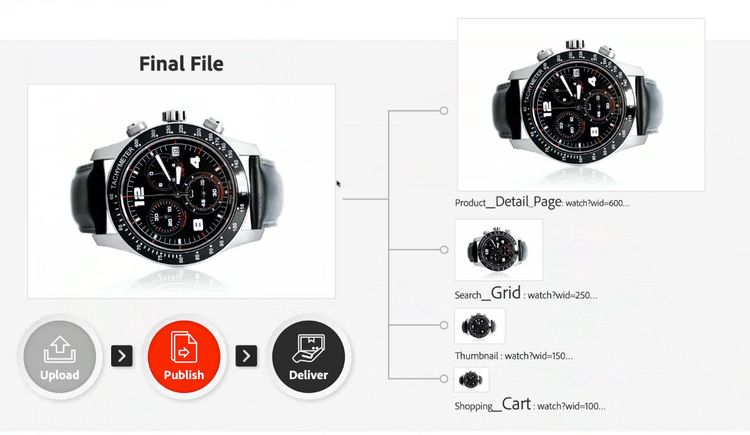
Best: one file with multiple renditions created on the fly using image presets, such as Search_Grid and Thumbnail.
Every place that you need to have a particular type of image, for example,
- a product detail page,
- search grid,
- thumbnail,
- shopping cart, or
- hero image
You want that image delivered with the same parameters wherever they are used.
For a moment, let’s look at how an image preset is created in Dynamic Media.
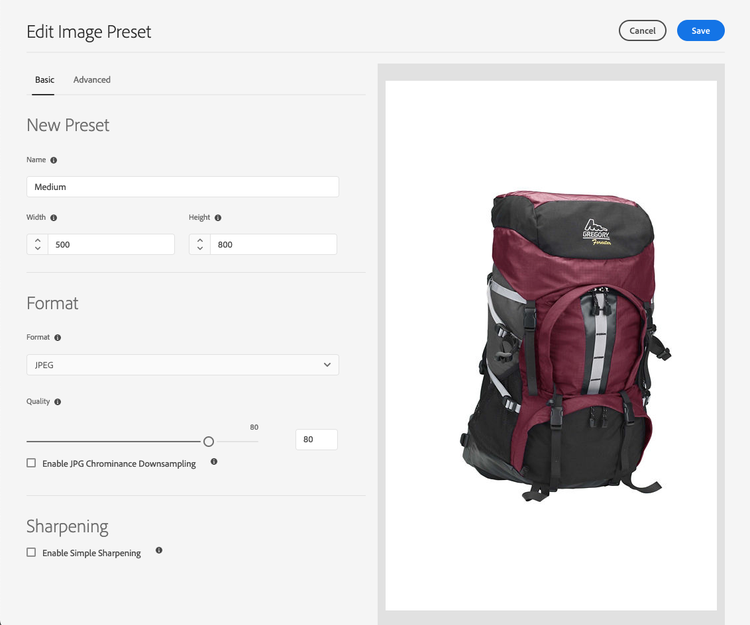
Creating an image preset starting with the Basic tab.
In the example above, you can see that a new image preset was created with the name Medium. Dynamic Media uses an example, out-of-the-box image – the backpack – to help you see characteristics of the image preset as you create it.
The Medium image preset has a width of 500 pixels and a height of 800 pixels. In Part I of this Journey, you read about delivering assets in different formats. From the Format pull-down menu, you can choose to deliver assets as JPEG, PNG, TIFF, or several other formats. You have flexibility here.
Selecting the Advanced tab gives you options for the asset’s color space. Depending on the format selected in the Basic tab, you can deliver assets in RGB, Grayscale, or CMYK. Use the Color Profile pull-down menu to select how to deliver a CMYK image asset for print. Notice, too, that there are additional parameters you can apply for sharpening your images. In this case, Unsharp Mask was applied.
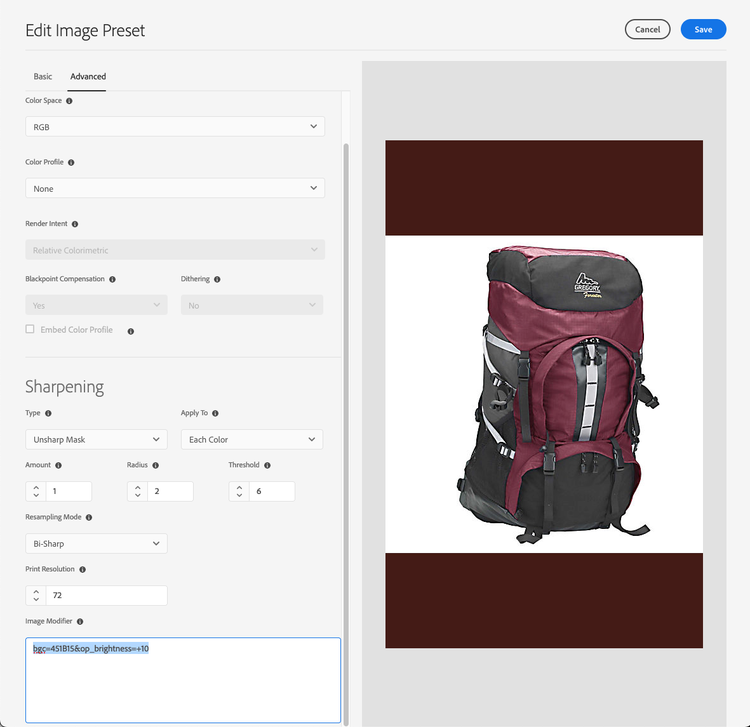
Creating an image preset by selecting options from the Advanced tab.
You recall in Structure of a Dynamic Media URL earlier, that you read about the Dynamic Media URL and how that is built. The Image Modifier text box is where you can type any additional image processing parameters that you want. The parameters get included in the preset name of the URL when your images are delivered, using the preset. In the screenshot above, the parameter bgc=451B15 was added. That is, a dark brown background color was added.
You can think of an image preset as a configuration for your images. It delivers any images that use the preset consistently every time; it is the same. The parameter &op_brightness=+10 was also added to increase the brightness slightly.
When you are finished, you save the preset, and now it is available for all images that you have. In this case, you want to apply the Medium image preset to an image of a bowl of liquid chocolate.
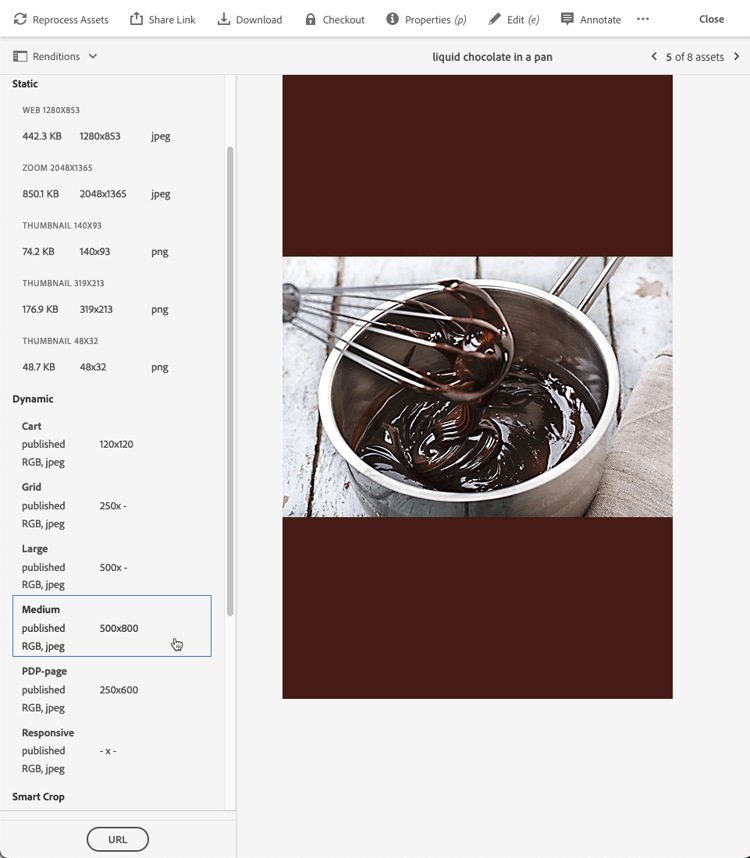
To generate a rendition of an image, apply the image preset Medium.
To check the appearance of the image, copy the URL and paste it into your browser. Try it.
In your browser, notice the name of the image preset Medium in the full URL path.
You can see the kind of clarity that is displayed in the image. That quality is partially due to the way the bowl of chocolate was shot. Also, it’s partially because with Dynamic Media, you can store larger images than what is being delivered to digital channels.
If everything looks satisfactory for your bowl of chocolate, you paste the URL into your web pages where you want the image to appear on your website.
If you look again at the watch image below, you can see that there is a Cart image preset, a Grid preset, a Large preset, a PDP-page (Product Detail Page) preset, and several others.
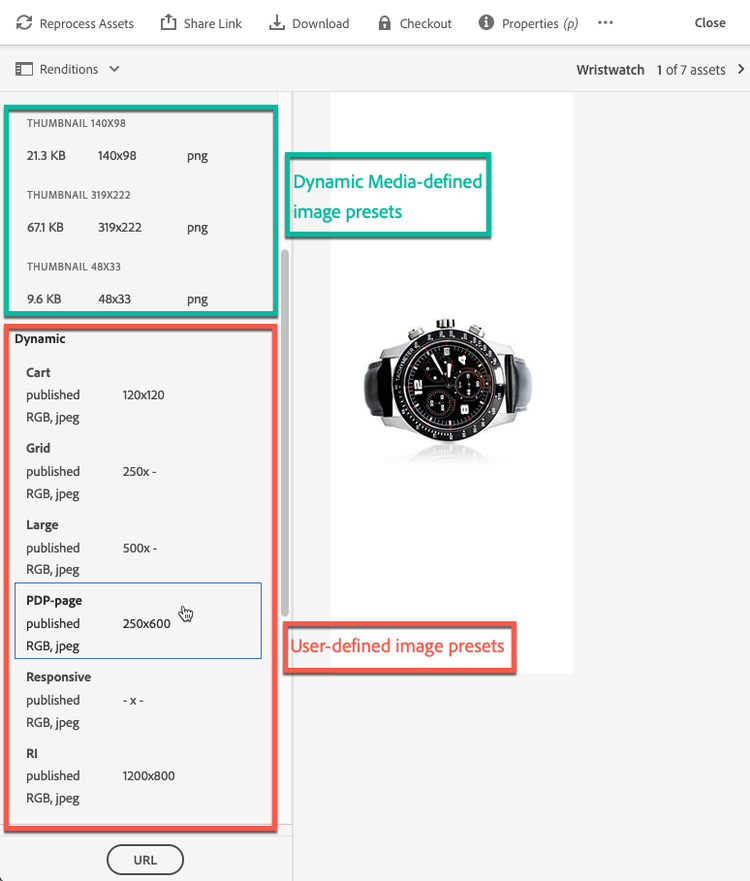
Static and Dynamic image presets. The watch image was rendered using the PDP-page image preset.
But what if you have to change an image on your website? For example, suppose you have done some testing, and found that the image of 120 x 120 (the Cart image preset) is not being perceived as you thought. Increase the image size by increasing the width to 175 pixels and the height to 175 pixels. Traditionally, you go into Adobe Photoshop and re-create all of those cart images. But with Dynamic Media, you edit the image preset by updating the Width and Height values to 175 and save your preset, as seen in the example below.
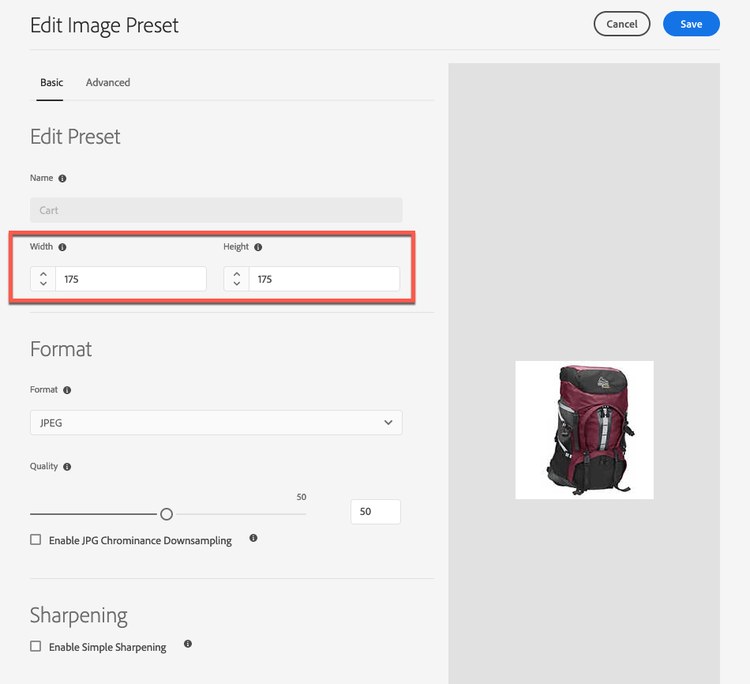
Editing the Width and Height of the Cart image preset.
After you change your image preset, and clear the cache, all the images get updated, and all the URLs that are being used with that preset, do not change anywhere. That means no broken links and no webpage redirects are necessary.
Image sets, Spin sets, and Mixed Media sets dm-journey-f
Some of the more popular uses of Dynamic Media are the ability for you to create Image sets, Spin sets, and Mixed Media sets.
Image sets are typically made up of a series of image assets that are presented as a single entity. These kinds of sets give users an integrated viewing experience, where users can see different views of an item by clicking a thumbnail image. Image sets let you present alternative views of something and the viewer offers zooming tools for examining images closely. View an image set called “Running” that uses the Flyout viewer.
Here inside Dynamic Media you can see several images of running shoes. It is a product line series that sales and marketing want customers to view as a single presentation: an image set.
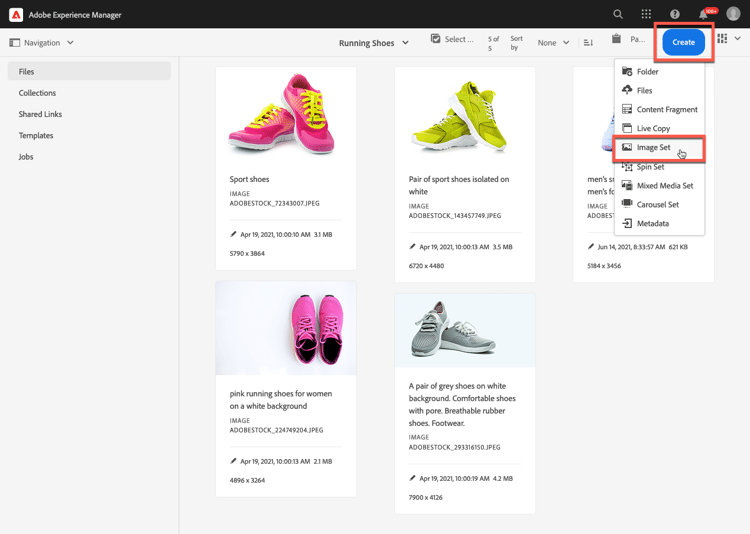
The start of creating an Image set.
To create the Image set, you choose Image Set from the Create pull-down menu. Notice on the menu that there are also options to create a Mixed Media Set, a Spin Set, and a Carousel Set. You create those sets in much the same way as an Image set.
A Mixed Media set can contain images, swatch sets, spin sets, videos, and Adaptive Video sets. Try it. A Spin set lets users rotate an object to examine it. Spin sets make it possible to view key visual details from any angle. Try it.
Creating an Image set is straightforward. You add the image assets that you want to include in the set.
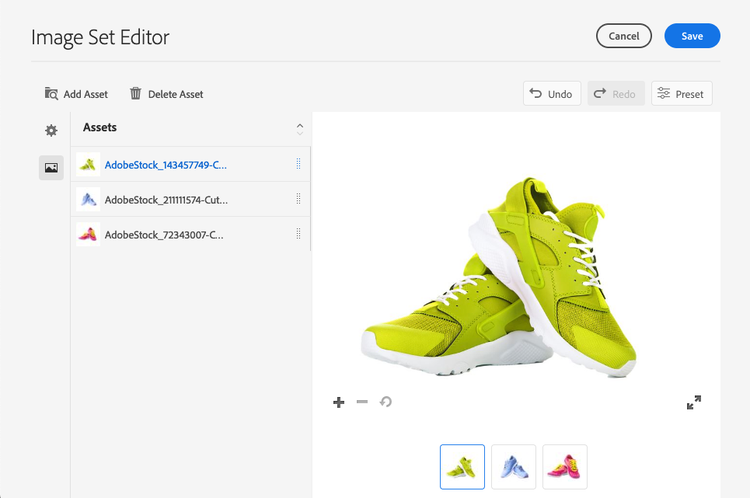
The Image Set Editor lets you add image assets and reorder their appearance in the set.
You are required to give the set a name. Choose the name carefully because you cannot edit it later! In the example above, the set is called Running. When you are done, you save the set.
And here is the Running Image set in Experience Manager Assets.
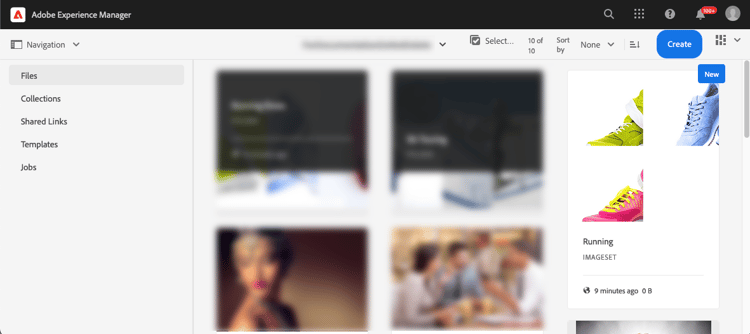
The Running Image set in Experience Manager Assets, Card View.
After you create an Image set, Mixed Media set, Spin set, or other interactive media, preview how it appears and behaves for a customer. Dynamic Media has numerous built-in viewers that let you do that.
You begin by selecting the image set to open it in a preview, as the following example shows.
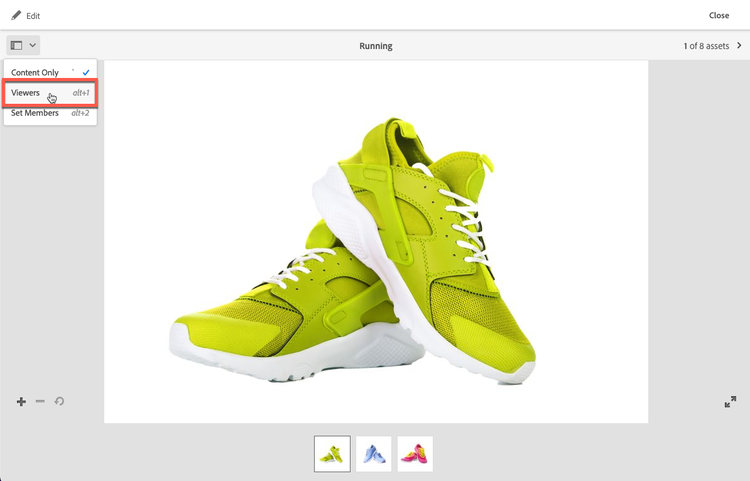
The Running Image set in preview with Viewers option selected.
Notice in the preview that you can select the running shoe swatches and zoom in and out on the shoes. To apply a viewer to the set, you select Viewers from the pull-down menu.
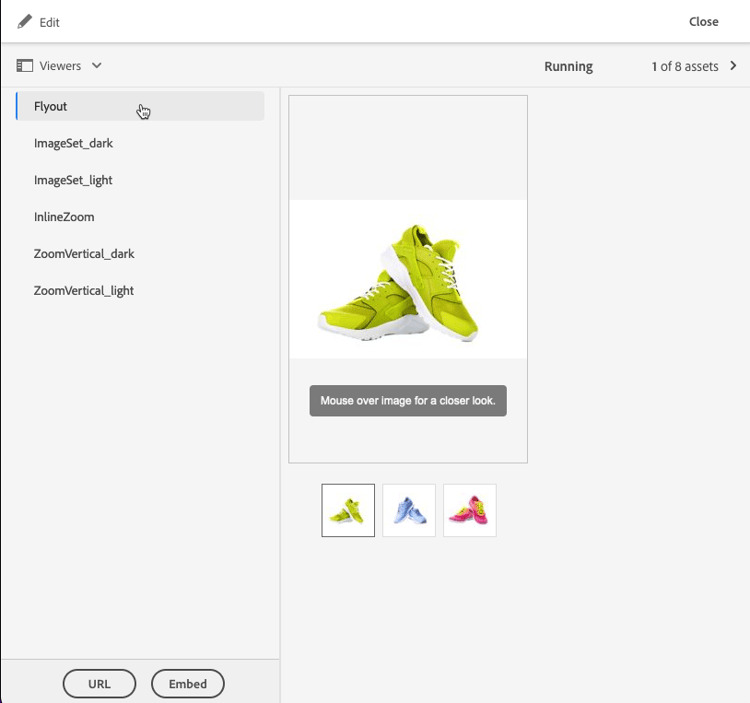
The Running Image set with the Flyout viewer applied to it.
In this case, the Flyout viewer was selected. At this point, you can preview the image set in the viewer. But, it is best to see it in your browser as a customer sees it. You select URL in the lower left, then copy the URL and paste it into your browser. Try it.
The single URL lets you use the image set and viewer where you need them on your website. You noticed in the previous example that Embed is to the right of the URL button. By selecting Embed, you can copy the code for this image set/viewer, and add it into a web page or an Experience Manager Sites component.
The Flyout viewer is a default, standard viewer whose properties you can edit. Or, like creating an image preset, you can create your own, custom viewer.
Now, suppose your sales and marketing team does not prefer the Flyout viewer. They like the zoom feature but they want customers to see the zoom effect directly over the shoes. In such a case, you apply the InlineZoom viewer to the image set, and copy and paste its URL into your browser to see how it behaves. Try it.
When you move the mouse pointer over the shoe, the image zooms in, and you can see more detail as you move the pointer. This zoom effect is due to the size of the image that was initially uploaded into Dynamic Media.
As you consider your role as a consumer, or as you work in your professional role, and as you visit different websites, you see examples of these features. Consider how that is being done, and how you can use the capabilities of Dynamic Media in your own work and on your company’s website.
You read about image sets and viewers. Let’s look at a couple of other viewers and try them out on single assets. To reset the viewer, click the Refresh button in the lower-left corner.
Optional - Learn more
To learn more about what you read, use the materials below to explore concepts in greater detail. Otherwise, your Dynamic Media Journey is complete!
Dynamic Media tutorials
- Use Dynamic Media with Experience Manager Assets
- Adobe Experience Manager content library (search on Dynamic Media)
Dynamic Media viewers
- Live Demos of each viewer