Tutorial: Create an adaptive form do-not-publish-tutorial-create-an-adaptive-form

This tutorial is a step in the Create Your First Adaptive Form series. It is recommended to follow the series in chronological sequence to understand, perform, and demonstrate the complete tutorial use case.
About the tutorial about-the-tutorial
Adaptive forms are new-generation forms that are dynamic and responsive. You can use Adaptive forms to deliver personalized experiences. You can also integrate adaptive forms with Adobe Analytics for usage statistics and Adobe Campaign for campaign management. For more information about adaptive forms capabilities, see Introduction to authoring adaptive forms.
It is easier to create and manage forms when a proper process is followed. In this article, you learn how to:
You will have a form similar to the following by end of article: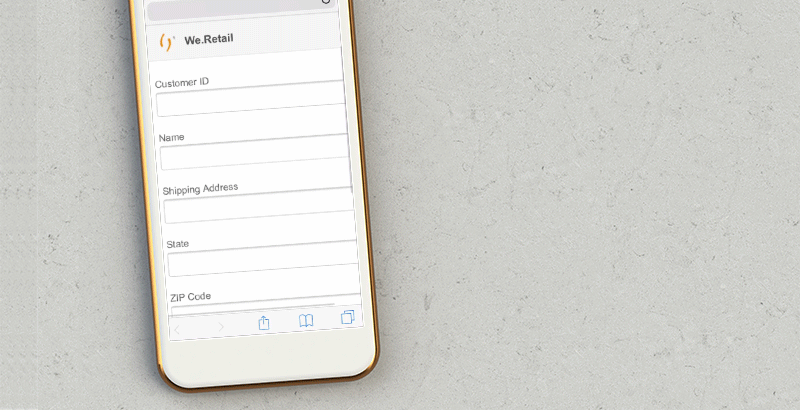
Step 1: Create the adaptive form step-create-the-adaptive-form
-
Log in to the AEM author instance and navigate to Adobe Experience Manager > Forms > Forms & Documents. The default URL is http://localhost:4502/aem/forms.html/content/dam/formsanddocuments.
-
Select Create and select Adaptive Form. An option to select a template appears. Select the Blank template to select it and select Next.
-
An option to Add Properties appears. The Title and Name fields are mandatory:
- Title: Specify
Add new or update shipping addressin the Title field. The title field specifies the display name of the form. The title helps you identify the form in the AEM Forms user interface. - Name: Specify
shipping-address-add-update-formin the Name field. The Name field specifies the name of the form. A node with the specified name is created in the repository. As you start typing a title, value for the name field is automatically generated. You can change the suggested value. The name field can include only alphanumeric characters, hyphens, and underscores. All the invalid inputs are replaced with a hyphen.
- Title: Specify
-
Select Create. An adaptive form is created and a dialog to open the form for editing appears. Select Open to open the newly created form in a new tab. The form opens for editing. It also displays the sidebar to customize the newly created form according to the needs.
For information about adaptive form authoring interface and available components, see Introduction to authoring adaptive forms.

Step 2: Add header and footer step-add-header-and-footer
AEM Forms provides many components to display information on an adaptive form. Header and Footer components help provide a consistent look and feel to a form. A header typically includes the logo of a corporation, the title of the form, and summary. A footer typically includes copyright information and links to other pages.
-
Select


-
Select Logo. The toolbar appears. Select


-
Select Image. The toolbar appears. Select

You can select Get file to download the logo used in this article if you do not have one.
-
Drag the Footer component from

Step 3: Add components to capture and display information step-add-components-to-capture-and-display-information
Components are building blocks of an adaptive form. AEM Forms provides many components to capture and display information in an adaptive form. You can drag the components from
-
Drag the Numeric Box component to the adaptive form. Place it before the footer component. Open properties of the component, change Title of the component to
Customer ID, change Element Name tocustomer_ID, enable the Required Field option, enable the Use HTML5 Number Input Type option, and select -
Drag three Text Box components to the adaptive form. Place these before the footer component. Set the following properties for these text boxes.:
table 0-row-4 1-row-4 2-row-4 3-row-4 4-row-4 html-authored no-header Property Text Box 1 Text Box 2 Text Box 3 Title Name Shipping Address State Element Name customer_Name customer_Shipping_Address customer_State Required Field Enabled Enabled Enabled Allow multiple lines Disabled Enabled Disabled -
Drag a Numeric Box component before the footer component. Open properties of the component, set values listed in the below table, Select
table 0-row-2 1-row-2 2-row-2 3-row-2 4-row-2 5-row-2 Property Value Title ZIP Code Element Name customer_ZIPCode Maximum Number of Digits 6 Required Field Enabled Display Pattern Type No Pattern -
Drag an Email component before the footer component. Open properties of the component, set values listed in the below table, and select
table 0-row-2 1-row-2 2-row-2 3-row-2 Property Value Title Email Element Name customer_Email Required Field Enabled -
Drag an File Attachment component before the footer component. Open properties of the component, set values listed in the below table, and select
table 0-row-2 1-row-2 2-row-2 3-row-2 html-authored no-header Property Value Title Government approved address proof Element Name customer_Address_Proof Required Field Enabled -
Drag a Submit Button component to the adaptive form. Place it before the footer component. Open properties of the component, change Element Name to
address_addition_update_submit, select
Step 4: Configure submit action for the adaptive form step-configure-submit-action-for-the-adaptive-form
A submit action is triggered when a user taps the Submit button on an adaptive form. You can use a submit action to save form data to the local repository, send form data to a REST endpoint, send form data as an email, and more. Adaptive forms provides a few more out-of-the-box submit actions. For detailed information, see Configuring the Submit action.
Using the following steps, you can configure email submit action and demo submit action of the form:
-
Configure the email server. For details, see Configuring Email Notification.
-
Select Form Container in the Content browser and select
-
Go to Submission > Submit Action. Select Send Email. Specify the following values and select
table 0-row-2 1-row-2 2-row-2 3-row-2 4-row-2 5-row-2 Property Value From donotreply@weretail.comTo ${customer_Email}Subject Acknowledgement: You have added shipping address on We.Retail website. Email Template Hi ${customer_Name}, The following address is added as the shipping address for your account:${customer_Name},${customer_Shipping_Address},${customer_State},${customer_ZIPCode}
Regards, We.RetailInclude attachments Enabled Your form is ready. Now, you can preview the form and test the functionality. If you have used the name mentioned the tutorial and accessing the form on the machine running AEM Forms server, then the form is available at http://localhost:4502/editor.html/content/forms/af/shipping-address-add-update-form.html.
Step 5: Preview and submit the adaptive form step-preview-and-submit-the-adaptive-form
You can use the Preview option to evaluate appearance and behavior of a form. You can submit a form in preview mode and also check validations applied on a form. For example, if an error is displayed when a mandatory field is left empty.
Adaptive forms also provide an option to Emulate experience of a form for various devices. For example, iPhone, iPad, and Desktop. You can use both Preview and Emulator

- Select the Preview option on the right side of the form editor. The form opens in the preview mode. If you have used the name mentioned the tutorial, then preview URL of the form is http://localhost:4502/content/dam/formsanddocuments/shipping-address-add-update-form/jcr:content?wcmmode=disabled
- Use
- Fill out fields of the form and select Submit. The form is submitted and you are redirected to default Thank You page. You can also specify a custom thank you page. For details, see Configuring redirect page.
The adaptive form to add an address is ready. If you have used the name mentioned in the tutorial and accessing the form on the machine running AEM Forms server, then the form is available at http://localhost:4502/editor.html/content/forms/af/shipping-address-add-update-form.html.