Stream a profile
API overview
It’s important to understand the structure of the API when streaming data into the Adobe Experience Platform in raw form so you can easily re-create it regardless of what dataflow you create. Below is an example of the basic structure of the call using cURL
Sample Request (raw data)
curl --location '' \
--header 'Content-Type: application/json' \
--header 'x-adobe-flow-id:  <dataflow-id>;' \
--header 'Authorization: Bearer XXX;' \
--data '{
    "customer_id": "202208240125",
    "firstName": "",
    "lastName": "",
    "email": "",
    "createDate": "1660096899",
    "modifyDate": "2022-08-09T22:01:40Z",
    "birth_Date": "1991-06-12",
    "mobile_phone": "888-888-8888",
    "email_optIn": "y",
    "sms_optIn": "n",
    "shipping_street_address": "1901 W Madison St",
    "shipping_city": "Chicago",
    "shipping_state": "IL",
    "shipping_zip_code": "60612",
    "billing_street_address": "1901 W Madison St",
    "billing_city": "Chicago",
    "billing_state": "IL",
    "billing_zip_code": "60612",
    "plan_id": "m1",
    "plan_name": "basic",
    "account_create_date": "Created on 2022-04-20T22:19:03Z",
    "account_end_date": "2022-01-20T13:15:32Z",
    "source": "inStore"
}'
A few important elements to note in the request above:
application/json as the data you are sending in is in JSON formataccess_token you generated during the Postman Setup labsGather required values
Before you can stream in data you need to gather a few of the required values listed above (i.e. specifically the streaming endpoint URL and body content ‘header’ values).
Perform the following steps:
-
Copy the Streaming endpoint value and save it to your local machine (assuming you haven’t navigated away from the previous section’s step). If you did navigate away, you can find it under Sources->Accounts.
note NOTE If you did navigate away you can get to this page by doing the following: - Click on Sources in the left rail
- Ensure you are on Accounts tab and click on the account you created titled Streaming Ingestion - <Your Initials>
note NOTE If you do not see this value ensure you do not have the dataflow row selected by clicking on the row. DO NOT CLICK ON THE BLUE LINKS 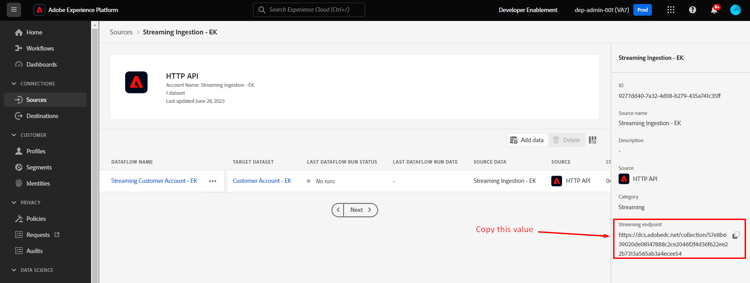
-
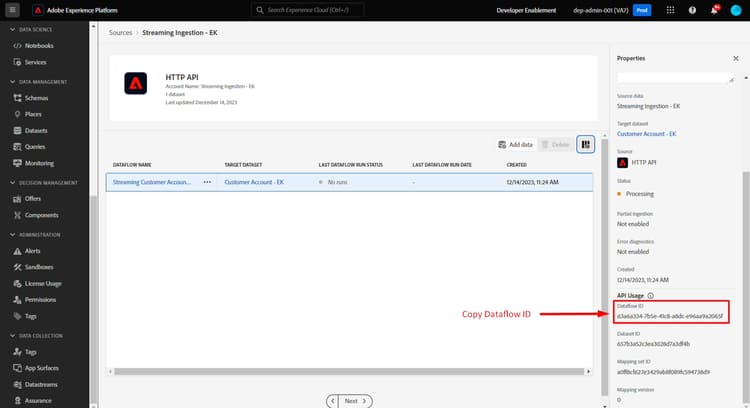
Select the dataflow row by clicking anywhere on it avoiding the blue links. Copy the Dataflow ID and save it somewhere safe
Update your API request
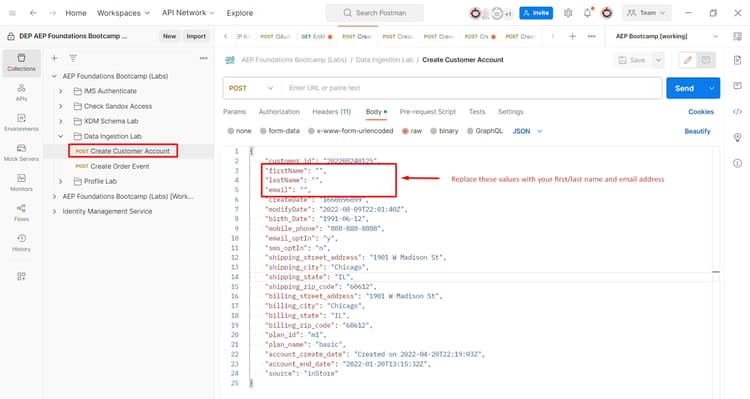
Switch over to your Postman application and update the Create Customer Account request with the information you just gathered.
-
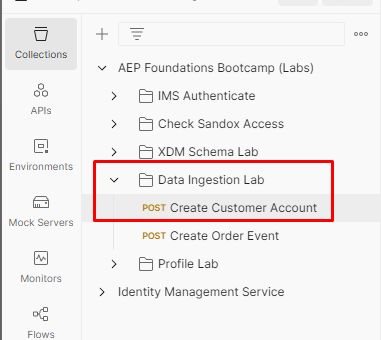
Open Postman and navigate to the Data Ingestion Lab -> Create Customer Account API request and open it
-
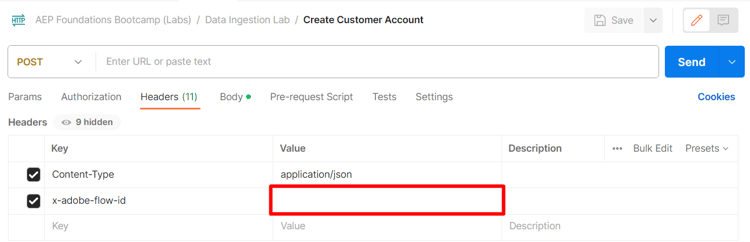
Copy and paste the Streaming endpoint value you saved previously into the request’s URL

-
Copy and paste the Dataflow ID value you saved previously into x-adobe-flow-id header value
-
In the body of the request update the following attributes like so:
- firstName -> Your First Name
- lastName -> Your Last Name
- email -> Your Email Address
- birth_Date -> YYYY-MM-DD
5. Save your request
-
Click on the Send button to execute the request to stream in your Customer Account Profile
-
You should receive a
200 OKresponse indicating it was successfully received by the Adobe Experience Platform
Sample 200 OK Response
{
    "inletId": "57e8b639020de08147888c2ce2046f2f4d36f622ee22b7313a565ab3a4ecee54",
    "xactionId": "1688068236344:7186:152",
    "flowId": "7d1d1a20-3df2-43fb-8bd8-2856bb3ea6a4",
    "receivedTimeMs": 1688068236344
}