Environment file
Postman environment file
Download File — AEP Bootcamp.postman_environment.json
Import environment file
- Open the
Environment Filefrom above in your browser by clicking on the file - Copy the URL of the file to your clipboard
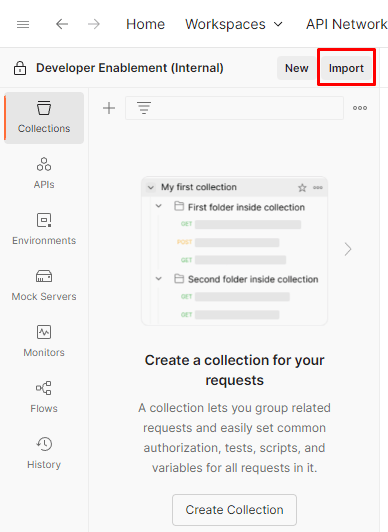
- Launch Postman on your local machine and click on the
Importbutton within your workspace - Paste the URL of the
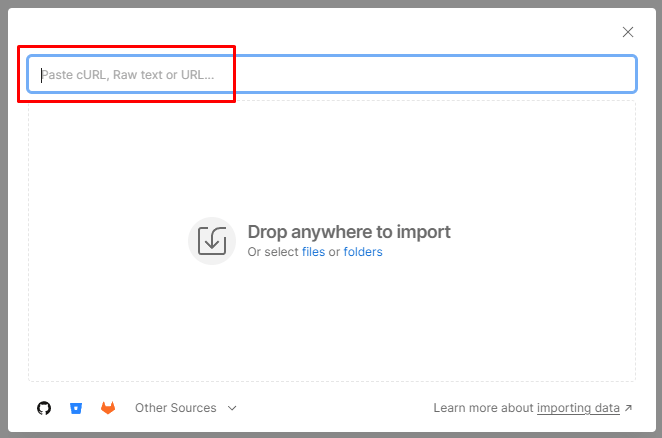
Environment Fileinto the import modal text box on the overlay. This should trigger an automatic import
Once imported, you can validate your environment file exists by clicking on the Environments tab in the left sidebar. You should see something similar to below.

Environment variables
Before you can make any API calls you need to update a few of the variables in the environment file you just imported. These variables are referenced in the API calls so be sure they are correctly filled in. The variables are broken into two groups:
- Developer Project Values -> these are the default variables generated from the Developer Project that were created in the Adobe Developer Console
- Other Values -> these are custom created variables that are typically created by a user to work with the various Experience Platform APIs
Update developer project values
-
Click on the
Environmentstab in the left sidebar of Postman -
Next click on the
AEP Bootcampenvironment file -
Update the
current valuesfor the below listed variables:- CLIENT_SECRET
- CLIENT_ID (also called API KEY)
- TECHNICAL_ACCOUNT_ID
- IMS_ORG
When done your environment file should look similar to this:

Update other values
The only other values that need to be updated are the SANDBOX_NAME variable and the TENANT_NAME variable.
SANDBOX_NAME- tells Adobe Experience Platform what sandbox to execute againstTENANT_NAME- used to pre-populate the tenant name in specific XDM calls
https://experience.adobe.com/#/@dep/sname:prod/platform/homeSANDBOX_NAMEis the value aftersname:— in this example,prodTENANT_NAMEis the value after the@symbol, prefixed with an underscore — in this example,_dep
-
Update the
current valuesfor the below listed variables:- SANDBOX_NAME
- TENANT_NAME
-
Save your updates by clicking the
Savebutton in the top right of the environment workspace
When you are done your environment file should look like this:
