Auf dieser Seite: Erfahren Sie, wie Sie Hintergrundfarben und -bilder auf der Text-, Viewport-, Struktur- und Spaltenebene Ihrer E-Mail im E-Mail-Designer festlegen.
Hintergründe tragen dazu bei, Ihre Markenidentität zu stärken und die Aufmerksamkeit auf wichtige Bereiche Ihrer E-Mail zu lenken. Im E-Mail-Designer können Sie eine Hintergrundfarbe oder ein Hintergrundbild auf verschiedenen Ebenen Ihres Inhalts festlegen – vom gesamten Hauptteil bis zu einzelnen Strukturen und Spalten. So können Sie genau steuern, wie Hintergründe in Ihrer E-Mail gerendert werden.
Beachten Sie beim Festlegen von Hintergründen im E-Mail-Designer die folgenden Best Practices:
- Wenden Sie eine Hintergrundfarbe nur dann auf den Hauptteil an, wenn Ihr Design dies erfordert.
- Wenn möglich, sollten Sie Hintergrundfarben besser auf Spaltenebene festlegen.
- Vermeiden Sie es, Hintergrundfarben für Bilder oder Textkomponenten zu verwenden, da sie schwieriger zu handhaben sind.
- Testen Sie Hintergrundbilder über echte E-Mail-Clients hinweg, bevor Sie senden, da das Rendern von der E-Mail-Designer-Vorschau abweichen kann.
Mit den folgenden Einstellungen können Sie eine Hintergrundfarbe oder ein Bild auf eine beliebige Ebene Ihres E-Mail-Inhalts anwenden, vom Hauptteil bis zu einzelnen Strukturen und Spalten.
Festlegen einer Hintergrundfarbe background-color
-
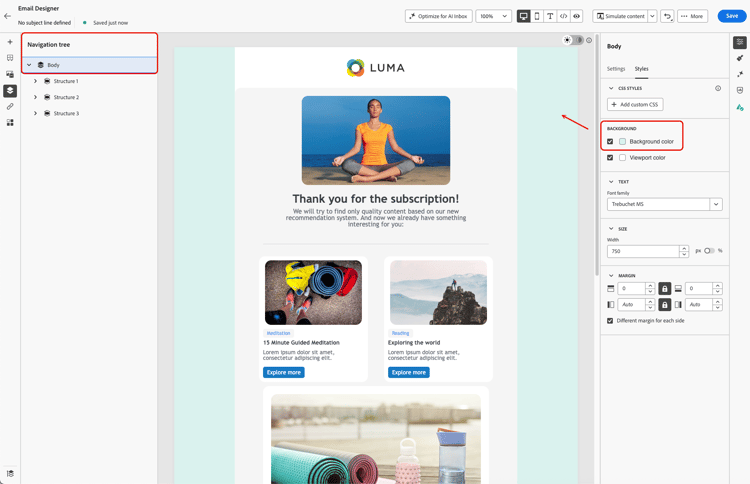
Hauptteil-Hintergrundfarbe – Legen Sie eine Hintergrundfarbe für die ganze E-Mail fest. Wählen Sie Hauptteil im Navigationsbaum aus, auf den Sie über die linke Palette zugreifen können, und nutzen Sie die dedizierte Option auf der Registerkarte Stile rechts.
-
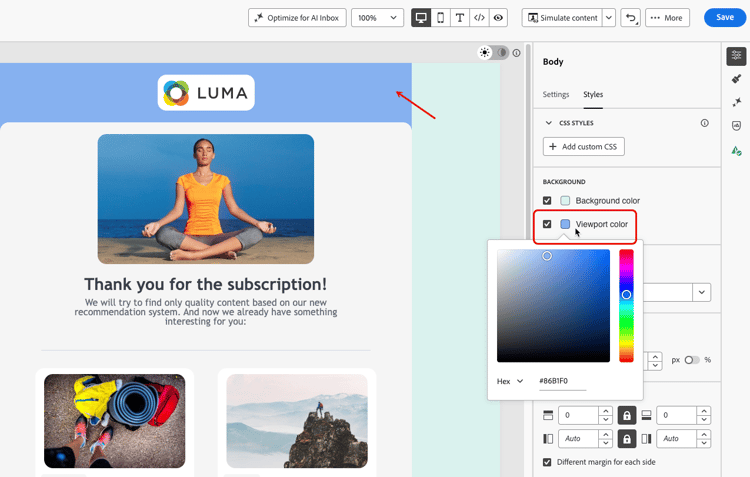
Viewport-Hintergrundfarbe – Legen Sie eine Viewport-Farbe fest, um dieselbe Hintergrundfarbe auf alle Strukturkomponenten anzuwenden (unabhängig von der Hintergrundfarbe des Hauptteils).
-
Struktur-Hintergrundfarbe – Um eine Hintergrundfarbe auf eine einzelne Strukturkomponente anzuwenden, wählen Sie sie direkt auf der Arbeitsfläche oder in der linken Palette aus und legen Sie eine bestimmte Farbe für diese Struktur fest.

note tip TIP Wählen Sie in diesem Fall aber keine Viewport-Hintergrundfarbe aus, da diese die Struktur-Hintergrundfarben verdecken könnte. -
Spalten-Hintergrundfarbe – Legen Sie auf Spaltenebene eine Hintergrundfarbe fest. Wählen Sie erneut die gewünschte Spalte aus der linken Palette aus und legen Sie eine bestimmte Farbe für diese Spalte fest.
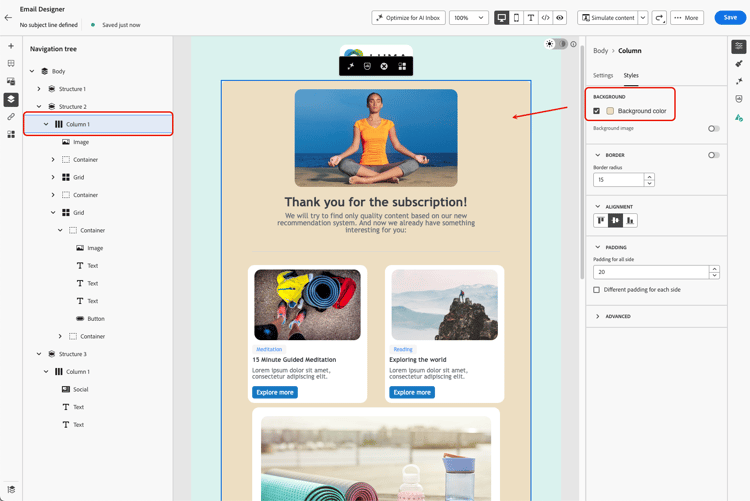
note tip TIP Dies ist der gängigste Anwendungsfall und eine Best Practice, da Sie beim Bearbeiten des restlichen E-Mail-Inhalts mehr Flexibilität erhalten.
Festlegen eines Hintergrundbilds background-image
Sie können für den Inhalt einer Struktur- oder Spaltenkomponente auch ein Hintergrundbild festlegen. Dies erfolgt am häufigsten auf Strukturebene. Das Festlegen auf Spaltenebene ist möglich, wird aber nur selten genutzt.
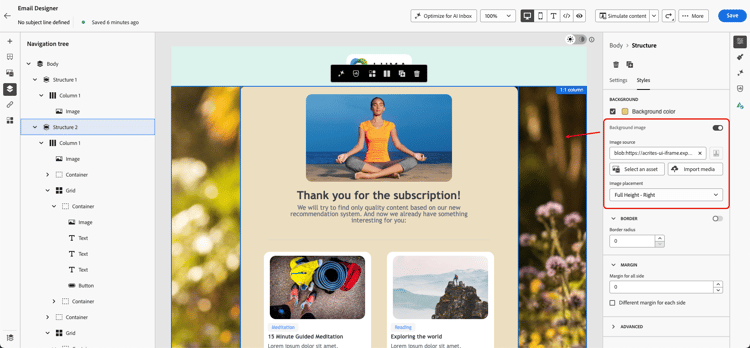
Sobald ein Hintergrundbild festgelegt wurde, verwenden Sie das Dropdown-Menü Bildplatzierung, um zu steuern, wie das Bild die Struktur oder Spalte ausfüllt. Die folgenden Optionen stehen zur Auswahl:
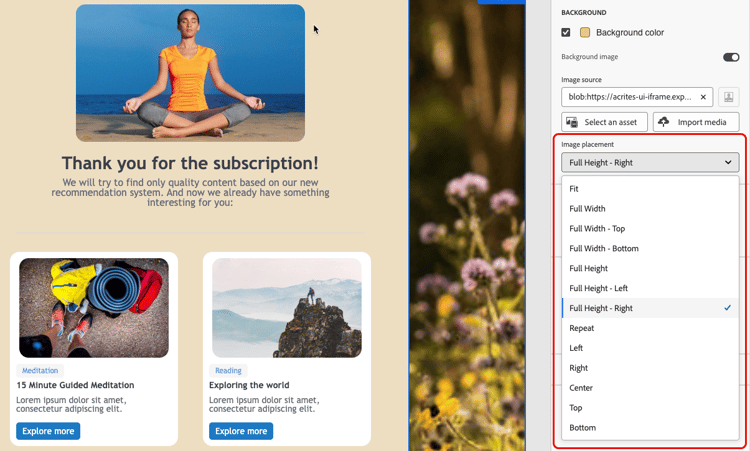
Skalierung zum Füllen, zentriert:
- Anpassen – Dehnt das Bild, um den Container auf beiden Achsen zu füllen, ohne das Seitenverhältnis beizubehalten.
- Volle Breite – Skaliert das Bild proportional zur Breite des Containers und zentriert es vertikal.
- Volle Höhe – Skaliert das Bild proportional zur Höhe des Containers und zentriert es horizontal.
Skalierung zum Füllen, an einer Kante verankert:
- Volle Breite – Oben – Gleich wie Volle Breite, am oberen Ende des Containers verankert. Der Überlauf wird unten abgeschnitten.
- Volle Breite – Unten – Gleich wie Volle Breite, am unteren Ende des Containers verankert. Der Überlauf wird oben abgeschnitten.
- Volle Höhe – Links – Gleich wie Volle Höhe, links am Container verankert. Der Überlauf wird rechts abgeschnitten.
- Volle Höhe – Rechts – Gleich wie Volle Höhe, rechts am Container verankert. Der Überlauf wird links abgeschnitten.
Kachel:
- Wiederholen – Kachelt das Bild in seiner Originalgröße, um den Container zu füllen.
Position ohne Skalierung:
- Links, Rechts, Zentriert, Oben, Unten – Positioniert das Bild in seiner Originalgröße, verankert an der entsprechenden Kante oder Mitte des Containers.
This section contains structured knowledge intended to support interpretation, retrieval, and question answering related to this topic.
For complete understanding, this information should be combined with the documentation on this page. Neither source is intended to stand alone; the page describes the feature, while this section provides additional context that helps disambiguate terminology, intent, applicability, and constraints.
- TL;DR: This page explains how to set background colors and images at the body, viewport, structure, and column levels of an email in the Email Designer, and Adobe’s best practices for doing so.
Intents:
- Set a Background color for the whole email at the body level
- Apply the same background color to all structure components using Viewport background color
- Set a different background color for a specific structure component
- Set a background color for a specific column
- Set a Background image for a structure or column component and choose an Image placement option
Glossary:
- Background color: A color applied to the whole email when Body is selected in the navigation tree (product-specific)
- Viewport background color: A setting that applies the same background color to all structure components, independently of the body’s background color (product-specific)
- Background image: An image set for the content of a structure or column component; falls back to the background color when not supported (product-specific)
- Image placement: A dropdown that controls how a background image fills its container — by scaling it centered, scaling it anchored to an edge, tiling it, or positioning it without scaling (product-specific)
Guardrails:
- Some email programs / clients do not support background images; when not supported, the background color is used instead, so select an appropriate fallback background color.
- When setting a different background color per structure component, do not set a viewport background color, as it may hide the structure background colors.
- Column-level background color is the most common use case and Adobe’s recommended best practice, for more flexibility when editing the rest of the email content.
- Avoid using background colors on image or text components, as they are harder to manage.
- Apply a background color to the body only if the design requires it.
- A background image can also be set at the column level, though this is rarely used; the same fallback color and Image placement options apply there too.
Terminology:
- Canonical name: Background — Acronym: n/a — variants: background color, background image, image placement
- Do not confuse: “Background color” (body-level, whole email) ≠ “Viewport background color” (same color applied to all structure components)
- Do not confuse: “Background color” (supported broadly by email clients) ≠ “Background image” (not supported by all email clients, falls back to background color)
- Do not confuse the “Scale to fill, centered” Image placement options (Fit, Full Width, Full Height) with the “Scale to fill, anchored to an edge” options (Full Width - Top, Full Width - Bottom, Full Height - Left, Full Height - Right), which control which side is cropped instead of centering the image
FAQ:
- Q: Where does Adobe recommend setting background colors? — At the column level, which is the most common use case and best practice, allowing more flexibility when editing the rest of the email content.
- Q: What happens if a background image is not supported by an email client? — The background color is used instead, so select an appropriate fallback background color.
- Q: How do I apply the same background color to all structure components? — Select Viewport background color, which can be set independently of the body’s background color.
- Q: Why might my per-structure background colors not appear? — A viewport background color may hide the structure background colors; do not set one in that case.
- Q: Can I set a background image at the column level? — Yes, though it is rarely used; the same fallback color behavior and Image placement options described for structures apply there too.
- Q: What is the difference between “Full Width” and “Full Width - Top” / “Full Width - Bottom”? — “Full Width” scales the image proportionally to the container’s width and centers it vertically. The “Top” and “Bottom” variants anchor it to that edge instead, cropping the opposite side rather than centering.
- Q: What is the difference between “Full Height” and “Full Height - Left” / “Full Height - Right”? — “Full Height” scales the image proportionally to the container’s height and centers it horizontally. The “Left” and “Right” variants anchor it to that side instead, cropping the opposite side rather than centering.