將程式化資產上傳至AEM as a Cloud Service

瞭解如何使用使用aem-upload Node.js程式庫的使用者端應用程式,將資產上傳至AEM as a Cloud Service環境。

學習內容

在本教學課程中,您將學習:

  • 如何使用​ 直接二進位上傳 ​方法,透過aem-upload Node.js程式庫將資產上傳至AEM as a Cloud Service環境(RDE、Dev、Stage、Prod)。
  • 如何設定並執行aem-asset-upload-sample應用程式,以將資產上傳至AEM as a Cloud Service環境。
  • 檢閱應用程式程式碼範例,並瞭解實作詳細資料。
  • 瞭解將程式化資產上傳至AEM as a Cloud Service環境的最佳實務。

瞭解​ 直接二進位上傳 ​方法

直接二進位上傳​方法可讓您使用​預先簽署的URL,將檔案從來源系統​直接上傳至AEM as a Cloud Service環境中的雲端儲存空間。 如此一來,您就不需要透過AEM的Java程式路由二進位資料,進而加快上傳速度並降低伺服器負載。

在執行範例應用程式之前,請先瞭解直接二進位上傳流程。

在直接二進位上傳流程中,二進位資料會使用預先簽署的URL直接上傳至雲端儲存空間。 AEM as a Cloud Service負責輕量型的處理作業,例如產生預先簽署的URL,以及通知AEM Asset Compute Service上傳完成的相關資訊。 下列邏輯流程圖說明直接二進位上傳流程。
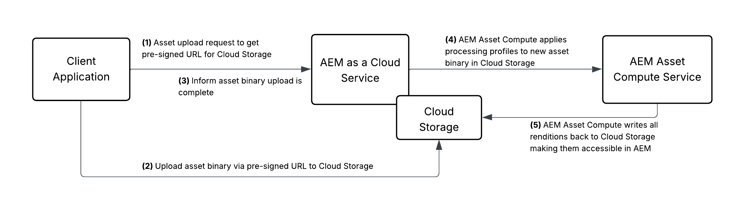
直接二進位上傳流程

aem-upload資料庫

aem-upload Node.js程式庫會擷取​ 直接二進位上傳 ​方法的實作詳細資料。 它提供兩種類別來協調上傳程式:

  • FileSystemUpload — 從本機檔案系統上傳檔案時使用此檔案,包括對目錄結構的支援
  • DirectBinaryUpload — 使用它來更精細地控制二進位上傳程式,例如從資料流或緩衝區上傳
CAUTION
在Java中沒有等同於aem-upload的資料庫。 使用者端應用程式必須以Node.js撰寫,才能使用​_直接二進位上傳_​方法。 如需詳細資訊,請參閱Experience Manager Assets API與作業頁面。

範例應用程式

使用aem-asset-upload-sample應用程式來瞭解程式化的資產上傳程式。 範例應用程式示範了從aem-upload資料庫使用FileSystemUploadDirectBinaryUpload類別的情況。

先決條件

在執行範例應用程式之前,請確定您具備下列必要條件:

  • AEM as a Cloud Service作者環境,例如快速開發環境(RDE)、開發環境等。
  • Node.js (最新LTS版本)
  • 基本瞭解Node.js和npm
CAUTION
您無法使用AEM as a Cloud Service SDK (亦稱為本機AEM例項)來測試程式化資產上傳程式。 您必須使用AEM as a Cloud Service環境,例如快速開發環境(RDE)、開發環境等。

下載範例應用程式

  1. 下載aem-asset-upload-sample應用程式zip檔案並解壓縮。

    code language-bash
    $ unzip aem-asset-upload-sample.zip
    
  2. 在您最愛的程式碼編輯器中開啟解壓縮的資料夾。

    code language-bash
    $ cd aem-asset-upload-sample
    $ code .
    
  3. 使用程式碼編輯器終端機,安裝相依性。

    code language-bash
    $ npm install
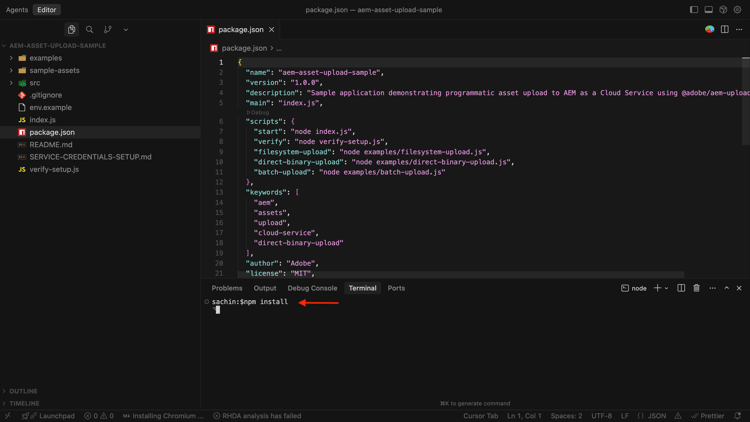
    

    範例應用程式

設定範例應用程式

在執行範例應用程式之前,您必須先使用必要的AEM as a Cloud Service環境詳細資料來設定它,例如AEM作者URL、驗證方法​和資產資料夾路徑。

aem-upload Node.js程式庫支援​多種驗證方法。 下表摘要列出支援的​ 驗證方法 ​及其用途。

基本驗證
本機開發權杖
服務認證
OAuth S2S
OAuth網頁應用程式
OAuth SPA
是否支援?
檢查(&C);
檢查(&C);
檢查(&C);
跨(&C)
跨(&C)
跨(&C)
用途
本機開發
本機開發
生產
N/A
N/A
N/A

若要設定範例應用程式,請遵循下列步驟:

  1. env.example檔案複製到.env檔案。

    code language-bash
    $ cp env.example .env
    
  2. 開啟.env檔案,並使用AEM as a Cloud Service作者URL更新AEM_URL環境變數。

  3. 從下列選項中選擇驗證方法,並更新對應的環境變數。

基本驗證

若要使用基本驗證,您需要在AEM as a Cloud Service環境中建立使用者。

  1. 登入您的AEM as a Cloud Service環境。

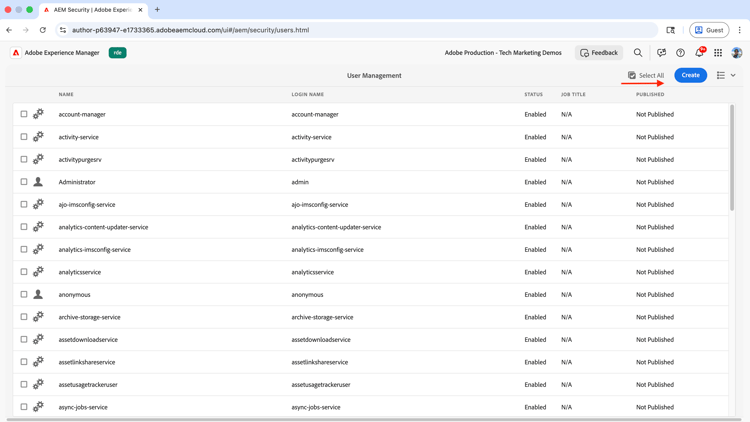
  2. 瀏覽至​工具 > 安全性 > 使用者,然後按一下​ 建立 ​按鈕。

    建立使用者

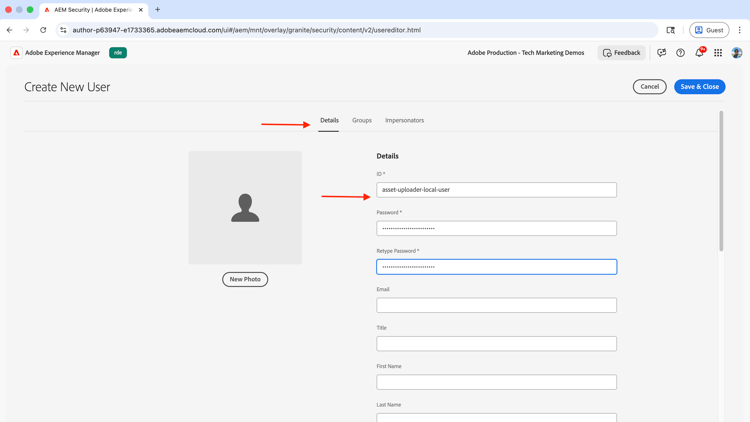
  3. 輸入使用者詳細資訊

    使用者詳細資料

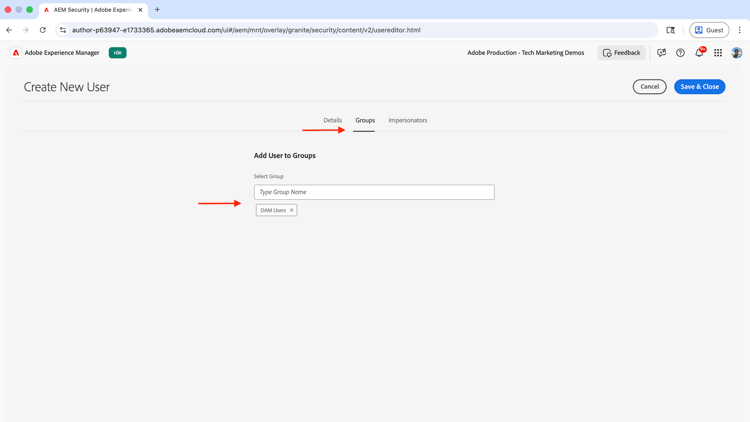
  4. 在​ 群組 ​索引標籤中,新增​ DAM使用者 ​群組。 按一下​ 儲存並關閉 ​按鈕。

    新增DAM使用者群組

  5. 以建立的使用者名稱和密碼更新AEM_USERNAMEAEM_PASSWORD環境變數。

本機開發權杖

若要取得本機開發權杖,您需要使用​AEM Developer Console。 產生的權杖是JSON Web權杖(JWT)型別。

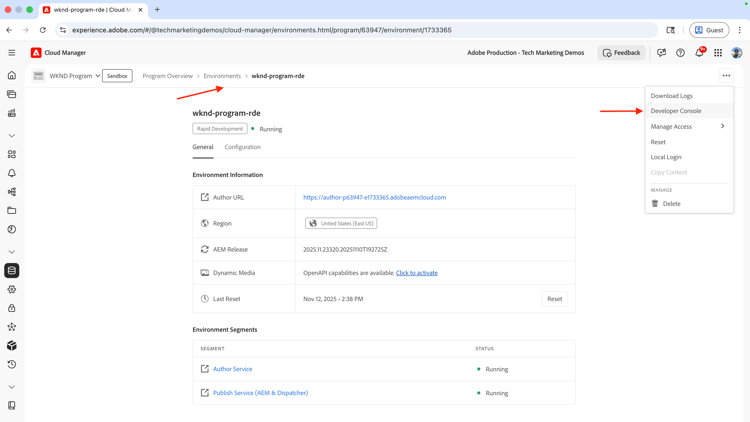
  1. 登入Adobe Cloud Manager並導覽至所需的​ 環境 ​詳細資訊頁面。 按一下​「……」 並選取​Developer Console

    開發人員控制台

  2. 登入AEM Developer Console並使用​ 新主控台 ​按鈕切換到更新的主控台。

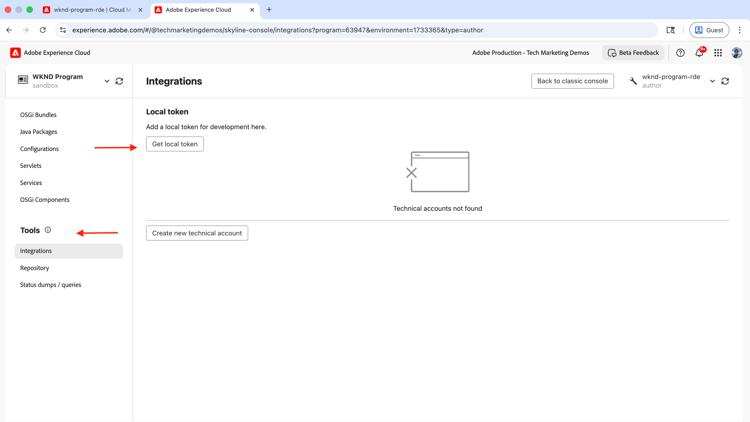
  3. 從​ 工具 ​區段中,選取​整合,然後按一下​ 取得本機權杖 ​按鈕。

    取得本機Token

  4. 複製權杖值並使用權杖值更新AEM_BEARER_TOKEN環境變數。

請注意,本機開發權杖的有效期限為24小時,系統會針對產生權杖的使用者核發。

服務認證

若要取得服務認證,您必須使用​AEM Developer Console。 它可用來使用jwt-auth npm模組產生JSON Web權杖(JWT)型別的權杖。

  1. 登入Adobe Cloud Manager並導覽至所需的​ 環境 ​詳細資訊頁面。 按一下​「……」 並選取​Developer Console

    開發人員控制台

  2. 登入AEM Developer Console並使用​ 新主控台 ​按鈕切換到更新的主控台。

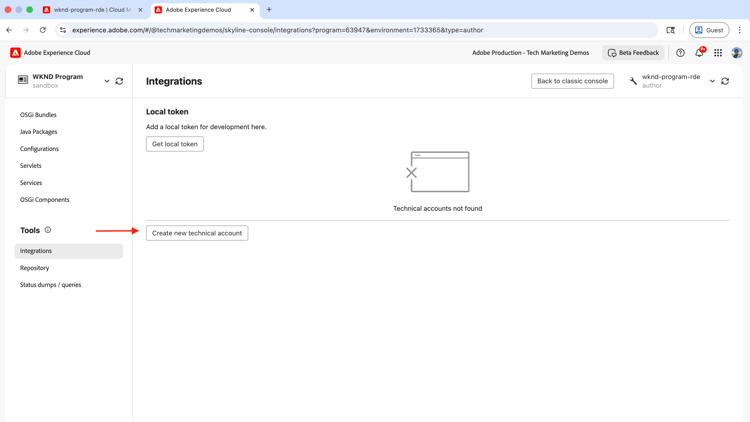
  3. 從​ 工具 ​區段中,選取​ 整合 ​並按一下​ 建立新的技術帳戶 ​按鈕。

    取得服務認證

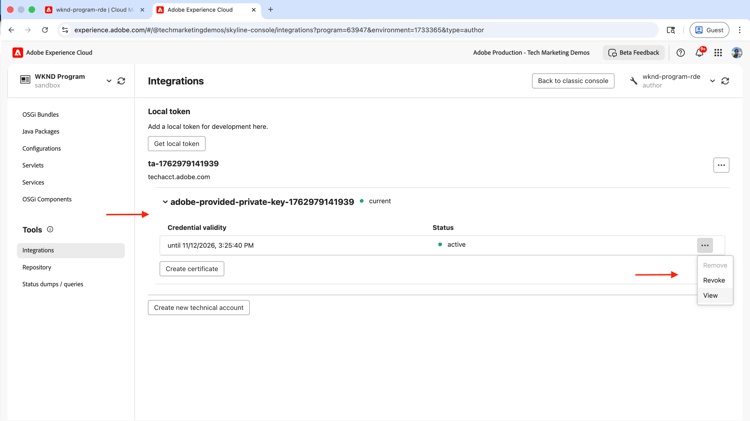
  4. 按一下​ 檢視 ​選項以復制服務認證JSON。

    服務認證

  5. 在範例應用程式的根目錄中建立service-credentials.json檔案,並將服務認證JSON貼到檔案中。

  6. 使用service-credentials.json檔案的路徑更新AEM_SERVICE_CREDENTIALS_FILE環境變數。

  7. 請確定服務認證使用者具有將資產上傳到AEM as a Cloud Service環境的必要許可權。 如需詳細資訊,請參閱在AEM中設定存取權頁面。

以下是設定了所有三種驗證方法的完整範例.env檔案。

# AEM Environment Configuration
# Copy this file to .env and fill in your AEM as a Cloud Service details

# AEM as a Cloud Service Author URL (without trailing slash)
# Example: https://author-p12345-e67890.adobeaemcloud.com
AEM_URL=https://author-p63947-e1733365.adobeaemcloud.com

# Upload Configuration
# Target folder in AEM DAM where assets will be uploaded
TARGET_FOLDER=/content/dam

# DirectBinaryUpload Remote URLs (required for DirectBinaryUpload example)
# URLs for remote files to upload in the DirectBinaryUpload example
# These demonstrate uploading from remote sources (URLs, CDNs, APIs)
REMOTE_FILE_URL_1=https://placehold.co/600x400/red/white?text=Adobe+Experience+Manager+Assets

################################################################
# Authentication - Choose one of the following methods:
################################################################

# Method 1: Service Credentials (RECOMMENDED for production)
# Download service credentials JSON from AEM Developer Console and save it locally
# Then provide the path to the file here
AEM_SERVICE_CREDENTIALS_FILE=./service-credentials.json

# Method 2: Bearer Token Authentication (for manual testing)
AEM_BEARER_TOKEN=eyJhbGciOiJSUzI1NiIsIng1dSI6Imltc19uYTEta2V5LWF0LTEuY2VyIiwia2lkIjoiaW1zX25hM....fsdf-Rgt5hm_8FHutTyNQnkj1x1SUs5OkqUfJaGBaKBKdqQ

# Method 3: Basic Authentication (for development/testing only)
AEM_USERNAME=asset-uploader-local-user
AEM_PASSWORD=asset-uploader-local-user

# Optional: Enable detailed logging
DEBUG=false

執行範例應用程式

範例應用程式會示範三種將範例資產上傳至AEM as a Cloud Service環境的不同方法。

  1. FileSystemUpload — 從本機檔案系統上傳檔案,具有目錄結構支援和自動資料夾建立功能
  2. DirectBinaryUpload — 上傳遠端檔案。 檔案二進位檔會先在記憶體中緩衝,然後再上傳至AEM as a Cloud Service環境。
  3. 批次上傳 — 使用自動重試邏輯和錯誤修復以批次方式從本機檔案系統上傳多個檔案。 在幕後,它使用FileSystemUpload類別從本機檔案系統上傳檔案。

要上傳的資產位於sample-assets資料夾中,且包含imgvideodoc子資料夾,每個子資料夾都包含一些範例資產。

  1. 若要執行範例應用程式,請使用下列命令:
$ npm start
  1. 從下列選項中輸入所要的選項​number
╔════════════════════════════════════════════════════════════╗
║      AEM Asset Upload Sample Application                   ║
║      Demonstrating @adobe/aem-upload library               ║
╚════════════════════════════════════════════════════════════╝

Choose an upload method:

1. FileSystemUpload - Upload files from local filesystem with auto-folder creation
2. DirectBinaryUpload - Upload from remote URLs/streams to AEM
3. Batch Upload - Upload multiple files in batches with retry logic
4. Exit

以下標籤顯示範例應用程式執行、其輸出以及AEM as a Cloud Service環境中每個上傳方法的上傳資產。

FileSystemUpload
  1. FileSystemUpload選項的範例應用程式輸出:
code language-bash
...
Upload Summary:
──────────────────────────────────────────────────
Total files: 5
Successful: 5
Failed: 0
Total time: 2.67s
──────────────────────────────────────────────────
✓
All files uploaded successfully!
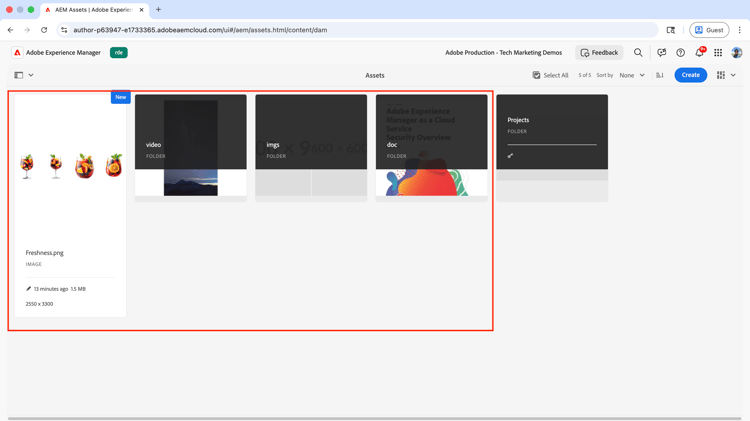
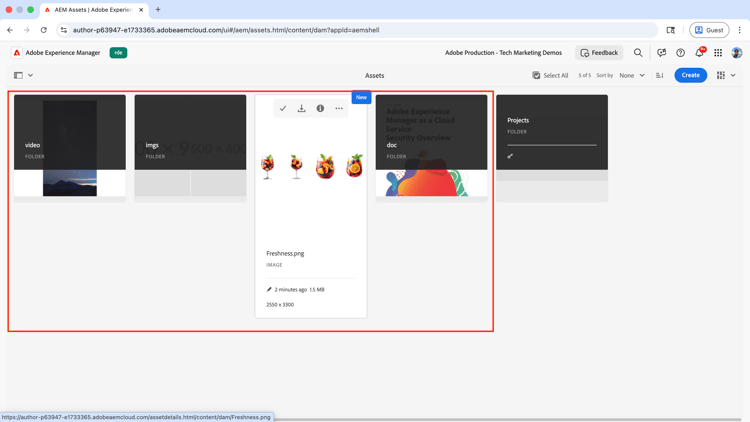
  1. 使用AEM as a Cloud Service環境中的FileSystemUpload選項上傳的Assets:

    已在AEM as a Cloud Service環境中使用FileSystemUpload類別上傳資產

DirectBinaryUpload
  1. DirectBinaryUpload選項的範例應用程式輸出:
code language-bash
...
Upload Summary:
──────────────────────────────────────────────────
Total files: 1
Successful: 1
Total time: 561ms
──────────────────────────────────────────────────

✅ Successfully uploaded to AEM: https://author-p63947-e1733365.adobeaemcloud.com/ui#/aem/assets.html/content/dam?appId=aemshell
  → remote-file-1.png
    Source: https://placehold.co/600x400/red/white?text=Adobe+Experience+Manager+Assets
✓
All files uploaded successfully!
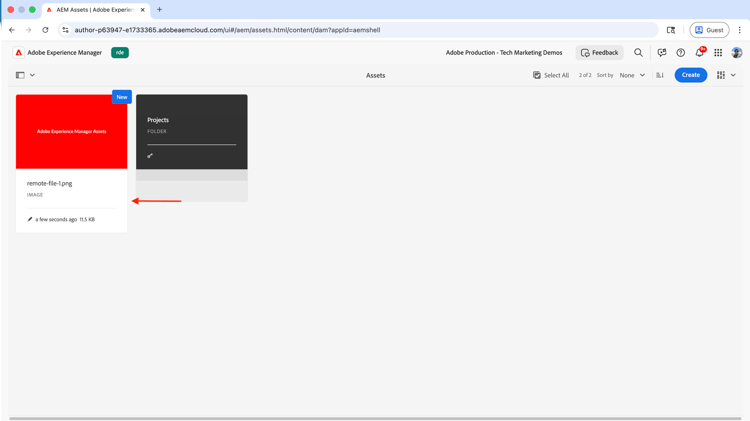
  1. 使用AEM as a Cloud Service環境中的DirectBinaryUpload選項上傳的Assets:

已在AEM as a Cloud Service環境中使用DirectBinaryUpload類別上傳資產

批次上傳
  1. Batch Upload選項的範例應用程式輸出:
code language-bash
...
ℹ Found 4 item(s) to upload in batches (directories + files)
ℹ Batch size: 2 (small for demo, use 10-50 for production)

...

✓ Batch 2 completed in 2.79s

Upload Summary:
──────────────────────────────────────────────────
Total files: 5
Successful: 5
Failed: 0
Total time: 4.50s
──────────────────────────────────────────────────
✓
All files uploaded successfully!
  1. 使用AEM as a Cloud Service環境中的Batch Upload選項上傳的Assets:

已在AEM as a Cloud Service環境中使用BatchUpload類別上傳資產

檢閱範例應用程式程式碼

範例應用程式的主要進入點為index.js檔案。 它包含promptUser函式,可提示使用者選擇並執行選取的範例。

/**
 * Prompts user for choice and executes the selected example
 */
function promptUser() {
  rl.question(chalk.bold('Enter your choice (1-4): '), async (answer) => {
    console.log('');

    try {
      switch (answer.trim()) {
        case '1':
          console.log(chalk.bold.green('\n▶ Running FileSystemUpload Example...\n'));
          await filesystemUpload.main();
          break;

        case '2':
          console.log(chalk.bold.green('\n▶ Running DirectBinaryUpload Example...\n'));
          await directBinaryUpload.main();
          break;

        case '3':
          console.log(chalk.bold.green('\n▶ Running Batch Upload Example...\n'));
          await batchUpload.main();
          break;

        case '4':
          rl.close();
          return;

        default:
          console.log(chalk.red('\n✗ Invalid choice. Please enter 1, 2, 3, or 4.\n'));
      }

      // After example completes, ask if user wants to continue
      rl.question(chalk.bold('\nPress Enter to return to menu or Ctrl+C to exit...'), () => {
        displayMenu();
        promptUser();
      });

    } catch (error) {
      console.error(chalk.red('\n✗ Error:'), error.message);
      rl.question(chalk.bold('\nPress Enter to return to menu...'), () => {
        displayMenu();
        promptUser();
      });
    }
  });
}

如需完整程式碼,請參閱範例應用程式中的index.js檔案。

以下標籤顯示每個上傳方法的實作詳細資料。

FileSystemUpload

FileSystemUpload類別是用來上傳來自本機檔案系統的檔案,具有目錄結構支援及自動建立資料夾的功能。

code language-javascript
...
// Initialize FileSystemUpload
const upload = new FileSystemUpload();

const startTime = Date.now();
const spinner = createSpinner('Preparing upload...');

// Upload options for this specific upload
// For FileSystemUpload, the url should include the target folder path
const fullUrl = `${options.url}${targetFolder}`;

const uploadOptions = new FileSystemUploadOptions()
  .withUrl(fullUrl)
  .withDeepUpload(true);  // Enable recursive upload of subdirectories

// Add HTTP options including headers (auth is already in headers from config)
uploadOptions.withHttpOptions({
  headers: {
    ...options.headers,
    'X-Upload-Source': 'FileSystemUpload-Example'
  }
});

spinner.stop();

// Attach progress event handlers to the upload instance
handleUploadProgress(upload);

// Perform the upload and wait for completion
// Upload the contents (subdirectories and files) not the parent folder
const uploadResult = await upload.upload(uploadOptions, uploadPaths);
const totalTime = Date.now() - startTime;

// Analyze results using shared function
const analysis = analyzeUploadResult(uploadResult);

// Display summary
displayUploadSummary(analysis, totalTime);
...

如需完整程式碼,請參閱範例應用程式中的examples/filesystem-upload.js檔案。

DirectBinaryUpload

DirectBinaryUpload類別是用來上傳遠端檔案至AEM as a Cloud Service環境。

code language-javascript
...
/**
 * Creates upload file objects for DirectBinaryUpload from remote URLs
 * @param {Array<Object>} remoteFiles - Array of objects with url, fileName, targetFolder
 * @returns {Array<Object>} Array of upload file objects
 */
async function createUploadFilesFromUrls(remoteFiles) {
  const uploadFiles = [];

  for (const remoteFile of remoteFiles) {
    logInfo(`Fetching: ${remoteFile.fileName} from ${remoteFile.url}`);
    try {
      const fileBuffer = await fetchRemoteFile(remoteFile.url);
      uploadFiles.push({
        fileName: remoteFile.fileName,
        fileSize: fileBuffer.length,
        blob: fileBuffer,  // DirectBinaryUpload uses 'blob' for buffers
        targetFolder: remoteFile.targetFolder,
        targetFile: `${remoteFile.targetFolder}/${remoteFile.fileName}`,
        sourceUrl: remoteFile.url  // Track source URL for display in summary
      });
      logSuccess(`Downloaded: ${remoteFile.fileName} (${formatBytes(fileBuffer.length)})`);
    } catch (error) {
      logError(`Failed to fetch ${remoteFile.fileName}: ${error.message}`);
    }
  }

  return uploadFiles;
}

...

    // Initialize DirectBinaryUpload
    const upload = new DirectBinaryUpload();

    // Fetch remote files and create upload objects
    const uploadFiles = await createUploadFilesFromUrls(remoteFiles);

...

    // Upload options for each file
    const uploadOptions = new DirectBinaryUploadOptions()
        .withUrl(fullUrl)
        .withUploadFiles([uploadFile]);

    // Add HTTP options (auth is already in headers from config)
    uploadOptions
        .withHttpOptions({
        headers: {
            ...options.headers,
            'X-Upload-Source': 'DirectBinaryUpload-Example'
        }
        })
        .withMaxConcurrent(5);

    // Upload individual file and wait for completion
    const uploadResult = await upload.uploadFiles(uploadOptions);

如需完整程式碼,請參閱範例應用程式中的examples/direct-binary-upload.js檔案。

批次上傳

它會分割檔案為批次,並使用自動重試邏輯和錯誤修復以批次方式上傳。 在幕後,它使用FileSystemUpload類別從本機檔案系統上傳檔案。

code language-javascript
...
async function uploadInBatches(paths, options, targetFolder, batchSize = 2) {
  const allResults = [];
  const totalPaths = paths.length;
  const totalBatches = Math.ceil(totalPaths / batchSize);

  logInfo(`Processing ${totalPaths} item(s) in ${totalBatches} batch(es)`);

  for (let i = 0; i < totalPaths; i += batchSize) {
    const batchNumber = Math.floor(i / batchSize) + 1;
    const batch = paths.slice(i, i + batchSize);

    console.log(`\n${'='.repeat(50)}`);
    logInfo(`Batch ${batchNumber}/${totalBatches} - Uploading ${batch.length} item(s)`);
    console.log('='.repeat(50));

    const batchStartTime = Date.now();
    let retryCount = 0;
    const maxRetries = 3;
    let batchResults = null;

    // Retry logic for failed batches
    while (retryCount <= maxRetries) {
      try {
        // Create a fresh upload instance for each retry to avoid duplicate event listeners
        const upload = new FileSystemUpload();

        const fullUrl = `${options.url}${targetFolder}`;

        const uploadOptions = new FileSystemUploadOptions()
          .withUrl(fullUrl)
          .withDeepUpload(true);  // Enable recursive upload of subdirectories

        // Add HTTP options including headers (auth is already in headers from config)
        uploadOptions.withHttpOptions({
          headers: {
            ...options.headers,
            'X-Upload-Source': 'Batch-Upload-Example',
            'X-Batch-Number': batchNumber
          }
        });

        // Track progress - attach listeners to upload instance
        upload.on('foldercreated', (data) => {
          logSuccess(`Created folder: ${data.folderName} at ${data.targetFolder}`);
        });

        let currentFile = '';
        upload.on('filestart', (data) => {
          currentFile = data.fileName;
          logInfo(`Starting: ${currentFile}`);
        });

        upload.on('fileprogress', (data) => {
          const percentage = ((data.transferred / data.fileSize) * 100).toFixed(1);
          process.stdout.write(
            `\r  Progress: ${percentage}% - ${formatBytes(data.transferred)}/${formatBytes(data.fileSize)}`
          );
        });

        upload.on('fileend', (data) => {
          process.stdout.write('\n');
          logSuccess(`Completed: ${data.fileName}`);
        });

        upload.on('fileerror', (data) => {
          // Only show in DEBUG mode (may be retries)
          if (process.env.DEBUG === 'true') {
            process.stdout.write('\n');
            const errorMsg = data.error?.message || data.message || 'Unknown error';
            logWarning(`Error (may retry): ${data.fileName} - ${errorMsg}`);
          }
        });

        // Perform upload and wait for batch completion
        const uploadResult = await upload.upload(uploadOptions, batch);

        const batchEndTime = Date.now();
        const batchTime = batchEndTime - batchStartTime;

        logSuccess(`Batch ${batchNumber} completed in ${formatTime(batchTime)}`);

        // Extract detailed results from the upload result
        batchResults = uploadResult.detailedResult || [];
        break; // Success, exit retry loop

      } catch (error) {
        retryCount++;
        if (retryCount <= maxRetries) {
          logWarning(`Batch ${batchNumber} failed. Retry ${retryCount}/${maxRetries}...`);
          await new Promise(resolve => setTimeout(resolve, 2000 * retryCount)); // Exponential backoff
        } else {
          logError(`Batch ${batchNumber} failed after ${maxRetries} retries: ${error.message}`);
          // Mark all files in batch as failed
          batchResults = batch.map(file => ({
            fileName: path.basename(file),
            error: error,
            success: false
          }));
        }
      }
    }

    if (batchResults) {
      allResults.push(...batchResults);
    }
  }

  return allResults;
}

如需完整程式碼,請參閱範例應用程式中的examples/batch-upload.js檔案。

此外,範例應用程式的README.md檔案包含範例應用程式的詳細檔案。

最佳做法

  1. 選擇正確的驗證方法:
    針對生產環境使用服務認證、本機開發權杖和基本驗證僅供開發/測試使用。 請確定服務認證使用者具有將資產上傳到AEM as a Cloud Service環境的必要許可權。

  2. 選擇正確的上傳方法:
    針對具有自動資料夾建立的本機檔案,使用FileSystemUpload;針對具有微調控制的串流/緩衝區/遠端URL,使用DirectBinaryUpload;以及針對具有1000多個需要重試邏輯之檔案的生產環境使用批次上傳模式。

  3. 正確建構DirectBinaryUpload檔案物件
    將blob屬性(非緩衝區)與下列必要欄位搭配使用: { fileName, fileSize, blob: buffer, targetFolder },並記住DirectBinaryUpload不會自動建立資料夾。

  4. 範例應用程式作為參考:
    範例應用程式是程式化資產上傳流程實作詳細資訊的良好參考。 您可將它當作自己實作的起點。

recommendation-more-help
experience-manager-learn-help-assets