at.js ライブラリとAdobe Experience Platform Web SDKの比較
概要
この記事では、at.js ライブラリとExperience Platform Web SDKの違いについて説明します。
at.js実装では、Target 配信APIを直接呼び出します(例:POST https://<clientCode>.tt.omtrdc.net/rest/v1/delivery)。 Platform Web SDK個の実装では、代わりにExperience Platform Edge Network (例:POST https://edge.adobedc.net/ee/v2/interact)経由でsendEvent コマンドを使用してInteract APIを呼び出します。 これらは2つの異なるAPIであり、互換性がありません。ライブラリのインストール
at.jsのインストール
Adobeでは、Adobe Experience Cloud、実装 タブから直接ライブラリをダウンロードできます。 at.js ライブラリは、顧客がclientCode、imsOrgIdなどの設定でカスタマイズされます。
Web SDKのインストール
ビルド済みのバージョンは、CDNで利用できます。 CDN上のライブラリをページ上で直接参照するか、独自のインフラストラクチャでダウンロードしてホストできます。 最小化された形式と最小化されていない形式で使用できます。 最小化されていないバージョンは、デバッグの目的に役立ちます。
詳しくは、JavaScript ライブラリを使用したWeb SDKのインストール を参照してください。
ライブラリの設定
at.jsの設定
すべてのat.js ファイルの最後に、Adobeがインスタンス化して設定オブジェクトを渡すセクションが表示されます。 カスタマイズ可能で、ダウンロード時にAdobeはそのセクションに現在のお客様の設定を入力します。
window.adobe.target.init(window, document, {
  "clientCode": "demo",
  "imsOrgId": "",
  "serverDomain": "localhost:5000",
  "timeout": 2000,
  "globalMboxName": "target-global-mbox",
  "version": "2.0.0",
  "defaultContentHiddenStyle": "visibility: hidden;",
  "defaultContentVisibleStyle": "visibility: visible;",
  "bodyHiddenStyle": "body {opacity: 0 !important}",
  "bodyHidingEnabled": true,
  "deviceIdLifetime": 63244800000,
  "sessionIdLifetime": 1860000,
  "selectorsPollingTimeout": 5000,
  "visitorApiTimeout": 2000,
  "overrideMboxEdgeServer": false,
  "overrideMboxEdgeServerTimeout": 1860000,
  "optoutEnabled": false,
  "optinEnabled": false,
  "secureOnly": false,
  "supplementalDataIdParamTimeout": 30,
  "authoringScriptUrl": "//cdn.tt.omtrdc.net/cdn/target-vec.js",
  "urlSizeLimit": 2048,
  "endpoint": "/rest/v1/delivery",
  "pageLoadEnabled": true,
  "viewsEnabled": true,
  "analyticsLogging": "server_side",
  "serverState": {},
  "decisioningMethod": "server-side",
  "legacyBrowserSupport":  false
});
Platform Web SDKの設定
SDKの設定は、configure コマンドを使用して行います。 configure コマンドは、最初に呼び出された always です。
ページ読み込みTarget オファーをリクエストして自動的にレンダリングする方法
at.jsの使用
at.js 2.xを使用して、設定pageLoadEnabled,を有効にすると、ライブラリはTarget Edgeへの呼び出しをexecute -> pageLoadでトリガーします。 すべての設定がデフォルト値に設定されている場合、カスタムコーディングは必要ありません。 at.jsがページに追加され、ブラウザーによって読み込まれると、Target Edge呼び出しが実行されます。
PLatform Web SDKの使用中
Target Visual Experience Composer内で作成されたコンテンツは、SDKで自動的に取得およびレンダリングできます。
Target件のオファーをリクエストして自動的にレンダリングするには、sendEvent コマンドを使用し、renderDecisions オプションをtrue.に設定します。これにより、SDKは、自動レンダリングの対象となるパーソナライズされたコンテンツを自動的にレンダリングします。
例:
alloy("sendEvent", {
  "renderDecisions": true,
  "xdm": {
    "commerce": {
      "order": {
        "purchaseID": "a8g784hjq1mnp3",
        "purchaseOrderNumber": "VAU3123",
        "currencyCode": "USD",
        "priceTotal": 999.98
      }
    }
  }
});
Experience Platform Web SDKは、Platform WEB SDKによって実行されたオファーを含む通知を自動的に送信します。 通知リクエストペイロードの例を次に示します。
{
  "events": [{
      "xdm": {
        "_experience": {
          "decisioning": {
            "propositions": [
              {
                "id": "AT:eyJhY3Rpdml0eUlkIjoiMTI3MDE5IiwiZXhwZXJpZW5jZUlkIjoiMCJ9",
                "scope": "cart",
                "scopeDetails": {
                  "decisionProvider": "TGT",
                  "activity": {
                    "id": "127019"
                  },
                  "experience": {
                    "id": "0"
                  },
                  "strategies": [
                    {
                      "step": "entry",
                      "algorithmID": "0",
                      "trafficType": "0"
                    },
                    {
                      "step": "display",
                      "algorithmID": "0",
                      "trafficType": "0"
                    }
                  ],
                  "characteristics": {
                    "eventToken": "bKMxJ8dCR1XlPfDCx+2vSGqipfsIHvVzTQxHolz2IpSCnQ9Y9OaLL2gsdrWQTvE54PwSz67rmXWmSnkXpSSS2Q=="
                  }
                }
              }
            ]
          }
        },
        "eventType": "display",
        "web": {
          "webPageDetails": {
            "viewName": "cart",
            "URL": "https://alloyio.com/personalizationSpa/cart"
          },
          "webReferrer": {
            "URL": ""
          }
        },
        "device": {
          "screenHeight": 800,
          "screenWidth": 1280,
          "screenOrientation": "landscape"
        },
        "environment": {
          "type": "browser",
          "browserDetails": {
            "viewportWidth": 1280,
            "viewportHeight": 284
          }
        },
        "placeContext": {
          "localTime": "2021-12-10T15:50:34.467+02:00",
          "localTimezoneOffset": -120
        },
        "timestamp": "2021-12-10T13:50:34.467Z",
        "implementationDetails": {
          "name": "https://ns.adobe.com/experience/alloy",
          "version": "2.6.2",
          "environment": "browser"
        }
      }
    }
  ]
}
ページ読み込みターゲットのオファーを自動的にレンダリングする方法とNOT
at.jsの使用
ページ読み込みのオファーを取得するTarget Edgeへの呼び出しを実行するには、2つの方法があります。
例1:
adobe.target.getOffer({
   mbox: "target-global-mbox",
   success: console.log,
   error: console.error
});
例2:
adobe.target.getOffers({
    request: {
      execute: {
        pageLoad: {}
    }
  }
})
.then(console.log)
.catch(console.error);
Platform Web SDKの使用中
decisionScopesの下に特別なスコープを持つsendEvent コマンドを実行します:__view__。 Adobeは、このスコープをシグナルとして使用して、Targetからすべてのページ読み込みアクティビティを取得し、すべてのビューを先行取得します。 Platform Web SDKは、すべてのVEC ビューベースのアクティビティを評価しようとしています。 ビューの先行取得を無効にすることは、現在Platform Web SDKではサポートされていません。
パーソナライゼーションコンテンツにアクセスするには、コールバック関数を指定します。これは、SDKがサーバーから正常なレスポンスを受け取った後に呼び出されます。 コールバックには結果オブジェクトが指定されます。このオブジェクトには、返されたパーソナライゼーションコンテンツを含むpropositions プロパティが含まれている場合があります。
例:
alloy("sendEvent", {
    xdm: {...},
    decisionScopes: ["__view__"]
  }).then(function(result) {
    if (result.propositions) {
      result.propositions.forEach(proposition => {
        proposition.items.forEach(item => {
          if (item.schema === HTML_SCHEMA) {
            // manually apply offer
            document.getElementById("form-based-offer-container").innerHTML =
              item.data.content;
            const executedPropositions = [
              {
                id: proposition.id,
                scope: proposition.scope,
                scopeDetails: proposition.scopeDetails
              }
            ];
          // manually send the display notification event, so that Target/Analytics impressions aare increased
            alloy("sendEvent",{
              "xdm": {
                "eventType": "decisioning.propositionDisplay",
                "_experience": {
                  "decisioning": {
                    "propositions": executedPropositions
                  }
                }
              }
            });
          }
        });
      });
    }
  });
特定のフォームベースのTarget mboxをリクエストする方法
at.jsの使用
getOffer関数を使用してアクティビティを取得できます。
例1:
adobe.target.getOffer({
   mbox: "hero-banner",
   success: console.log,
   error: console.error
});
例2:
adobe.target.getOffers({
    request: {
      execute: {
        mboxes: [
        {
          index: 0,
          name: "hero-banner"
        }]
    }
  }
})
.then(console.log)
.catch(console.error);
Platform Web SDKの使用中
sendEvent コマンドを使用し、decisionScopes オプションの下にmbox名を渡すことで、 フォームベースのコンポーザーのアクティビティを取得できます。 sendEvent コマンドは、要求されたアクティビティまたは提案を含むオブジェクトで解決されるプロミスを返します。
このコードスニペットは、propositions配列がどのように見えるかです。
[
  {
    "id": "AT:eyJhY3Rpdml0eUlkIjoiNDM0Njg5IiwiZXhwZXJpZW5jZUlkIjoiMCJ9",
    "scope": "hero-banner",
    "scopeDetails": {
      "decisionProvider": "TGT",
      "activity": {
        "id": "434689"
      },
      "experience": {
        "id": "0"
      },
      "strategies": [
        {
          "algorithmID": "0",
          "trafficType": "0"
        }
      ],
      "characteristics": {
        "eventToken": "2lTS5KA6gj4JuSjOdhqUhGqipfsIHvVzTQxHolz2IpTMromRrB5ztP5VMxjHbs7c6qPG9UF4rvQTJZniWgqbOw=="
      }
    },
    "items": [
      {
        "id": "1184844",
        "schema": "https://ns.adobe.com/personalization/html-content-item",
        "meta": {
          "geo.state": "bucuresti",
          "activity.id": "434689",
          "experience.id": "0",
          "activity.name": "a4t test form based activity",
          "offer.id": "1184844",
          "profile.tntId": "04608610399599289452943468926942466370-pybgfJ"
        },
        "data": {
          "id": "1184844",
          "format": "text/html",
          "content": "<div> analytics impressions </div>"
        }
      }
    ]
  },
  {
    "id": "AT:eyJhY3Rpdml0eUlkIjoiNDM0Njg5IiwiZXhwZXJpZW5jZUlkIjoiMCJ9",
    "scope": "hero-banner",
    "scopeDetails": {
      "decisionProvider": "TGT",
      "activity": {
        "id": "434689"
      },
      "characteristics": {
        "eventToken": "E0gb6q1+WyFW3FMbbQJmrg=="
      }
    },
    "items": [
      {
        "id": "434689",
        "schema": "https://ns.adobe.com/personalization/measurement",
        "data": {
          "type": "click",
          "format": "application/vnd.adobe.target.metric"
        }
      }
    ]
  }
]
例:
alloy("sendEvent", {
  xdm: { ...},
  decisionScopes: ["hero-banner"]
}).then(function (result) {
  var propositions = result.propositions;

  if (propositions) {
    // Find the discount proposition, if it exists.
    for (var i = 0; i < propositions.length; i++) {
      var proposition = propositions[i];
      for (var j = 0; j < proposition.items; j++) {
        var item = proposition.items[j];
        if (item.schema === HTML_SCHEMA) {
          // apply offer
          document.getElementById("form-based-offer-container").innerHTML =
            item.data.content;
          const executedPropositions = [
            {
              id: proposition.id,
              scope: proposition.scope,
              scopeDetails: proposition.scopeDetails
            }
          ];

          alloy("sendEvent", {
            "xdm": {
              "eventType": "decisioning.propositionDisplay",
              "_experience": {
                "decisioning": {
                  "propositions": executedPropositions
                }
              }
            }
          });
        }
      }
    }
  }
});
Target アクティビティの適用方法
at.jsの使用
applyOffers関数を使用してTarget アクティビティを適用できます:adobe.target.applyOffer(options).
例:
adobe.target.getOffers({...})
  .then(response => adobe.target.applyOffers({ response: response }))
  .then(() => console.log("Success"))
  .catch(error => console.log("Error", error));
applyOffers コマンドについて詳しくは、専用ドキュメント を参照してください。
Platform Web SDKの使用中
applyPropositions コマンドを使用して、Target アクティビティを適用できます。
例:
alloy("applyPropositions", {
    propositions: [...]
});
applyPropositions コマンドについて詳しくは、専用ドキュメント を参照してください。
イベントの追跡方法
at.jsの使用
イベントは、trackEvent関数を使用するか、sendNotifications.を使用して追跡できます
この関数は、クリックやコンバージョンなどのユーザーアクションを報告するリクエストを実行します。 この関数は、応答でアクティビティを配信しません。
例 1
adobe.target.trackEvent({
    "type": "click",
    "mbox": "some-mbox"
});
例 2
adobe.target.sendNotifications({
    request: {
       notifications: [{
          ...,
          mbox: {
            name: "some-mbox"
          },
          type: "click",
          ...
       }]
    }
});
Platform Web SDKの使用中
sendEvent コマンドを呼び出し、_experience.decisioning.propositions XDM fieldgroupを入力し、eventTypeを2つの値のいずれかに設定することで、イベントとユーザーアクションを追跡できます。
decisioning.propositionDisplay: Target アクティビティのレンダリングを通知します。decisioning.propositionInteract: マウスのクリックなど、アクティビティに対するユーザーの操作を示します。
_experience.decisioning.propositions XDM fieldgroupはオブジェクトの配列です。 各オブジェクトのプロパティは、sendEvent コマンドで返されるresult.propositionsから派生します:{ id, scope, scopeDetails }.
例1 - アクティビティのレンダリング後にdecisioning.propositionDisplay イベントを追跡
alloy("sendEvent", {
  xdm: {},
  decisionScopes: ['discount']
}).then(function(result) {
  var propositions = result.propositions;

  var discountProposition;
  if (propositions) {
    // Find the discount proposition, if it exists.
    for (var i = 0; i < propositions.length; i++) {
      var proposition = propositions[i];
      if (proposition.scope === "discount") {
        discountProposition = proposition;
        break;
      }
    }
  }

  if (discountProposition) {
    // Find the item from proposition that should be rendered.
    // Rather than assuming there a single item that has HTML
    // content, find the first item whose schema indicates
    // it contains HTML content.
    for (var j = 0; j < discountProposition.items.length; j++) {
      var discountPropositionItem = discountProposition.items[i];
      if (discountPropositionItem.schema === "https://ns.adobe.com/personalization/html-content-item") {
        var discountHtml = discountPropositionItem.data.content;
        // Render the content
        var dailySpecialElement = document.getElementById("daily-special");
        dailySpecialElement.innerHTML = discountHtml;

        // For this example, we assume there is only a single place to update in the HTML.
        break;
      }
    }
    // Send a "decisioning.propositionDisplay" event signaling that the proposition has been rendered.
    alloy("sendEvent", {
      "xdm": {
        "eventType": "decisioning.propositionDisplay",
        "_experience": {
          "decisioning": {
            "propositions": [{
              "id": id,
              "scope": scope,
              "scopeDetails": scopeDetails
            }],
            "propositionEventType": {
              "display": 1
            }
          }
        }
      }
    });
  }
});
例2 - クリック指標が発生した後のdecisioning.propositionInteract イベントの追跡
alloy("sendEvent", {
  xdm: { ...},
  decisionScopes: ["hero-banner"]
}).then(function (result) {
  var propositions = result.propositions;

  if (propositions) {
    // Find the discount proposition, if it exists.
    for (var i = 0; i < propositions.length; i++) {
      var proposition = propositions[i];
      for (var j = 0; j < proposition.items.length; j++) {
        var item = proposition.items[j];

        if (item.schema === "https://ns.adobe.com/personalization/measurement") {
          // add metric to the DOM element
          const button = document.getElementById("form-based-click-metric");

          button.addEventListener("click", event => {
            const executedPropositions = [
              {
                id: proposition.id,
                scope: proposition.scope,
                scopeDetails: proposition.scopeDetails
              }
            ];
            // send the click track event
            alloy("sendEvent", {
              "xdm": {
                "eventType": "decisioning.propositionInteract",
                "_experience": {
                  "decisioning": {
                    "propositions": executedPropositions
                  }
                }
              }
            });
          });
        }
      }
    }
  }
});
例3 - アクションの実行後に発生したイベントの追跡
次の使用例は、ボタンのクリックなど、特定のアクションを実行した後に発生したイベントを追跡します。__adobe.target データオブジェクトを使用して、追加のカスタムパラメーターを追加できます。
commerce XDM オブジェクトを追加することもできます。
alloy("sendEvent", {
    "xdm": {
        "_experience": {
            "decisioning": {
                "propositions": [
                    {
                        "scope": "orderConfirm" //example scope name
                    }
                ],
                "propositionEventType": {
                    "display": 1
                }
            }
        },
        "eventType": "decisioning.propositionDisplay"
    },
    "commerce": {
        "order": {
            "purchaseID": "a8g784hjq1mnp3",
            "purchaseOrderNumber": "VAU3123",
            "currencyCode": "USD",
            "priceTotal": 999.98
        }
    },
    "data": {
        "__adobe": {
            "target": {
                "pageType": "Order Confirmation",
                "user.categoryId": "Insurance"
            }
        }
    }
})
シングルページアプリケーションでビューの変更をトリガーする方法
at.jsの使用
adobe.target.triggerView関数を使用します。 この関数は、新しいページが読み込まれるときや、ページ上のコンポーネントが再レンダリングされるときに呼び出すことができます。 adobe.target.triggerView()関数は、Visual Experience Composer (VEC)を使用してA/B テスト および エクスペリエンスのターゲット設定 (XT)アクティビティを作成するシングルページアプリケーション (SPA)に対して実装する必要があります。 adobe.target.triggerView()がサイトに実装されていない場合、VECをSPAに使用することはできません。
例
adobe.target.triggerView("homeView")
Platform Web SDKの使用中
シングルページアプリケーション View Changeをトリガーまたはシグナルするには、sendEvent コマンドのxdm オプションのweb.webPageDetails.viewName プロパティを設定します。 Platform Web SDKは、sendEventで指定されたviewNameに対するオファーがある場合、ビューキャッシュをチェックし、それらを実行して表示通知イベントを送信します。
例
alloy("sendEvent", {
  renderDecisions: true,
  xdm:{
    web:{
      webPageDetails:{
        viewName: "homeView"
      }
    }
  }
});
応答トークン の活用方法
Targetから返されたPersonalization コンテンツには、応答トークン が含まれています。 応答トークンには、アクティビティ、オファー、エクスペリエンス、ユーザープロファイル、位置情報などの詳細が含まれます。 これらの詳細は、サードパーティのツールと共有することも、デバッグに使用することもできます。 応答トークンは、Target ユーザーインターフェイスで設定できます。
at.jsの使用
at.js カスタムイベントを使用して、Target応答をリッスンし、応答トークンを読み取ります。
例
document.addEventListener(adobe.target.event.REQUEST_SUCCEEDED, function(e) {
  console.log("Request succeeded", e.detail);
});
Platform Web SDKの使用中
応答トークンは、sendEvent コマンドの結果で公開されるpropositionsの一部として返されます。 各提案にはitems,の配列が含まれ、各項目にはmeta オブジェクトが含まれており、対応トークンがTarget管理UIで有効になっている場合は、応答トークンが入力されます。 詳細情報
例
alloy("sendEvent", {
    renderDecisions: true,
    xdm: {}
  }).then(function(result) {
    if (result.propositions) {
      // Format of result.propositions:
      /*
        [
            {
                "id": "",
                "scope": "",
                "items": [
                    {
                        "id": "",
                        "schema": "",
                        "data": {},
                        "meta": { // RESPONSE TOKENS
                            "activity.name": ...,
                            "offer.id": ...,
                            "profile.activeActivities": ...
                        }
                    }
                ],
                "scopeDetails": {}
                "renderAttempted": false
            }
        ]
      */
    }
  });
フリッカーの管理方法
at.jsの使用
at.jsを使用すると、at.jsが処理できるようにbodyHidingEnabled: trueを設定することで、ちらつきを管理できます
DOMの変更を取得して適用する前に、パーソナライズされたコンテナを事前に非表示にします。
パーソナライズされたコンテンツを含むページセクションは、at.js bodyHiddenStyle.を上書きすることで事前非表示にできます
既定では、bodyHiddenStyleはHTML body.全体を非表示にします
両方の設定は、window.targetGlobalSettings. window.targetGlobalSettingsを使用して上書きできます。これらは、at.jsを読み込む前に配置する必要があります。
Platform Web SDKの使用中
Platform Web SDKを使用すると、次の例のように、configure コマンドで事前非表示スタイルを設定できます。
alloy("configure", {
  datastreamId: "configurationId",
  orgId: "orgId@AdobeOrg",
  debugEnabled: true,
  prehidingStyle: "body { opacity: 0 !important }"
});
Platform Web SDK非同期を読み込む場合、Adobeは、Platform Web SDKを挿入する前に、次のスニペットをページに挿入することをお勧めします。
<script>
  !function(e,a,n,t){
  if (a) return;
  var i=e.head;if(i){
  var o=e.createElement("style");
  o.id="alloy-prehiding",o.innerText=n,i.appendChild(o),
  setTimeout(function(){o.parentNode&&o.parentNode.removeChild(o)},t)}}
  (document, document.location.href.indexOf("adobe_authoring_enabled") !== -1, "body { opacity: 0 !important }", 3000);
</script>
A4Tはどのように扱われているのか
at.jsの使用
at.jsを使用してサポートされるA4T ログには、次の2種類があります。
- Analytics クライアントサイドロギング
- Analytics Server Side Logging
Analytics クライアントサイドロギング
例1: Target グローバル設定の使用
Analytics クライアント側ログは、at.js設定でanalyticsLogging: client_sideを設定するか、window.targetglobalSettings オブジェクトを上書きすることで有効にできます。
このオプションを設定すると、返されるペイロードの形式は次のようになります。
{
  "analytics": {
    "payload": {
      "pe": "tnt",
      "tnta": "167169:0:0|0|100,167169:0:0|2|100,167169:0:0|1|100"
    }
  }
}
次に、ペイロードを Data Insertion API経由でAnalyticsに転送できます。
例2: getOffers関数ごとに設定する:
adobe.target.getOffers({
      request: {
        experienceCloud: {
          analytics: {
            logging: "client_side"
          }
        },
        prefetch: {
          mboxes: [{
            index: 0,
            name: "a1-serverside-xt"
          }]
        }
      }
    })
    .then(console.log)
このコードスニペットは、応答ペイロードがどのように表示されるかです。
{
  "prefetch": {
    "mboxes": [{
      "index": 0,
      "name": "a1-serverside-xt",
      "options": [{
        "content": "<img src=\"http://s7d2.scene7.com/is/image/TargetAdobeTargetMobile/L4242-xt-usa?tm=1490025518668&fit=constrain&hei=491&wid=980&fmt=png-alpha\"/>",
        "type": "html",
        "eventToken": "n/K05qdH0MxsiyH4gX05/2qipfsIHvVzTQxHolz2IpSCnQ9Y9OaLL2gsdrWQTvE54PwSz67rmXWmSnkXpSSS2Q==",
        "responseTokens": {
          "profile.memberlevel": "0",
          "geo.city": "bucharest",
          "activity.id": "167169",
          "experience.name": "USA Experience",
          "geo.country": "romania"
        }
      }],
      "analytics": {
        "payload": {
          "pe": "tnt",
          "tnta": "167169:0:0|0|100,167169:0:0|2|100,167169:0:0|1|100"
        }
      }
    }]
  }
}
Analytics ペイロード (tnta トークン)は、 データ挿入APIを使用してAnalytics ヒットに含める必要があります。
Analytics サーバーサイドのログ
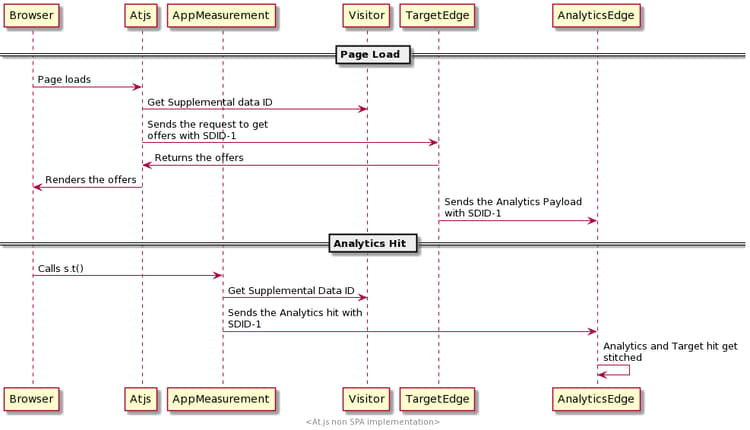
Analytics サーバー側ログは、at.js設定でanalyticsLogging: server_sideを設定するか、window.targetglobalSettings オブジェクトを上書きすることで有効にできます。
その後、データは次のように流れます。
Analytics Server Side Logging ワークフローを示す
Platform Web SDKの使用中
Web SDKでは、次の機能もサポートしています。
- Analytics クライアントサイドログ
- Analytics Server Side ログ
Analytics クライアント側ログ
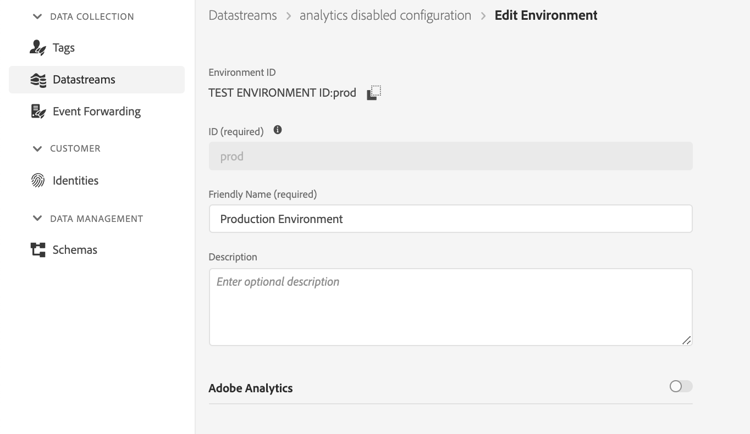
Analytics Client Side Loggingは、そのDataStream設定でAdobe Analyticsが無効になっている場合に有効になります。
Analytics クライアント側のログ記録ワークフローを示す
お客様は、sendEvent コマンドをチェーンしてAnalytics データ挿入API🔗を使用してと共有する必要があるAnalytics トークン (tnta)にアクセスし、結果として得られる提案の配列を繰り返します。
例
alloy("sendEvent", {
    "renderDecisions": true,
    "xdm": {
      "web": {
        "webPageDetails": {
          "name": "Home Page"
        }
      }
    }
  }
).then(function (results) {
  var analyticsPayloads = new Set();
  for (var i = 0; i < results.propositions.length; i++) {
    var proposition = results.propositions[i];
    var renderAttempted = proposition.renderAttempted;

    if (renderAttempted === true) {
      var analyticsPayload = getAnalyticsPayload(proposition);
      if (analyticsPayload !== undefined) {
        analyticsPayloads.add(analyticsPayload);
      }
    }
  }
  var analyticsPayloadsToken = concatenateAnalyticsPayloads(analyticsPayloads);
  // send the page view Analytics hit with collected Analytics payload using Data Insertion API
});
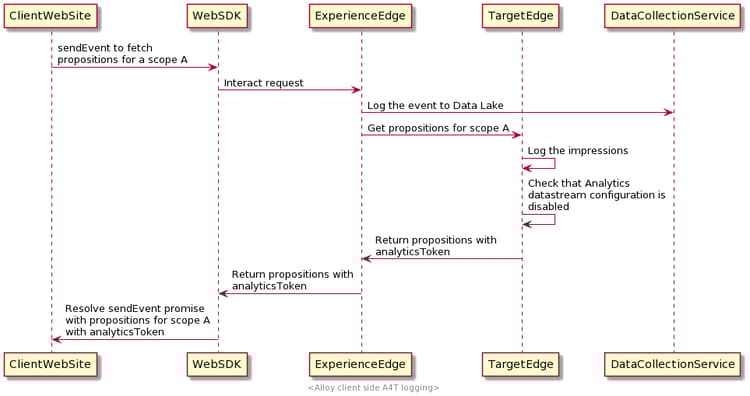
Analytics Client Sideが有効になっている場合のデータの流れを示す図を次に示します。
Analytics クライアントサイドの
Analytics サーバーサイドのログ
Analytics サーバー側ログは、そのDataStream設定でAnalyticsが有効になっている場合に有効になります。
Analytics設定を示す
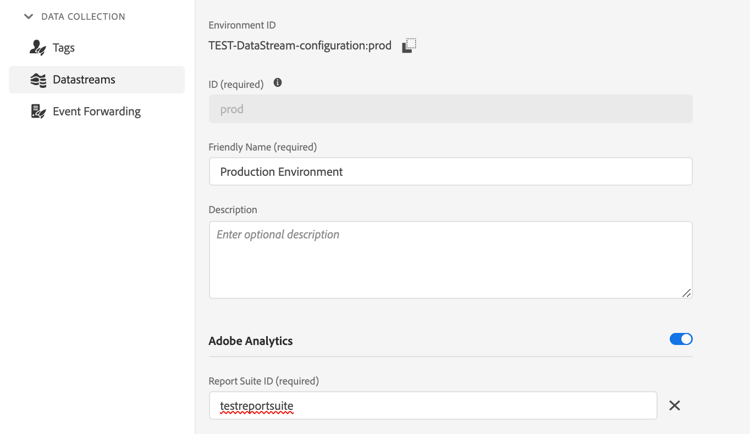
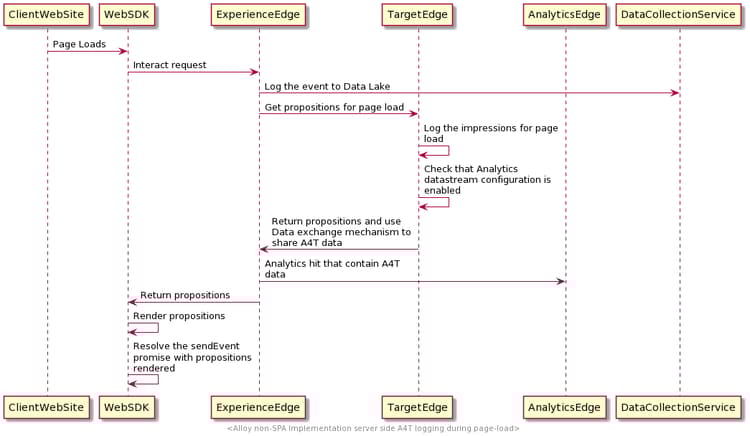
サーバーサイド Analytics ログが有効になっている場合、Analytics レポートに正しいインプレッションとコンバージョンが表示されるように、Analyticsと共有する必要があるA4T ペイロードがEdge Network レベルで共有されるので、お客様は追加の処理を行う必要はありません。
サーバーサイド分析ログが有効になっている場合、システムにデータが流れ込む方法は次のとおりです。
Target グローバル設定の設定方法
at.jsの使用
at.js ライブラリの設定は、Target UIやREST APIを使用して設定を設定するのではなく、window.targetGlobalSettings,を使用して上書きできます。
オーバーライドは、at.jsが読み込まれる前に、または管理/実装/at.js設定を編集/コード設定/ライブラリヘッダーで定義する必要があります。
例:
window.targetGlobalSettings = {
   timeout: 200, // using custom timeout
   visitorApiTimeout: 500, // using custom API timeout
   enabled: document.location.href.indexOf('https://www.adobe.com/jp') >= 0 // enabled ONLY on adobe.com
};
Platform Web SDKの使用中
この機能は、Web SDKではサポートされていません。
Target プロファイル属性の更新方法
at.jsの使用
例 1
adobe.target.getOffer({
   mbox: "target-global-mbox",
   params: {
     "profile.name": "test",
     "profile.gender": "female"
   },
   success: console.log,
   error: console.error
});
例 2
adobe.target.getOffers({
    request: {
      execute: {
        pageLoad: {
          profileParameters: {
            name: "test",
            gender: "female"
          }
        }
    }
  }
})
.then(console.log)
.catch(console.error);
Platform Web SDKの使用中
Target プロファイルを更新するには、sendEvent コマンドを使用してdata.__adobe.target プロパティを設定し、profile.を使用してキー名の先頭に付けます
例
alloy("sendEvent", {
  renderDecisions: true,
  data: {
    __adobe: {
      target: {
        "profile.gender": "female",
        "profile.age": 30
      }
    }
  }
});
Target Recommendationsの使用方法
at.jsの使用
例 1
adobe.target.getOffer({
   mbox: "target-global-mbox",
   params: {
     "entity.name": "T-shirt",
     "entity.id": "1234"
   },
   success: console.log,
   error: console.error
});
例 2
adobe.target.getOffers({
    request: {
      execute: {
        pageLoad: {
          parameters: {
            "entity.name": "T-shirt",
            "entity.id": "1234"
          }
        }
    }
  }
})
.then(console.log)
.catch(console.error);
Platform Web SDKの使用中
Recommendations データを送信するには、sendEvent コマンドを使用してdata.__adobe.target プロパティを設定し、entity.を使用してキー名の先頭に付けます
例
alloy("sendEvent", {
  renderDecisions: true,
  data: {
    __adobe: {
      target: {
        "entity.name": "T-shirt",
        "entity.id": "1234"
      }
    }
  }
});
サードパーティ IDの使用方法
at.jsの使用
at.jsを使用すると、getOffer,またはgetOffersを使用してmbox3rdPartyIdを送信する方法が複数あります。
例 1
adobe.target.getOffer({
  mbox:"test",
  params:{
    "mbox3rdPartyId": "1234"
  },
  success: console.log,
  error: console.error
});
例 2
adobe.target.getOffers({
    request: {
      id:{
        thirdPartyId: "1234"
      },
      execute: {
        pageLoad: {}
    }
  }
})
.then(console.log)
.catch(console.error);
または、targetPageParamsまたはtargetPageParamsAll.のいずれかでmbox3rdPartyIdを設定する方法があります
targetPageParamsを設定すると、pag-lLoadとも呼ばれるtarget-global-mboxのリクエストが送信されます。
レコメンデーションは、Target リクエストごとに送信されるため、targetPageParamsAllを使用して設定する必要があります。 targetPageParamsAllを使用する利点は、ページ上のmbox3rdPartyIdを1回定義して、すべてのTarget リクエストに適切なmbox3rdPartyId.を割り当てることができることです
window.targetPageParamsAll = function() {
      return {
        "mbox3rdPartyId": "1234"
      };
    };
window.targetPageParams = function() {
  return {
    "mbox3rdPartyId": "1234"
  };
};
Platform Web SDKの使用中
Platform Web SDKはTargetのサードパーティ IDをサポートしています。 しかし、それにはいくつかの手順が必要です。
ID マップを使用すると、顧客は複数のIDを送信できます。 すべてのIDには名前空間が設定されています。 各名前空間には、1つ以上のIDを含めることができます。 特定のIDをプライマリとしてマークできます。 この知識を念頭に置いて、Platform Web SDKでTargetのサードパーティ IDを使用するために必要な手順を確認できます。
- データストリーム設定ページでTarget サードパーティ IDを含む名前空間を設定します。
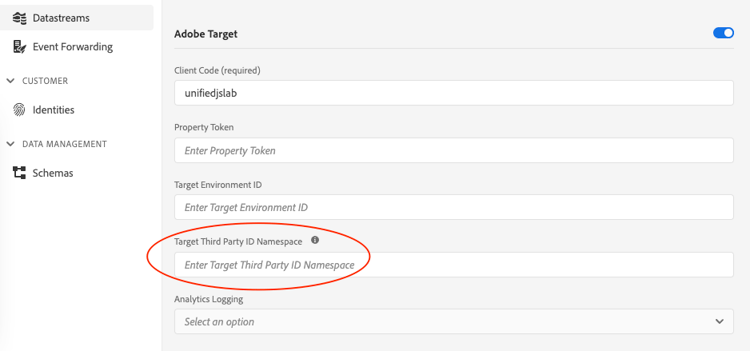
- 次のように、
sendEventコマンドごとにID名前空間を送信します。
alloy("sendEvent", {
  "renderDecisions": true,
  "xdm": {
    "identityMap": {
      "TGT3PID": [
        {
          "id": "1234",
          "primary": true
        }
      ]
    }
  }
});
プロパティトークンの設定方法
at.jsの使用
at.jsを使用してプロパティトークンを設定する方法は2つあります。targetPageParamsまたはtargetPageParamsAll.を使用してtargetPageParamsを使用すると、target-global-mbox呼び出しにプロパティトークンが追加されますが、targetPageParamsAllを使用すると、Target呼び出しすべてにトークンが追加されます。
例 1
   window.targetPageParamsAll = function() {
      return {
        "at_property": "1234"
      };
    };
例 2
window.targetPageParams = function() {
      return {
        "at_property": "1234"
      };
    };
Platform Web SDKの使用中
Platform Web SDKを使用している顧客は、データストリーム設定を設定する際に、Adobe Target名前空間の下でプロパティをより高いレベルで設定できます。
Adobe Targetの設定を示す
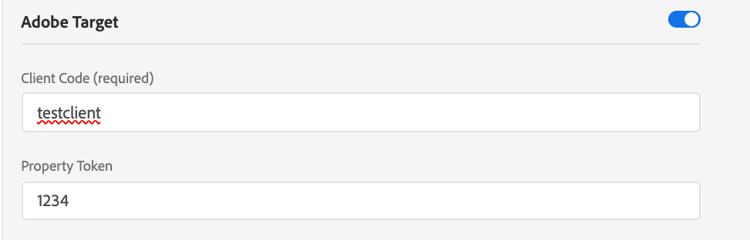
つまり、特定のデータストリーム設定に対するTarget呼び出しごとに、そのプロパティトークンが含まれています。
mboxのプリフェッチ方法
at.jsの使用
この機能は、at.js 2.xでのみ使用できます。 at.js 2.xには、getOffersという名前の新しい関数があります。 getOffers関数を使用すると、1つ以上のmboxのコンテンツを先行取得できます。 次に例を示します。
adobe.target.getOffers({
    request: {
      prefetch: {
        mboxes: [{
          index: 0,
          name: "test-mbox",
          parameters: {
            ...
          },
          profileParameters: {
            ...
          }
        }]
    }
  }
})
.then(console.log)
.catch(console.error);
mboxes配列内のすべてのmboxに独自のインデックスがあることを確認することをお勧めします。 通常、最初のmboxにはindex=0、次のmboxにはindex=1,などが含まれます。Platform Web SDKの使用中
この機能は現在Platform Web SDKではサポートされていません。
Target実装のデバッグ方法
at.jsの使用
at.js ライブラリは、次のデバッグ機能を公開します。
- Mbox無効 – Targetの取得とレンダリングを無効にして、Targetの操作なしでページが壊れているかどうかを確認します
- Mbox デバッグ - at.jsはアクションごとにログを記録します
- ターゲット トレース – 決定プロセスに参加した詳細を含むトレース オブジェクトで生成されたmbox トレース トークンは、
window.___target_traceオブジェクトで利用できます。
Platform Web SDKの使用中
Platform Web SDKを使用する場合、複数のデバッグ機能があります:
- Assuranceを使用しています
- Web SDK デバッグ有効
- Web SDK モニタリングフックを使用
- Adobe Experience Platform Debuggerを使用
- ターゲットトレース