Installation
Install and initialize the Marketo Mobile SDK to send push notifications, in-app messages, or both.
Install Marketo SDK on iOS
Prerequisites
- Add an application in Marketo Admin and obtain the application Secret Key and Munchkin Id.
- Optional: Set up push notifications.
Install Framework via CocoaPods
- Install CocoaPods.
$ sudo gem install cocoapods - Change directory to your project directory and create a Podfile with smart defaults.
$ pod init - Open your Podfile.
$ open -a Xcode Podfile - Add the following line to your Podfile.
$ pod 'Marketo-iOS-SDK' - Save and close your Podfile.
- Download and install Marketo iOS SDK.
$ pod install - Open the workspace in Xcode.
$ open App.xcworkspace
Install Framework using Swift Package Manager
-
Select your project in the Project Navigator. Under “Add Package Dependency”, select ‘+’.
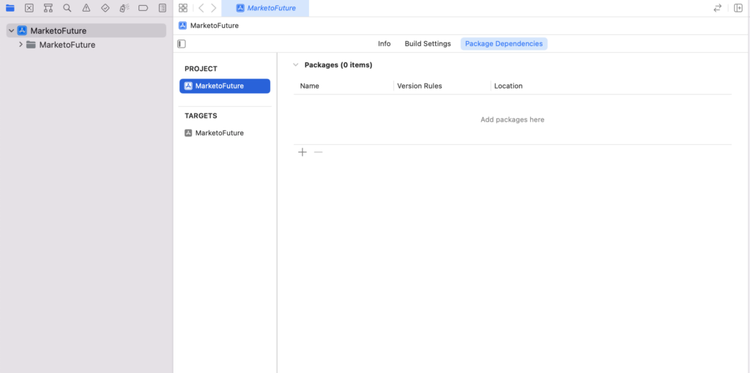
-
Add the Marketo package from https://github.com/Marketo/ios-sdk.
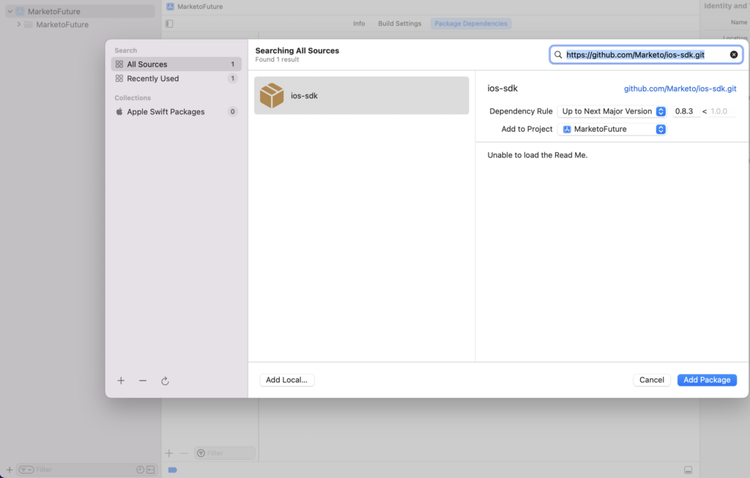
-
Add the resource bundle. Locate
MarketoFramework.XCframeworkin the Project Navigator and open it in Finder. DragMKTResources.bundleto Copy Bundle Resources.
Setup Swift Bridging Header
-
Go to File > New > File and select “Header File”.
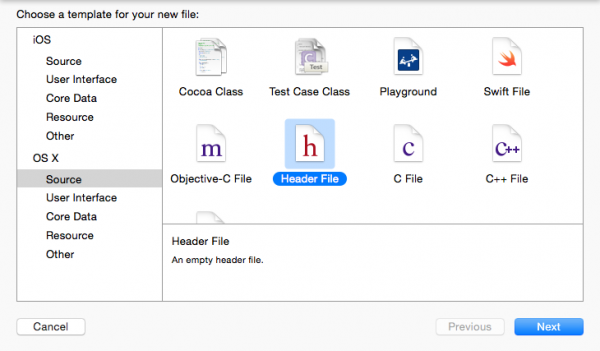
-
Name the file “<ProjectName>-Bridging-Header”.
-
Go to Project > Target > Build Phases > Swift Compiler > Code Generation. Add the following path to Objective-Bridging Header:
$(PODS_ROOT)/<_ProjectName_>-Bridging-Header.h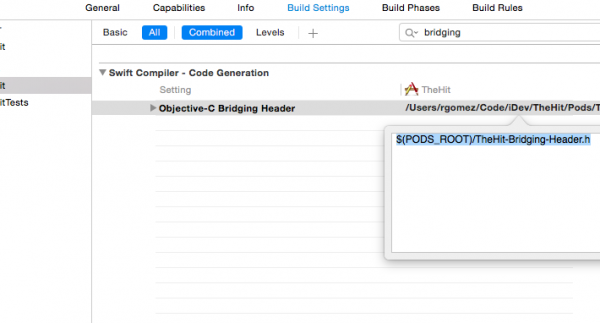
Initialize SDK
Initialize the Marketo iOS SDK with your Munchkin Account Id and App Secret Key. Find both values under “Mobile Apps and Devices” in Marketo Admin.
-
Open the AppDelegate.m file for Objective-C or the Bridging file for Swift. Import the Marketo.h header file.
code language-none #import <MarketoFramework/MarketoFramework.h> -
Paste the following code inside the
application:didFinishLaunchingWithOptions: function.Pass “native” as the framework type for native apps.
| code language-objectivec |
|---|
|
| code language-swift |
|---|
|
- Replace
munkinAccountIdandsecretKeywith the “Munchkin Account ID” and “Secret Key” from Marketo Admin > Mobile Apps and Devices.
iOS Test Devices
- Select Project > Target > Info > URL Types.
- Add the identifier ${PRODUCT_NAME}.
- Set URL Schemes to
mkto-<Secret Key_>. - Add applicationsourceApplication to the AppDelegate.m file for Objective-C.
Handle Custom Url Type in AppDelegate
| code language-objectivec |
|---|
|
| code language-swift |
|---|
|
How to Install Marketo SDK on Android
Prerequisites
- Add an application in Marketo Admin and obtain the application Secret Key and Munchkin Id.
- Optional: Set up push notifications.
- Download Marketo SDK for Android
Android SDK Setup with Gradle
-
In the application-level build.gradle file, add the dependency under the dependencies section.
implementation 'com.marketo:MarketoSDK:0.8.9' -
Add the following configuration to the root
build.gradlefile.code language-none buildscript { repositories { google() mavenCentral() } -
Sync the project with the Gradle files.
Configure Permissions
Open AndroidManifest.xml and add the following permissions. Your app must request the “INTERNET” and “ACCESS_NETWORK_STATE” permissions. Skip this step if the app already requests them.
<uses‐permission android:name="android.permission.INTERNET"></uses‐permission>
<uses‐permission android:name="android.permission.ACCESS_NETWORK_STATE"></uses‐permission>
Initialize SDK
-
Open the Application or Activity class. Import the Marketo SDK into the Activity before setContentView or in Application Context.
code language-java // Initialize Marketo Marketo marketoSdk = Marketo.getInstance(getApplicationContext()); marketoSdk.initializeSDK("native","munchkinAccountId","secretKey"); -
ProGuard Configuration (Optional)
If your app uses ProGuard, add the following lines to the
proguard.cfgfile in the project folder. This configuration excludes the Marketo SDK from obfuscation.code language-none -dontwarn com.marketo.* -dontnote com.marketo.* -keep class com.marketo.`{ *; }
Android Test Devices
Add “MarketoActivity” to AndroidManifest.xml inside the application tag.
<activity android:name="com.marketo.MarketoActivity"  android:configChanges="orientation|screenSize" >
    <intent-filter android:label="MarketoActivity" >
        <action  android:name="android.intent.action.VIEW"/>
        <category  android:name="android.intent.category.DEFAULT"/>
        <category  android:name="android.intent.category.BROWSABLE"/>
        <data android:host="add_test_device" android:scheme="mkto" />
    </intent-filter>
</activity>
Firebase Cloud Messaging Support
The MME SDK for Android supports direct use of Google’s Firebase Cloud Messaging (FCM).
Adding FCM to your Application
-
Integrate the latest Marketo Android SDK into the Android app. See the steps on GitHub.
-
Configure the Firebase app in Firebase Console.
-
Create/Add a Project on Firebase Console.
- In the Firebase console, select
Add Project. - Select your GCM project from the list of existing Google Cloud projects, and select
Add Firebase. - In the Firebase welcome screen, select
Add Firebase to your Android App. - Provide your package name and SHA-1, and select
Add App. A newgoogle-services.jsonfile for your Firebase app is downloaded. - Select
Continueand follow the detailed instructions for adding the Google Services plugin in Android Studio.
- In the Firebase console, select
-
Navigate to ‘Project Settings’ in Project Overview
- Click ‘General’ tab. Download the ‘google-services.json’ file.
- Click on ‘Cloud Messaging’ tab. Copy ‘Server Key’ and ‘Sender ID’. Provide these ‘Server Key’ and ‘Sender ID’ to Marketo.
-
Configure FCM in the Android app.
-
Switch to the Project view in Android Studio to see your project root directory
-
Move the downloaded ‘google-services.json’ file into your Android app module root directory
-
In Project-level build.gradle, add the following:
code language-none buildscript { dependencies { classpath 'com.google.gms:google-services:4.0.0' } } -
In App-level build.gradle, add the following:
code language-none dependencies { compile 'com.google.firebase:firebase-core:17.4.0' } // Add to the bottom of the file apply plugin: 'com.google.gms.google-services' -
Finally, select Sync now in the bar that appears in the ID
-
-
-
Edit the app manifest. The FCM SDK automatically adds the required permissions and receiver functionality. Remove the following obsolete elements, which might cause message duplication:
code language-xml <uses-permission android:name="android.permission.WAKE_LOCK" /> <permission android:name="<your-package-name>.permission.C2D_MESSAGE" android:protectionLevel="signature" /> <uses-permission android:name="<your-package-name>.permission.C2D_MESSAGE" /> ... <receiver> android:name="com.google.android.gms.gcm.GcmReceiver" android:exported="true" android:permission="com.google.android.c2dm.permission.SEND" <intent-filter> <action android:name="com.google.android.c2dm.intent.RECEIVE" /> <category android:name="<your-package-name> /> </intent-filter> </receiver>
-