Generate ad names
Automated ad naming in GenStudio for Performance Marketing helps you follow your organization’s naming conventions when you activate ads. Consistent names support performance reporting, attribution, and spend reconciliation.
A naming template defines the parts of an ad name and their order. Example parts include the product, campaign, and market. To create a template, upload an Excel file that describes your organization’s naming convention.
Use the template to generate names from information about each experience, such as its product or campaign. Review and correct the results before sending your ads. The final names are sent to each destination platform as the ad names.
Before you begin
You only need to set up a template once. If your platform already has a template assigned in your current Project, go directly to Generate names for an activation.
Otherwise, create a template and ask a system manager to assign it to your platforms. Each Project can have a different default template for the same platform.
For template setup, prepare an Excel file no larger than 3 MB, with only one sheet. CSV files are not supported. Describe the naming convention for individual ads, not campaigns or ad groups.
List the fields in their required order. For each field, include the allowed values, corresponding codes, and instructions for choosing a value. For example, the Image option for the format field uses the code IMG in the name.
For a sample structure, download the WKND Meta naming convention example (Excel). The file defines fields and example values for product, campaign, market, and other parts of an ad name.
Replace the sample values and rules with your organization’s convention before using the file for your own activations. The example’s platform values illustrate naming choices, not a list of supported activation destinations.
Create a naming template
Create a template from your existing naming-convention file, then review the extracted structure before you use it.
-
Open the Project where you want to use the template.
-
Go to More > Settings.
-
Select Set up beside Ad name template.
If templates already exist, open Ad name template, then select Create template.
-
Select Select file in the Upload file dialog.
-
Choose your Excel file.
Alternatively, drag the file into the upload area. While Analyzing your spreadsheet… appears, the fields and values are mapped to your template. Allow a few minutes for the analysis to finish.
-
Review the fields, allowed values, and Ad name preview.
The preview uses sample values, not the details of a specific ad.
-
Select Save.
Files larger than 3 MB, unsupported file types, and empty files show an error without changing existing templates or platform assignments.
Customize a template
Edit a saved template to adjust its name, fields, separator, or rules.
-
Go to More > Settings > Ad name template.
-
Open the three-dot menu beside your template.
-
Select Edit.
-
To rename the template, select the pencil icon beside the title.
-
Set the Field separator to the character that separates the parts of the name, such as an underscore (
_). -
Drag the fields into the required order.
Use Add field or a field’s trash icon if you need to change which fields are included.
-
To open a field’s settings, select its pencil icon.
-
Review Type and Name in the Edit a field dialog.
Use Dropdown for a field with predefined choices or Free text for a value that you enter.
-
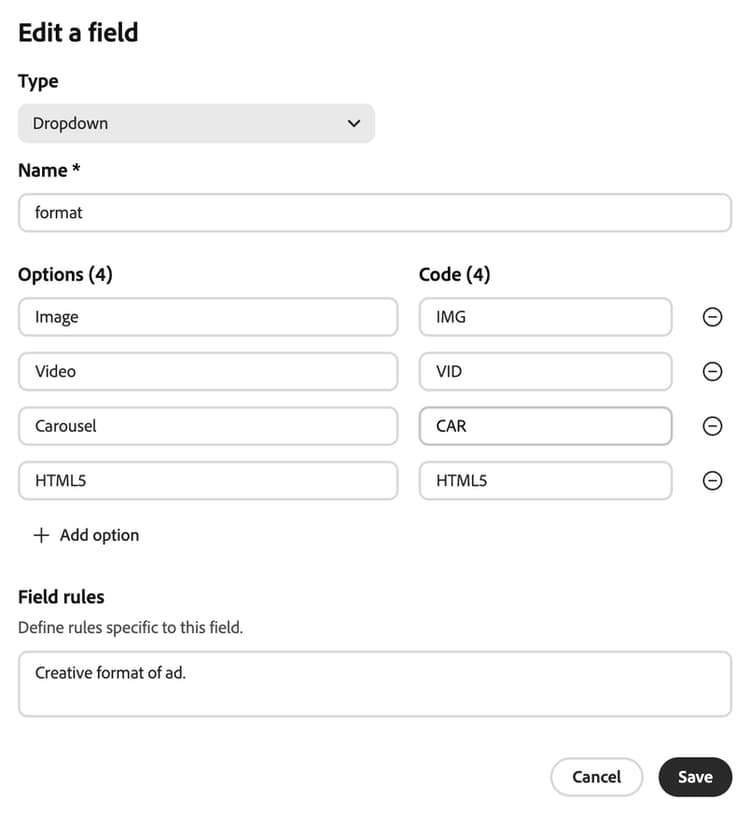
For a dropdown field, review Options and Code.
Options contains the readable choices. Code contains the corresponding values used in the ad name. For example, the option
Imageuses the codeIMG.To add a choice, select Add option. To remove a choice, select its minus icon. Duplicate values within a field are not allowed.
-
Enter any Field rules needed to choose or format that field’s value.
For the
creativeVersionfree-text field, enter this example rule:Use the experience name as a starting value, with spaces removed. -
Select Save in the field dialog.
Repeat the field review for any other fields that need changes.
-
Enter any Template rules that apply across the name.
For example, enter
Remove spaces from Product and Campaign values. -
Select Save at the top of the page.
The preview reflects the updated field order and separator. To check your saved changes, reopen the template.
The field editor shows how readable options map to the codes included in generated names:
Assign a template to platforms
System managers set the default template for each platform within a Project. If you are not a system manager, ask one to complete this procedure.
- Open the Project whose platform defaults you want to set.
- Go to More > Settings > Ad name template.
- Open the three-dot menu beside your template.
- Select Edit.
- Select one or more platforms under Preferred platforms at the bottom of the editor.
- Select Save.
Each platform has one default template per Project. You can assign the same template to several platforms.
Templates are available to view and edit across Projects. However, you can change platform assignments only in your current Project.
Replacing a platform’s default does not delete the previous template or change other Projects’ assignments.
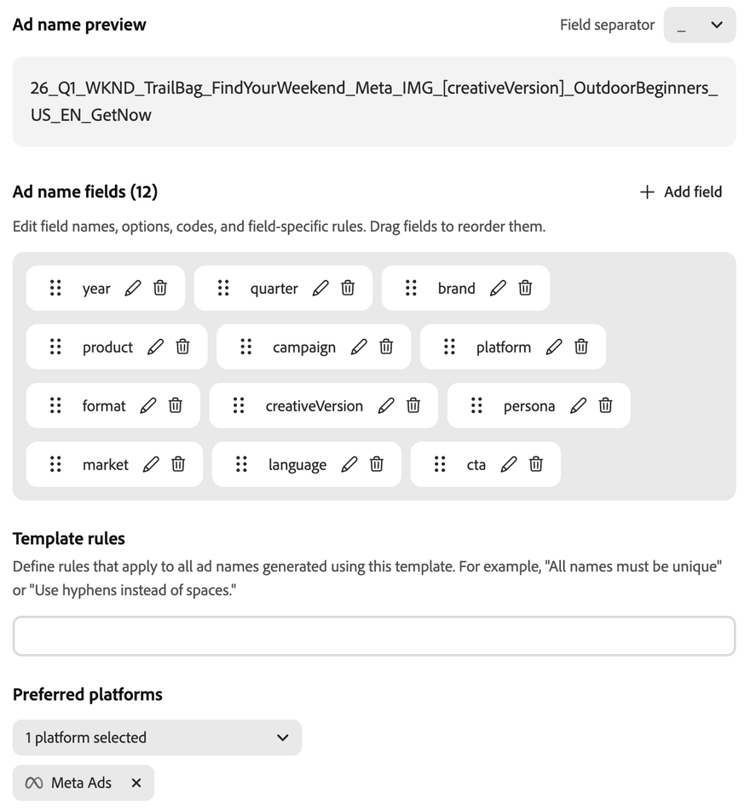
The example below shows the template preview, field order, rules, and Preferred platforms with Meta Ads selected:
Generate names for an activation
Prepare your activation before generating names. Each experience’s metadata contains information such as its campaign, product, or persona. Check that the metadata provides the values your template needs. See Activation workflow for help preparing an activation.
When you first create an activation, each ad’s initial name depends on its platform’s template assignment:
[market]_[year]. Names are generated only after you select Generate ad name.-
Open Activate in the intended Project.
-
Add your experiences to an activation.
-
Complete the platform setup and all required information, including copy, call-to-action (CTA), and website URL.
-
Check that the experiences have the metadata needed by your naming convention.
-
Select Generate ad name above the activation table.
Wait for Generating ad names to finish before reviewing the results.
-
Review the Ad name column.
Generation applies to all ads on platforms with an assigned template, except ads with custom name overrides. Names are not generated automatically when you open the table.
For platforms without an assigned template, edit the experience-based ad names manually as needed.
If no platforms have templates assigned, no names are generated.
Correct an individual ad name
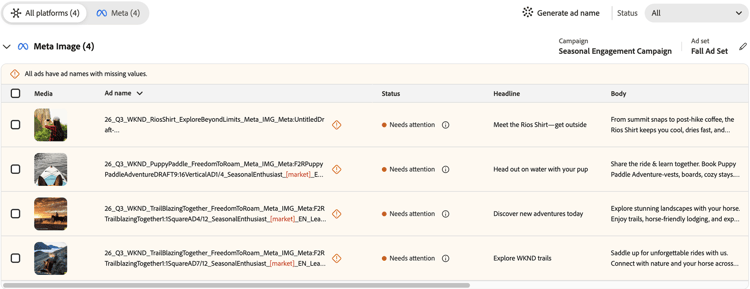
Review generated names before you send your ads. Any fields that remain empty after generation appear as highlighted placeholders, such as [market]. The affected ads show Needs attention.
To find names that need corrections, look for highlighted placeholders and Needs attention statuses in the activation table:
- Select the ad’s row in the activation table.
- Select Edit ad name.
- Update the relevant dropdowns or text fields.
- Select Save.
For example, if market has no value, enter or select the appropriate market to replace [market] in the name.
Check the updated name against your convention.
Resolve potential duplicate names
Identical ad names on the same platform are flagged as potential duplicates.
- Select one of the affected ads.
- Select Edit ad name.
- Change the name so that the two names are different.
- Select Save.
The potential-duplicate warning clears after the names are made different.
Edit multiple ad names edit-several-ad-names-at-once
Use bulk editing to apply a shared correction while preserving values that differ between ads.
-
Select the ads using their row checkboxes.
-
Select Edit ad name from the selection toolbar.
-
Change only the fields that need the same value across the selected ads.
Mixed values means that the selected ads currently have different values for a field. Leave that field untouched to preserve each ad’s value.
-
Select Save.
-
Review the updated names for accuracy and potential duplicates.
Only selected ads are updated. Unselected ads remain unchanged.
The bulk editor displays Mixed values for fields that differ across the selected ads:
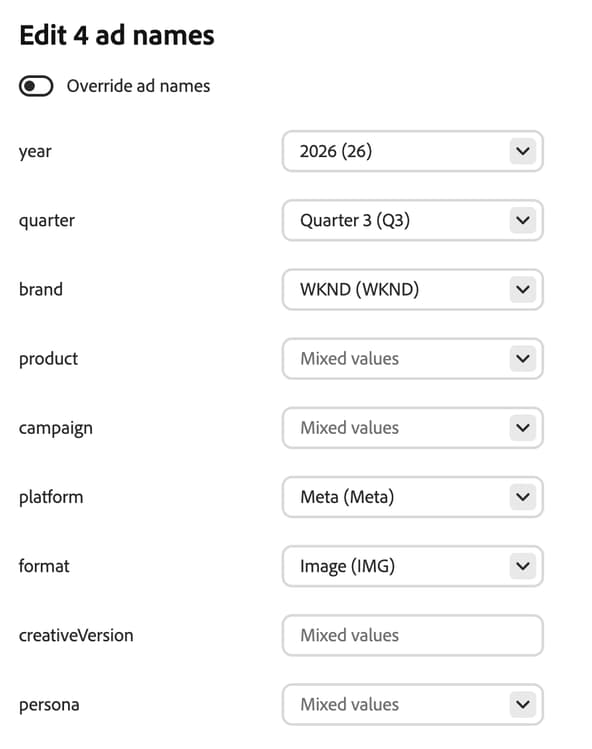
For example, changing only the persona from OutdoorBeginners to Adventurers preserves the different products. These shortened names illustrate the change:
WKND_TrailBag_OutdoorBeginnersWKND_TrailBag_AdventurersWKND_RiosShirt_OutdoorBeginnersWKND_RiosShirt_AdventurersUse a custom ad name
Use an override to replace the entire generated name with a custom name, rather than editing individual template fields.
- Select the ad’s row.
- Select Edit ad name.
- Turn on Override ad names.
- Enter the custom name.
- Select Save.
The custom name stays unchanged when you generate names again.
With the override enabled, edit the complete name instead of its individual template fields:
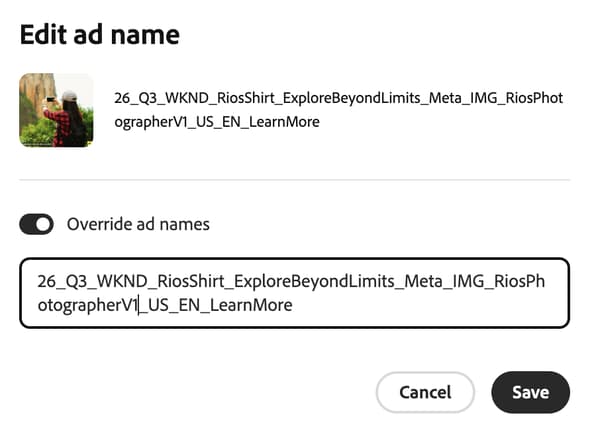
To return to template-based naming, follow these steps:
- Open Edit ad name for the ad.
- Turn off Override ad names.
- Select Save.
- Select Generate ad name above the activation table.
This action also regenerates names for other ads in the table that have an assigned template and no custom name override.
Respond to template changes
When you edit an activation table, a warning appears if a template it uses has changed or been deleted.
If the template has changed, review the updated template before you regenerate names. Select Generate ad name to apply it.
If the template has been deleted or you need a replacement, follow these steps:
- Ask a system manager to assign a replacement template to the affected platform in the same Project.
- Return to the activation table.
- Select Generate ad name.
- Review the updated names.
Names with overrides enabled remain unchanged during regeneration.
Send ads to platforms
Review your final names and address unresolved fields, potential duplicates, and other Needs attention issues before you send ads.
When the activation is ready, select Send to platforms.
GenStudio for Performance Marketing sends each ad’s final name to the destination platform as its ad name. The name sent includes any edits to template fields or custom name overrides. The ad names on the platform exactly match the final names you reviewed.
For display destinations such as Innovid, names appear as creative names.