Add a production pipeline configuring-production-pipelines
Learn how to use Cloud Manager to create and configure production pipelines to deploy your code. For a more conceptual overview of how pipelines work in Cloud Manager, see CI/CD Pipelines.
Overview overview
Using the Pipeline Settings tile in Cloud Manager you can create two different types of pipelines.
- Production Pipelines - A production pipeline is a purpose-built pipeline made of a series of orchestrated steps to take source code from your Git repository to production.
- Non-Production Pipelines - A non-production pipeline primarily serves to run code-quality scans or to deploy source code into a development environment.
This document focuses on production pipelines. For details on how to configure non-production pipelines see the document Configuring Non-Production Pipelines.
The Deployment Manager role is responsible for setting up the pipeline. Pipeline configuration consists of:
- Defining the trigger that starts the pipeline.
- Defining the parameters controlling the production deployment.
- Configuring the performance test parameters.
Add a production pipeline add-a-production-pipeline
After you have used the Cloud Manager UI to set up your program and have at least one environment, you are ready to add a production pipeline.
-
Log into Cloud Manager at my.cloudmanager.adobe.com and select the appropriate organization and program.
-
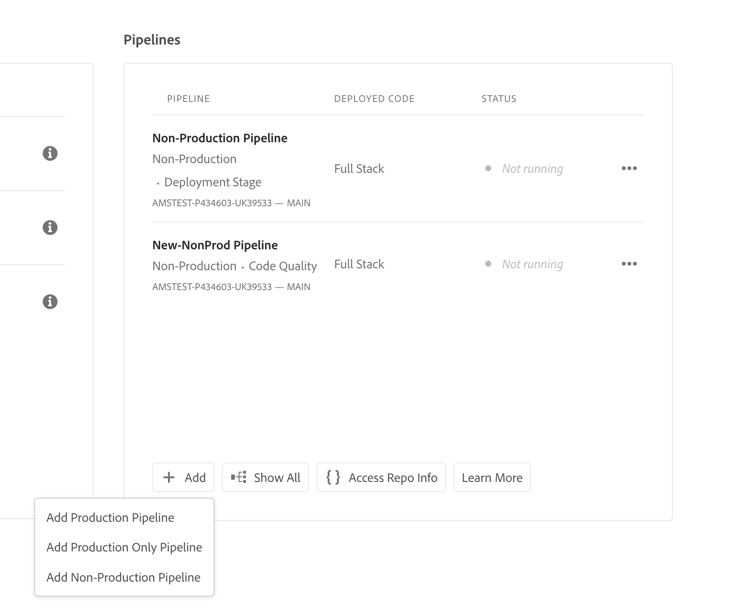
Navigate to the Pipelines card from the Program Overview page.
-
Click +Add, then select Add Production Pipeline.
-
The Add Production Pipeline dialog box opens to the Configuration tab where a number of options for your pipeline must be defined. These options are grouped into collapsible sections and are described in the following steps.
-
Provide a descriptive name for your pipeline in the Pipeline Name field.
-
Under the Environments section, you define what triggers a deployment and how it should be rolled out per environment.
-
In the STAGE section, you can define how the pipeline rolls out to your staging environment.
-
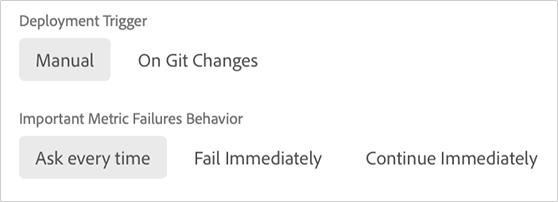
Deployment Trigger - You have the following options to define the deployment triggers to start the pipeline.
- Manual - Start the pipeline manually using the Cloud Manager UI.
- On Git Changes - Start the CI/CD pipeline whenever commits are added to the configured Git branch. With this option, you can still start the pipeline manually as required.
-
Important Metric Failures Behavior - During pipeline setup or edit, the Deployment Manager has the option of defining the behavior of the pipeline when an important failure is encountered in any of the quality gates. The available options are:
- Ask every time - The default setting and requires manual intervention on any important failure.
- Fail Immediately - The pipeline is canceled whenever an important failure occurs. It is emulating a user manually rejecting each failure.
- Continue Immediately - The pipeline proceeds automatically whenever an important failure occurs. It is emulating a user manually approving each failure.
-
Deployment Options - You can accelerate certain deployment tasks.
-
Approve after Stage Deployment - This approval occurs after deployment to the staging environment before any testing is done. Otherwise, approval occurs before the production deployment, which is done after all testing is complete.
-
Skip Load Balancer changes - Load balancer changes are not made.
-

-
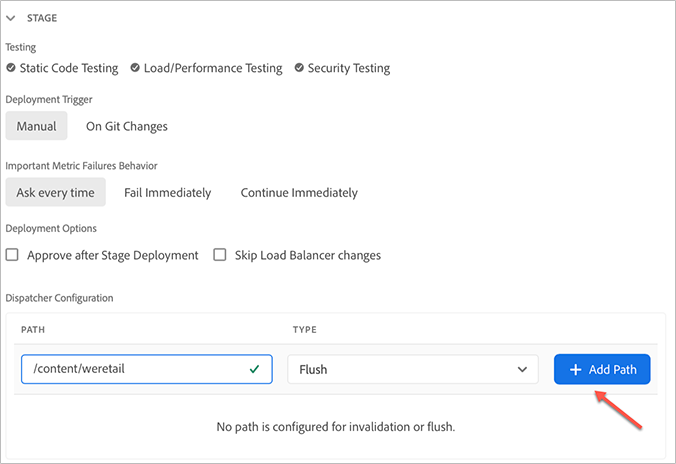
Dispatcher Configuration - The Deployment Manager role can configure a set of content paths that are either invalidated or flushed from the AEM Dispatcher cache when a pipeline is run. These cache actions are performed as part of the deployment pipeline step after any content packages are deployed. These settings use standard AEM Dispatcher behavior. To configure, do the following:
-
Under PATH provide a content path.
-
Under TYPE, select the action to be taken on that path.
- Flush - Perform a cache deletion.
- Invalidate - Perform a cache invalidation, similar to when content is activated from an authoring instance to a publishing instance.
-
Click Add Path to add your specified path. You can add up to 100 paths per environment.
-
note tip TIP In general, the use of the invalidate action is preferable, but there may be cases where flushing is required, especially when using AEM HTML Client Libraries. -
-
In the PRODUCTION section, you can define how the pipeline rolls out to your production environment.
-
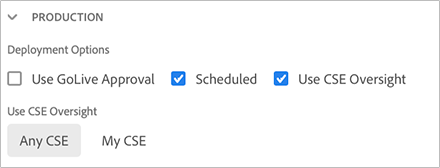
Deployment Options - You can define the parameters controlling the production deployment.
-
Use Go Live Approval - A user with the Business Owner, Project Manager, or Deployment Manager role by way of the Cloud Manager UI must manually approve a deployment.
-
Scheduled - Halts the pipeline before production deployment to allow it to be scheduled. If this option is selected, the pipeline halts after deployment to the staging environment and prompt the user for the action to take.
Now- Deploys to production immediately, effectively completing the pipeline.- Date - Lets the user schedule a time when the deployment should be completed.
- Stop Execution - Aborts deployment to production.
note tip TIP See Code Deployment to learn how to set the deployment schedule or execute the pipeline immediately. -
Use CSE Oversight - If this option is select, a CSE (Customer Success Engineer) is engaged to start the actual deployment. When creating or editing a pipeline when this option is enabled, the Deployment Manager role has the following options.
- Any CSE - Allows any available CSE to start the deployment.
- My CSE - Allows only the specific CSE assigned to the customer to start the deployment. This option also applies for the designated backup of the CSE if the assigned CSE is unavailable.
-
-
Dispatcher Configuration - Define the Dispatcher configuration for your production environment. The options are the same as the options for the staging environment.
-
-
-
-
Click Continue to advance to the Source Code tab where you select the type of code to deploy and configure the source repository.
-
Under Select code to deploy, choose the deployment type:
- Full Stack Code - Code for your complete AEM application.
- Web Tier Config - Dispatcher properties to store, process and deliver web pages to the client.
See CI/CD Pipelines for more information about these deployment types. The remaining steps to complete the pipeline configuration depend on the type you selected. Follow the links above to jump to the relevant section of this document.
-
-
Click Continue to advance to the Stage Testing tab where you can configure AEM Sites and AEM Assets Performance Testing, depending on which products you have licensed.
note tip TIP See Code Quality Testing for more details on the options available on the Stage Testing tab. -
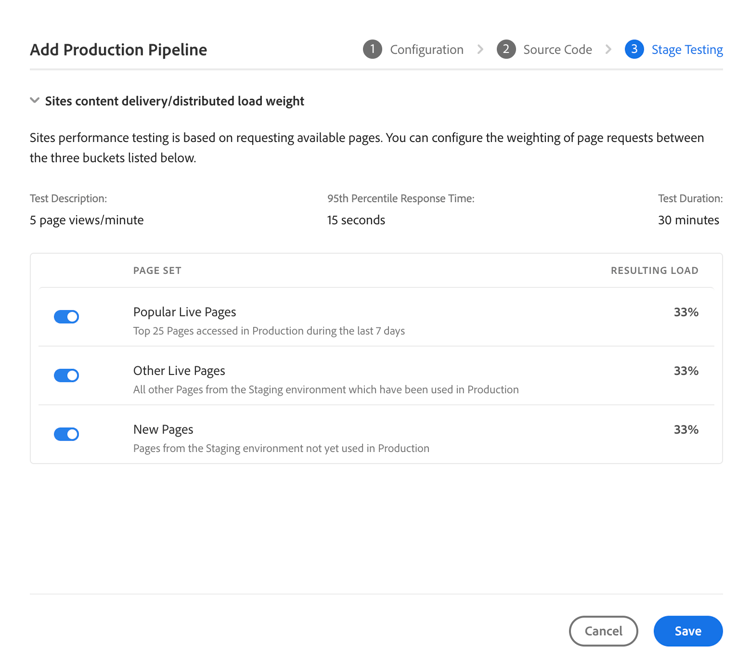
In the Sites Content Delivery/Distributed Load Weight section, you configure site Performance Testing based on the weighting of page requests among three page sets. You can enable or disable the page sets as needed.
- Popular Live Pages
- Other Live Pages
- New Pages
-
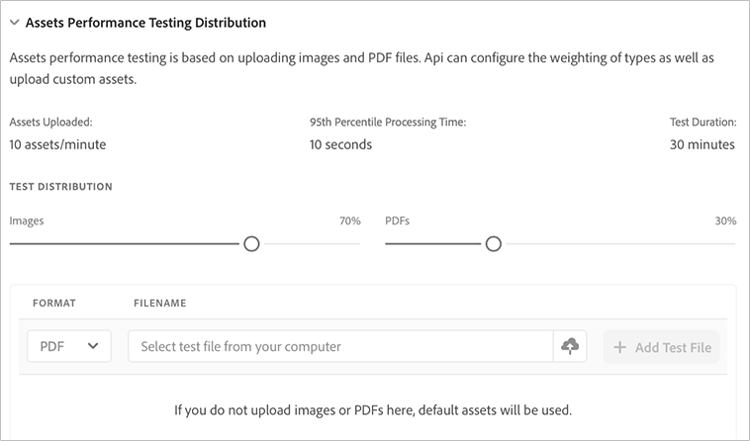
Under the Assets Performance Testing Distribution section, you define the test distribution of images and PDFs and define your own test assets.
-
Images - Adjust the slider to adjust the test split between images and PDFs.
-
PDFs - Adjust the slider to adjust the test split between images and PDFs.
-
Define your own custom assets by uploading them.
- FORMAT - Choose whether your custom asset is a PDF or an image.
- FILENAME - Use the file browser button to select an image from your local machine.
- Add Test File - Click to upload your selected asset.
-
-
-
Click Save to complete adding your production pipeline.
Full Stack Code full-stack-code
A full-stack code pipeline deploys back-end and front-end code builds along with HTTPD/Dispatcher configuration.
To configure a full stack code production pipeline:
-
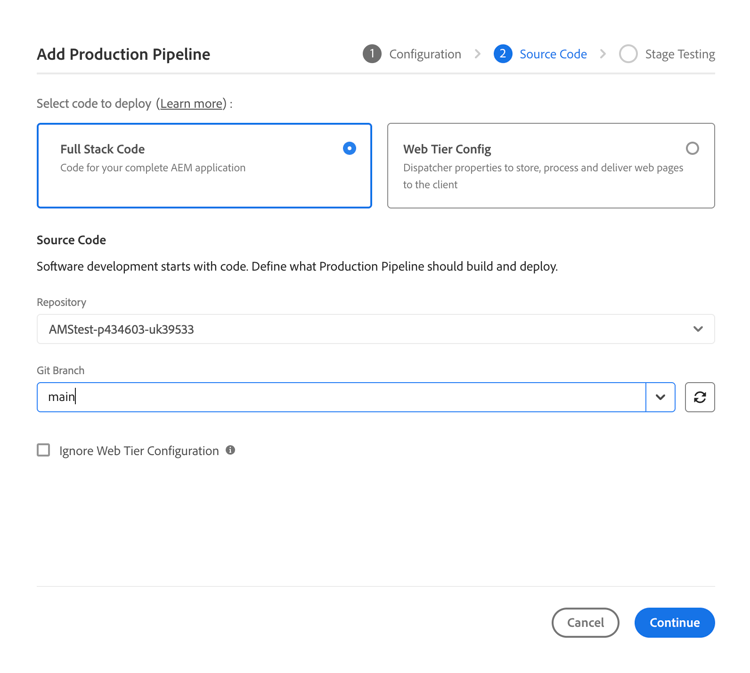
On the Source Code tab, define the following options.
- Repository - Defines which Git repository the pipeline retrieves the code from.
note tip TIP See the document Program Setup to learn how to add and manage repositories in Cloud Manager. - Git Branch - Defines from which branch the pipeline retrieves the code.
- Ignore Web Tier Configuration - When checked, the pipeline does not deploy your web tier configuration. If a web tier configuration pipeline already exists for the same environment, this check box is automatically selected and disabled because that pipeline manages the web tier configuration instead. When no web tier config pipeline exists, you can select or clear this option to control whether the full stack pipeline deploys the Dispatcher configuration.
-
Click Continue to advance to the Stage Testing tab. See Stage Testing for details.
Web Tier Config web-tier-config
A web tier config pipeline deploys only HTTPD/Dispatcher configuration. See CI/CD Pipelines for more details about this pipeline type.
If you create a web tier config pipeline for an environment with an existing full-stack pipeline, the web tier configuration in the full-stack pipeline is ignored. This change affects only the web tier configuration in that environment.
To configure a web tier config production pipeline:
-
On the Source Code tab, define the following options.
- Repository - From the drop-down list, select the Git repository that contains the web tier configuration.
- Git Branch - Select the branch in the chosen repository that Cloud Manager uses for the deployment.
- Code Location - Enter the path in the selected repository that contains the web tier configuration to deploy. The default location is the repository root (
/).
note NOTE If Code Location does not point to the dispatcher code location, additional application code could be pulled into the artifact package and deployed to the dispatcher, causing Apache to fail on restart and the pipeline to fail. Make sure to set the correct path to the dispatcher files in the repository. 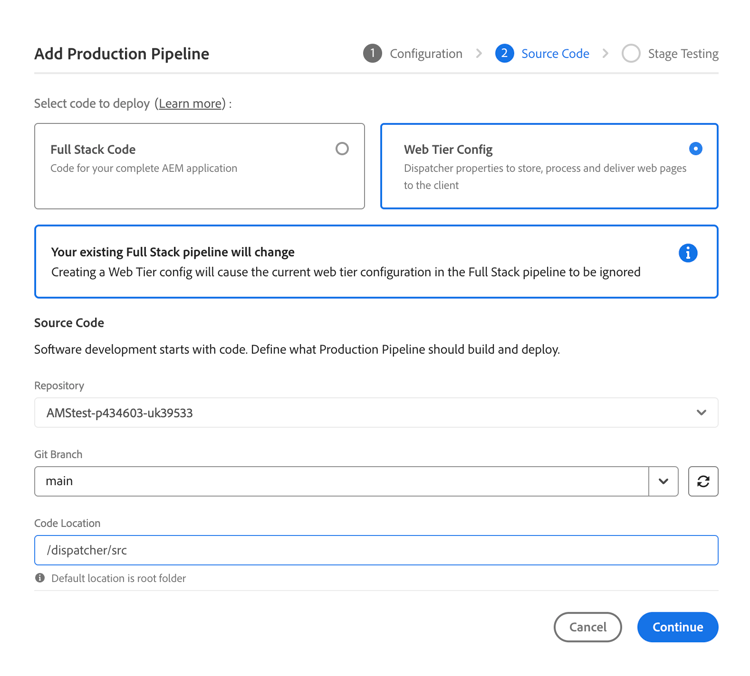
-
Click Continue to advance to the Stage Testing tab. See Stage Testing for details.
Use Smart Build in a production pipeline about-smart-build
Smart Build in Cloud Manager is an optimized build strategy for production pipelines. Smart Build reduces build times by caching modules and rebuilding only those modules that have changed since the last successful run. Unchanged modules are reused from cache, while only modified modules and their dependencies are rebuilt, improving efficiency for iterative development workflows.
Smart Build is currently available for the following:
- Code Quality pipelines.
- Development, Stage, and Production full-stack deployment pipelines.
Smart Build is recommended when you have the following:
- You are actively developing and committing frequent incremental changes.
- Your project contains multiple Maven modules.
- Full builds are taking significant time.
Smart Build is not always ideal when you have the following:
- Your build relies heavily on plugins that perform operations outside Maven’s dependency graph.
- You require full rebuild validation on every execution.
Understand build performance smart-build-performance
The performance gain from using Smart Build depends on several factors including the following:
- The number of modules in the project.
- The frequency and scope of code changes.
- The distribution of dependencies across modules.
Projects with many independent modules can see the greatest improvement.
Per-module cache opt-out smart-build-cache-optout
Smart Build provides fine-grained control that lets you disable caching for specific modules. This ability is useful when certain modules:
- Use plug-ins, such as
exec-maven-pluginormaven-antrun-plugin. - Perform file operations not tracked by Maven dependencies.
- Produce inconsistent results when cached.
Disable caching for a module smart-build-disable-caching
You can add the following property to the affected module’s pom.xml:
<properties>
  <maven.build.cache.enabled>false</maven.build.cache.enabled>
</properties>
This syntax forces the module to rebuild on every pipeline execution while other modules continue to benefit from caching.
Limitations and considerations when using Smart Build smart-build-limitations
Keep the following in mind when you use Smart Build:
- Smart Build relies on Maven dependency analysis.
- Changes outside the dependency graph do not trigger rebuilds.
- Some plugins are not fully compatible with caching.
- You can switch back to Full Build at any time by editing the production pipeline.
If you encounter unexpected build behavior, consider disabling caching for specific modules or temporarily switching your build strategy to Full Build.
Resolve Smart Build issues smart-build-troubleshoot
• Verify plug-in behavior (especially
exec/antrun plug-ins).• Check if most modules are changing frequently.
• Use Full Build for verification.
To enable Smart Build, see Add a production pipeline.
The next steps the-next-steps
After you have configured the pipeline, you deploy your code. See Code Deployment for more details.
Video tutorial video-tutorial-one
This video provides an overview of the pipeline creation process, which is detailed in this document.