Configure scheduler activities
Learn how to configure a scheduler activity in a workflow.
Transcript
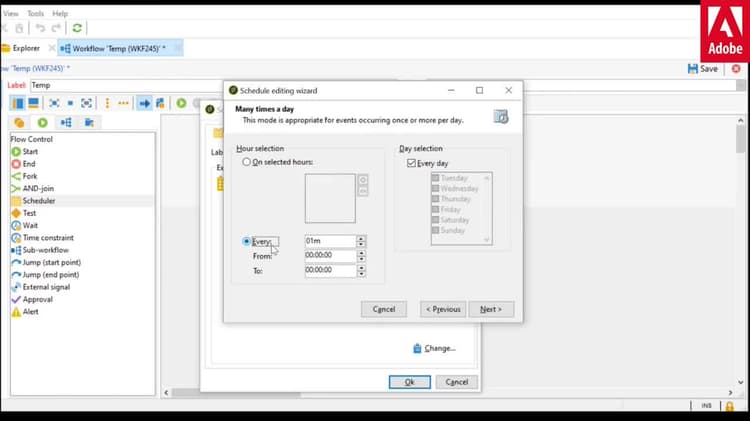
Welcome to Adobe campaign. In this video we are going to look at how to configure a scheduler. The scheduler activity allows you to schedule when a workflow or an activity is started. Scheduler activity can be considered as a scheduled start. In order to configure a scheduler, which is a part of the flow control. We double click on the scheduler icon. As soon as the pop up window appears. We can change or give a label to the scheduler. By typing it here. After we give a label to the scheduler as we have not defined any scheduling task yet, we can do so by clicking on the change button. After we click on the change button and editing wizard opens. In this editing wizard we can select frequency type for scheduling. There are five options available. We can schedule several times a day, daily, weekly, monthly. Or exactly once. After selecting the frequency type, click on next. As we have selected the option. Several times a day for frequency. Now we can select. How many times a day or at what time the schedule will run in the hour selection window? If we click on selected hours. We can add the time or the hours at which the schedule runs by clicking on the plus icon. We can edit it. To set to our preferred time. Or we can also have another option where we can run the schedule for every one minute or for a certain duration. We can change the duration. Here. We can increase or decrease the duration. And can change the starting and ending time. After we have selected one of the options here. We can also select the days on which the schedule should run. By default we have everyday selected. We can unselect this to select specific days of the week. By clicking. And selecting. After all selections have been made. We can click on the next button. Now we have to select the validity period for the schedule. Have permanent validity. But we have other options to define a validity range or a If we want to select a validity range. Click on the second option. We can select a valid from a specific date. And valid up to a specific date. We can also select a maximum number of iterations. Such as. One time, two times or three times from a starting date. To a specific time. On that date. After we have selected the validity period, click on next. A summary of all the configurations we have made so far shows up. Read through the description and also the launch times. These launch times show the next time at which the schedule will run. Then click on finish. And click on OK. Our scheduler is configured now.
recommendation-more-help
c86e6b28-19a6-4170-8455-9f02a8862493
