Configure event
Learning objective
Create and configure an event that will trigger a customer journey when the post-purchase action (order shipped) occurs.
Navigate to Journey Optimizer
In the upper right hand corner of your browser click on the Cube and then select Journey Optimizer

Configure order shipped event
In order to create a Journey that uses a Unitary Event, we need to first configure the event.
-
In the left rail under the Administration menu click to Configurations and then on the Events tile click the Manage button
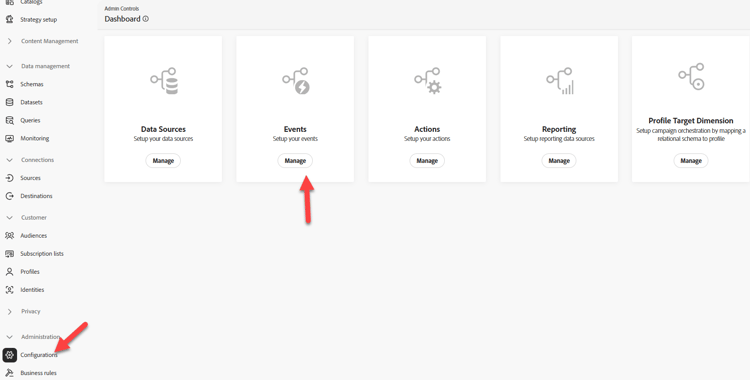
-
In the upper right click the Create Event button

-
Update the settings of the event as follows:
- Name =
orderShipped - Type =
Unitary - Event Id type =
Rule based - Schema =
dep: Orders v.1

- Name =
-
In the
Fieldsinput box click on the Pencil icon
-
Select the following fields to add to the event and when done click the OK button
Event Type (eventType)Order ID (orderID)

note NOTE Ensure you only select the Order ID field and not all the fields in the Order 😁 -
In the
Event Id condition input, click on the Pencil icon
-
Drag the
Event Typefield onto the canvas
-
In the selection box that appears look for and check the value titled orders.shipped. Then click the OK button.

-
Next update the last two values of Namespace and Profile Identifier with the values shown below:
- Namespace -->
Email - Profile Identifier -->
personalEmail
- Namespace -->
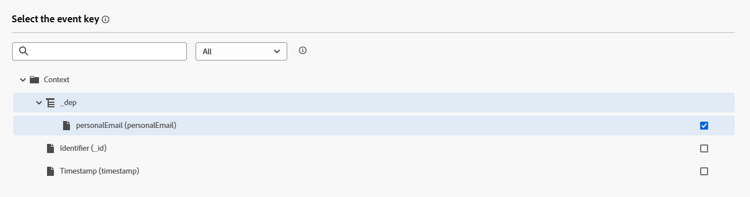

- ECID chosen --> it’s likely this is the first time identity service has seen this relationship so when a journey receives this event it will attempt to lookup the profile using the ECID and fail to find a profile. Why? The relationship doesn’t exist yet between ECID and Customer ID and the traits of the profile are likely stored against the known identifier Customer ID
- Customer ID chosen --> this identity is not required to be populated and it’s likely on most page views it would be empty. Therefore, if this identity was chosen the only time a Journey would fire is when there is an authenticated page view where the Customer ID is set.
Final orderShipped event configuration
Verify your final event configuration matches below. If everything looks good click the Save button

Recap
A configured order shipped event in Adobe Journey Optimizer that can be used as the entry point for a journey