Create the Journey

Name and define entrance criteria

  1. If necessary, expand the Journey management menu item in the left rail and click on Journeys. You land on the ‘Journeys’ page.

  2. Click on the blue Create Journey button.

  3. When the ‘Create a Journey’ overlay appears, select Create from scratch and click Confirm

  4. In the right rail, name the Journey iPhone 17 Abandon Browse and click the blue Save button so that you can start adding actions to the Journey canvas.

  5. Drag the Audience Qualification event onto the canvas.

  6. In the right rail, click the Pencil icon to select the audience for this event.

  7. Select the dep: Interested in iPhone 17 audience.

  8. Ensure that the Namespace drop-down is set to customerID. At this point, your Journey looks like this:
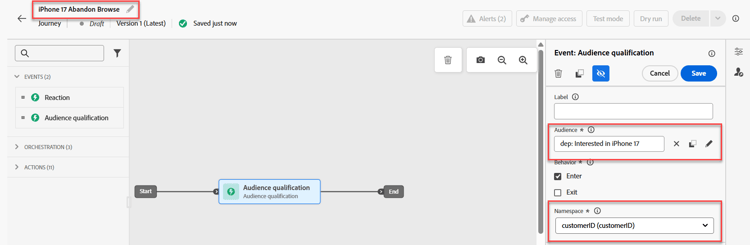
    Journey canvas with the Audience Qualification event added and namespace set to customerID

  9. Once everyone looks correct, click the blue Save button to save your progress.

NOTE
The ‘dep: Interested in iPhone 17’ audience is a streaming audience where the entrance criteria is viewing the fictional Connection 5G iPhone 17 overview page 3 times in the same day. Like many product overview pages, Connection 5G’s iPhone 17 overview page is a dynamic page with multiple elements that update without requiring the page to reload. One can compare the different tiers of the iPhone 17 and their features on this single page. As such, if someone views this page 3 times on the same day, then they likely have an interest in the iPhone 17. However, since not every element of the page is tagged and measured, Connection 5G will use the age of authenticated users to determine the tier of phone to display to them as they interact with different touchpoints of the Connection 5G brand.

Configure the CBE and decision policy

  1. Expand the Actions accordion just left of the canvas, drag the Action element onto the canvas, and connect it to the first node.

  2. When the ‘Select action type’ overlay appears, select the Code-base experience action and click the blue Add button.

  3. In the now visible ‘Action:Code-based experience’ properties, click the Configure Action button.

    Code-based experience action properties with the Configure Action button

  4. Change the Code-base configuration dropdown to the jsonOffer_cbe cbe that you created in the last section.

    Code-base configuration dropdown set to the jsonOffercbe channel

  5. Click the Edit content button just above the ‘Code-based configuration’ drop-down.

  6. On the resulting Code-base experience editor screen, click the Edit code button. The resulting screen is where you add the JSON that’s returned to the Experience Event requests

    Edit code screen for the Code-based experience editor

  7. On the far left side of the code editor, click the Decision policy menu item, followed by a click on the Add decision policy button in the new menu.

    Decision policy menu with the Add decision policy button

    note
    NOTE
    If a selection strategy is where you tie an offer collection to a ranking method (and apply strategy-level eligibility), then a decision policy is where you tie a selection strategy to a specific delivery of a channel.
  8. Name this decision policy iPhone 17 DP and leave the Number of items set to 1.

    note
    NOTE
    Up to this point, you’ve configured the offers and how to order them, but you haven’t configured how many to return. This is where you configure how many offers should be returned.
  9. Click the blue Next button. This is where you add the selection strategy. Click the +Add button (you may need to scroll down to see it), and choose Selection strategy.

  10. Tick the box next to the only selection strategy you should have (iPhone 17 Selection Strategy) and click Save. When finished, this is what you see:
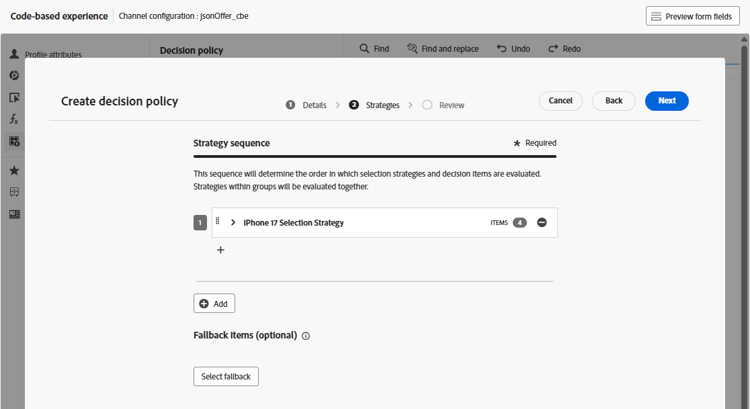
iPhone 17 Selection Strategy selected for the decision policy

NOTE
Note how you can add multiple selection strategies or just add the decision items themselves. When would you use multiple selection strategies? Imagine that you have a 4 X 4 grid of recommendations on one of your digital properties. You want to fill all of them with 16 offers. You may have those offers spread across a few collections, or perhaps the first two rows require one selection strategy, while the bottom two rows need a different strategy. In the previous screen, you would have chosen 16 and then used this screen to add as many selection strategies or offers as needed to reach 16.
The fallback offer is optional because it would only apply if it were possible for end users to be (or become) ineligible for any of the offers. In our case, our selection strategy was for all visitors, and the only people who would reach the CBE node were those who entered the Journey. Being authenticated is a requirement for Journey entrance (the namespace set in the Journey is one they’d only have if they were authenticated). We also built a fallback offer into our Ranking formula, so in our case, there’s no need to set this fallback offer.
  1. Click the blue Next button to review the decision policy.

Review step for the decision policy before creating it

  1. Once everything looks correct, click the blue Create button. Once it’s created, you’re returned to the expression editor page.
  2. You should see a screen similar to the one below; if not, click on Decision policy again, and you see your decision policy appear.

Expression editor showing the decision policy is ready to insert

  1. Click the + Insert policy button, and you see a ForEach loop appear in the code editor:

ForEach loop inserted into the code editor after inserting the decision policy

NOTE
Why a for each loop? In our case, we’re just returning a single offer. However, consider the previous steps where we could return multiple offers. When considering the functionality, the looping mechanism here makes sense.
  1. Add valid JSON within the bounds of the loop to return the make, model, and tier of the phone that should be offered to the end user. Since frequency capping is in place as well, a trackingToken needs to be added to the response. More on this later in the instructions. To save time, simply copy and paste these lines of code into the code editor within the For Each loop:
{
     "make":"",
     "model":"",
     "tier":"",
     "trackingToken":""
 },
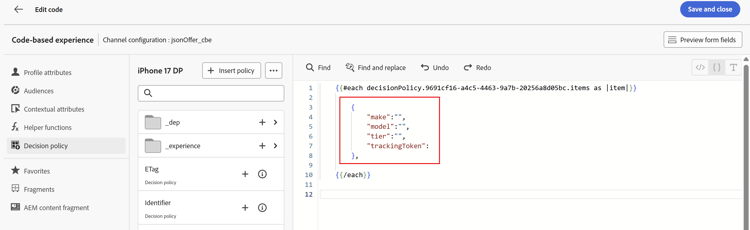
Initial JSON with make, model, tier, and trackingToken fields inside the ForEach loop

NOTE
Recall that you added attributes to the standard offer XDM schema, specifically, the make, model, and tier. You then populated those attributes when the offers were created. You now add those attributes as variables that are populated with values from the selected offer. The trackingToken field is a system-generated value used for tracking clicks and impressions.
  1. Place the cursor between the “” of the ‘make’ node. Insert the make of the offer by navigating in the decision policy menu to the _dep > Device > Make node. Click the + icon on the Make element, and you see it populate the editor.

Make attribute from the decision policy populated into the JSON editor

  1. Add the model and tier attributes in a similar manner.
  2. Click on Decision policy in the attribute navigation to return to the root level.
  3. Populate the trackingToken attribute by navigating to the Tracking Token value via _experience > decisioning > decisionitem > Tracking Token path.
  4. Finally, encase the entire piece of code in a set of square bracket ([]). Your final JSON code should look like this:

Final JSON code enclosed in square brackets for the CBE response

WARNING
Make sure you included the brackets “[ ]” around your entire decision item. Confused? See step #20 again.
  1. Once everything looks the screenshot above, click the Save and close in the upper right to save your code. You’re then returned to the Code-based Experience page.
  2. Click the back arrow < icon next to the Journey name, and you’re returned to the canvas.

Journey canvas after returning from the Code-based experience editor

  1. Click the blue Save button to save the CBE action node. Your Journey now looks like this:

Journey canvas showing the completed CBE action node

  1. With the Journey completed, click the blue Publish button in the upper right and Publish again when the confirmation box appears. After a moment or two, you see that your Journey is now live!

Published and live iPhone 17 Abandon Browse Journey

TIP
Your Journey is now ready to serve JSON offers for this Decisioning package!
NOTE
Why was a wait node automatically created after the CBE was placed on the canvas? Remember that a CBE is an inbound channel. Unlike an email or push notification that is proactively sent to the end user, a CBE is pushed to the Edge, and there it waits for the end user to come to the digital property and request an offer. How long it waits there is defined by that wait node. By default, it is set for 3 days, but it is configurable. This lab leaves it as 3 days, but in a real-world scenario, you’d likely want to extend it out for longer because when the wait time has elapsed, that user’s Journey progresses to the end node, and the CBE is removed from the Edge profile store for that user.
This also highlights an important architecture and timing consideration. When does the CBE for that user get pushed to the Edge profile store? When the user progresses to that node, which means after they qualify for the segment. This means that it’ll be anywhere from a few seconds to several minutes after the user views that 3rd page before the streaming segmentation executes, the user is placed in that segment, they enter the journey and progress to the CBE node, and then that CBE is projected to the Edge for that user. In a test org with very little data and processing demands, that whole process is just a few seconds or minutes. For a larger organization with much higher throughput, plan on at least 15 minutes with a potential of up to 2 hours.

Recap

On this page, you configured a Code-Based Experience (CBE) channel that enables external systems to request offer decisions via an API-style inbound channel. This setup included specifying the surface/location parameters that client systems will send, and choosing the JSON output format.

recommendation-more-help
blueprints-learn-help-blueprints