Create Decision Rule
Objective
Since eligibility is one of the key building blocks of an offer, the first step is to create the necessary entities to support it. In many cases, audience membership is the deciding factor, but in this case, we’ll use Decision Rules. With Connection 5G, higher-end iPhone 17s can only be activated for users with a high-tier plan. As such, we’ll use a decision rule to ensure that offers for higher-end phones are available only to those with a high enough plan.
Create the Decision Rule
-
If necessary, log in to the Adobe Experience Cloud and navigate to Adobe Journey Optimizer.
-
Expand the Decisioning menu item in the left rail if necessary, and click on Strategy Setup.
note warning WARNING Be sure you are in the Decisioning menu and NOT the Decision Management menu. If the Decision Management menu is expanded, collapse it to avoid navigation confusion during this lab. -
Click on Decisioning Rules under the ‘Eligibility’ menu, followed by the Create rule button in the upper right corner.

-
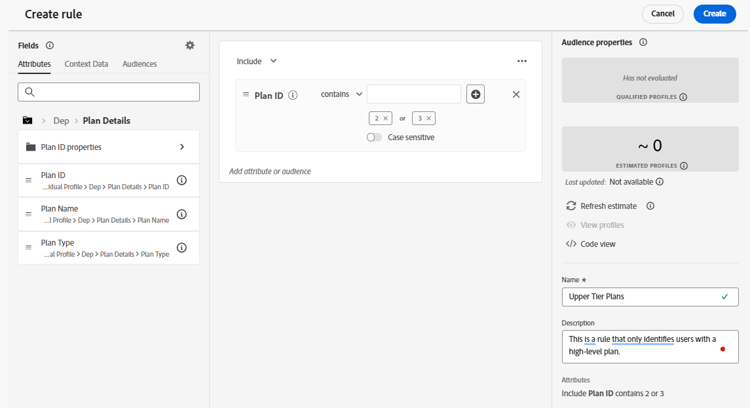
This opens a screen that resembles the Segment Builder UI. Add the Plan ID attribute to the rule canvas by clicking on XDM Individual Profile > DEP > Plan Details and then dragging the Plan ID attribute to the canvas.
-
Change the drop-down from equals to contains.
-
Enter the text 2 in the box, press the Tab key to accept the 2 value, then enter a 3, press Tab again so that the rule is looking for any Plan IDs that contain a 2 or 3
-
Use the Name textbox in the right rail to name the Decision Rule Upper Tier Plans. Add a description if you’d like. When finished, your Decision Rule should look like this:
-
Once the rule is correct, click the blue Create button in the upper-right corner, and you’re returned to the Strategy Setup page with the Decision Rule you just created listed as the only Decision rule.
Recap
You’ve now created a reusable Decision Rule, which you will use for offer eligibility.