Build an audience
Objective
In next few steps you will be creating the audience you want to target for the campaign, which is all the active line holders who have a make that matches the flagship phone that is launching. The goal being this is the group you want to target with an SMS message nudging them to upgrade their phones.
Add Build Audience activity
-
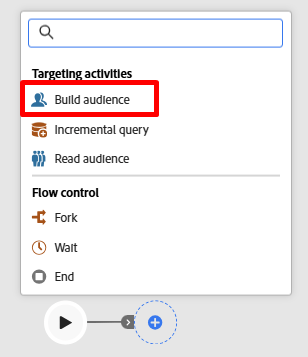
On the canvas click the + symbol and then select the Build audience activity to add it to the workflow
-
In the right rail you see the Build audience properties. Update the Label to state the following:
Active Lines with Apple

Select targeting dimension
The next step is to select the Targeting dimension (i.e. what table you want to query). Do the following steps:
-
Click on the search icon in the Targeting dimension box

-
On the popup, search for and select the table named dep-rel: Customer Line and then click the Confirm button.

Create audience
Now that you have selected your targeting dimension (what relational schema you are going to query) you can start creating your definition.
-
In the right rail click on the Create Audience button

-
Next click on the Add condition button

Create condition(s)
Now its time to write the logic of the audience using the attributes found in the schema. The goal is to find all customer lines who are active and using a make of Apple.
Create condition #1
-
Set the condition using the following information:
- Attribute:
Active Line - Value:
true

- Attribute:
-
Click Refresh icon to view the qualifying counts on the condition.

Create condition #2
-
Click the Add condition button and select the dep-rel: Product [Lookup] schema by clicking on the > icon

-
Look for the field named Make and click on the three dots and select Distribution of values

-
Note the various values. You only want
Appleand thankfully it doesn’t have 100 different spellings. Click on the Apple field to select it and then click the Select attribute and value button in the upper right.
note NOTE This is a prime example of where the data architect should have designed the schema with enumerations. This way a marketer doesn’t have to manually select/type in the value. Shame on the data architect! -
The
Makefield is automatically added along with conditions shown below.- Operator:
Equal to - Value:
Apple - Case sensitive:
Enabled
- Operator:
-
Click on the calculate icon and you see 85 as the result.

Verify counts
-
Click on the Calculate icon found in the right rail under the heading Profiles targeted to get an exact estimate of the audience size. You see 65 as the final count.
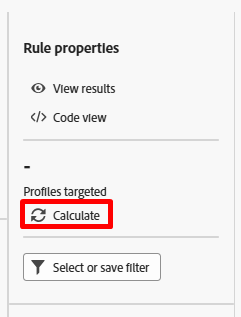
note NOTE Notice how each individual condition returned a different number (condition #1 --> 241 and condition #2 --> 85) but the final audience size was the lesser of the two conditions. This is because of that AND operator. -
If you see final count of 65 click the Confirm button in the top right of the screen and then click the Save button in the top right to save your work.
Challenge
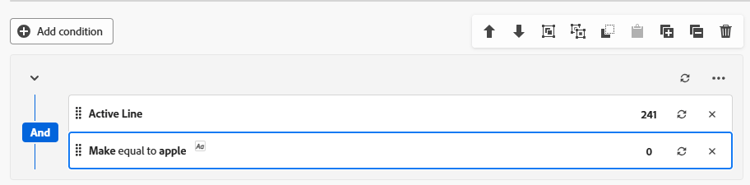
Assume for a moment you had typed in the last condition such that Make was equal to apple (lowercased) and you had left the configuration option for Case sensitive toggled on. This would make that conditions record count equal to 0. So you would have 241 active lines and 0 where the make is apple.
What would be the final audience size in this case?
Answer
It’s zero. Do you know why?

Recap
You have successfully created your first audience and should now see how easy it is to develop and validate your counts within the Build Audience activity.
