Merge policies
What is it?
You see merge policies in the Profile Viewer every time you search for a Profile (you probably just didn’t realize it did something)

A Merge Policy does two things:
-
Provides the instructions for how to assemble the fragments within the Profile Store (i.e. Identity Stitching). There are two options:
- Use the Identity Graph (i.e. Identity Service)
- Do not use the Identity Graph (i.e. rely on only the identity provided to find similarly stored profile fragments)
-
Tells the profile service how to resolve field conflicts within the XDM Individual Profile class-based datasets when a field may come from multiple datasets (i.e. Merge Method). There are two options:
- Timestamp Precedence - use the most recent record from all datasets as the truth set and let all other records fill in the gaps in order of recent to oldest
- Dataset Precedence - pick what XDM Individual Profile datasets are allowed to be used to form the profile and in what order to assemble them
- Rather than having multiple datasets record the same field, we give them unique names, e.g.:
- First Name - CRM
- First Name - Loyalty
- First Name - Web Form
- This allows a marketer to choose which datasource+field to use rather than the system choosing one automatically based on a ruleset they may not understand and possibly choosing fields of the Profile from one source and other fields from another without understanding it is happening.
- For our data model we do not need to resolve any field conflicts, so no custom Merge Policy is needed
To best understand how Merge Policies work with the Identity Graph you create one that does not utilize the Identity Graph for ID stitching.
Create a No Stitch Merge Policy
Create a merge policy that doesn’t use the ID Graph so you can see its behavior with profile formation.
Create
- Click on Profiles in the left rail
- Click on Merge Policies in the top navigation
- Click on Create merge policy near the far right of your screen

Configure
You now need to configure the merge policy settings. Enter the following information:
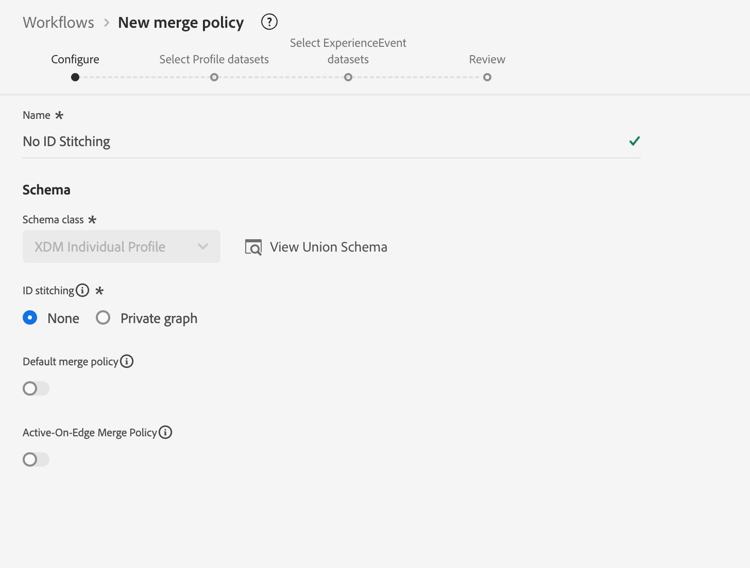
When you are done click Next
Select Profile datasets
- For the Merge method select Timestamp ordered
- Click Next

Select Experience Event datasets
Remember that if you select timestamp ordered for the merge method you are telling the Profile Service that all XDM Individual Profile and Experience Event class-based datasets participate in the formation of the Profile.
Therefore you can simply click Next as there is nothing to do in this step.

Review
In the final step you see a preview of the settings you’ve chosen and sample profiles showing you the merge policy in action.
Click the Finish button to create the merge policy

Merge methods in action
Remember the identity graph of the profile, Depeche Mode, looked like the below screenshot. To understand how profile service works it’s best to ignore using this identity graph during the assembly process.

Compare using Email
Go ahead and open the profile viewer following the below steps:
-
Click on Profiles in the left rail and then in the top navigation select Browse
-
Select the Identity namespace of Email
-
Enter the Identity value of depeche.mode@dep.com
-
Click on the View button to lookup the profile
-
Click on the link to the profile to see the profile’s details

Do another search for the Depeche Mode profile but this time using the No ID Stitching merge policy.
-
Right click on Profiles in the left rail and then select open in a new tab
-
In the top navigation select Browse
-
Select the Merge policy of No ID Stitching
-
Select the Identity namespace of Email
-
Enter the Identity value of depeche.mode@dep.com
-
Click on the View button to lookup the profile
-
Click on the link to the profile to see the profile’s details

Comparing both views of the profile you should notice they are very different. Some attributes and identities are missing from the version that uses the No ID Stitching merge policy.


If you look at each profile’s events you notice that the profile using the No ID Stitching merge policy only contains a single event whereas the other version contains all the events.
The single event on the No ID Stitching version of the profile is because that event is stored using the primary identity of “personalEmail.address”.
Compare using customerID
You can look at the various fragments of the Depeche Mode profile using some of the other identities from the graph. Try looking up the same profile again with the No ID Stitching merge policy but this time using the customerID namespace and value provided below:


Questions to Ask Yourself
Question: Notice anything about the attributes? There are none, why?
Answer: You loaded attributes using email as your primary identity
Question: Notice anything about the events?
Answer: The only events that show up are the ones that have customerID as the primary identity
Compare using GAID
Try looking up the same profile again with the No ID Stitching merge policy but this time using the GAID namespace and value provided below:
Question to Ask Yourself
Question: No profiles were found! What is going on? Why are no profiles found? Answer: There are no profile fragments that are stored using that GAID value as a primary identity
Profile + Identity
Quick synopsis:
- Profile store contains profile fragments stored using the primary identity
- Identity Graph contains the relationships between two (2) or more person-based identities
When the identity graph is used with the profile store you can think of it as giving directions for how to find the right profile fragments treating each identity value in the identity graph as primary identities.
Without the identity graph the profile store can only retrieve profile fragments using a single identifier (i.e. primary identity)
- Search for other profiles in the UI you know of that have two identities
- See how some Events are stored against one fragment but not the other
- See how some Profile attributes are stored against one fragment but not the other
- Go to a profile you already have looked up and re-lookup it up using the No ID Stitching merge policy. Note the difference