Set up the source
Upload sample file
You need to upload a sample data file to your Data Landing Zone via Azure Storage Explorer so that you can use it during the lab. To do so, do the following:
- Download the Sample Files
- Drag 'n drop and/or upload the Lab_Customer_Account.csv file to the Data Landing Zone you saved from the previous step.
When uploaded your screen should look like the below screenshot.

Navigate to Sources
- Go to Adobe Experience Platform and navigate to: Sources -> Catalog -> Cloud storage
- Click on Setup / Add Data for the Data Landing Zone

Preview the file
-
Select the Lab_Customer_Account.csv

-
In the preview pane, look at the following attributes and observe the following:
- sms_optIn is a consent field that has several missing values (shown in preview as - )
- account_create_date does not have the proper date format. It has string values along with date and time values in one string.
- account_end_date has the proper date format.

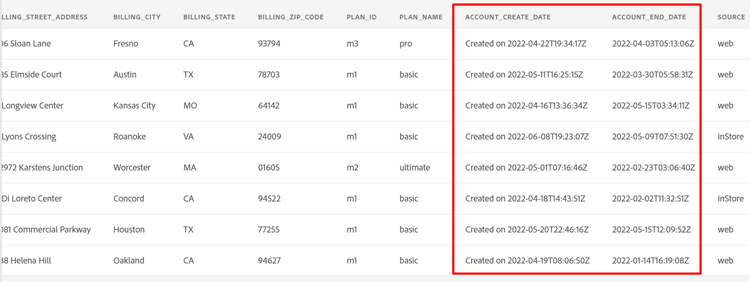
note NOTE You will need to deal with the missing values, dates and improperly formatted fields in the mapping steps later in this lab -
Click Next in the upper right corner of the screen to continue to the next step
Set up the dataflow
- In the Dataflow detail screen, choose New dataset.
- Name the output dataset as Customer Account - <Your Initials>
- Select the dep: Customer Account schema from the dropdown list.
- Turn on the Profile dataset toggle box.
(If you do not turn this on, the Profile Store is not able to monitor for new data entering this dataset and hence does not ingest this data into Profile) - Turn on the Enable partial ingestion.
(If you do not turn this on, the ingestion may fail if one of the records has errors) - Set the Dataflow name as Customer Account Batch Ingestion – <Your Initials>
- Turn on all the alerts Sources Dataflow Start/Success/Failure

Click Next in the upper right corner of the screen to continue to the next step.